Before You Start: Understanding Your Cast Hook Puzzle
You’re holding a classic disentanglement puzzle, a type of mechanical puzzle designed to separate two or more interlocked pieces through logic and manipulation, not force. If you’ve been staring at it for minutes—or, as some Reddit users confess, for years—feeling completely stumped, you’re not alone. That immediate feeling of “Any ideas on how to solve this???” is the universal starting point. This guide is your direct way out.
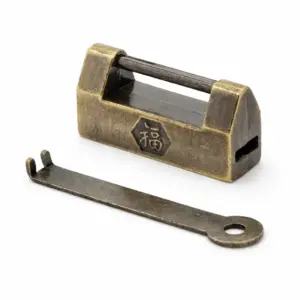
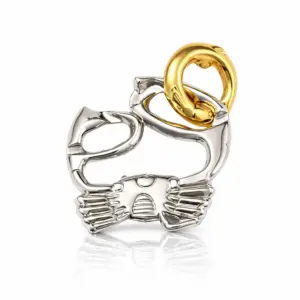
Your specific puzzle, often called the Cast Hook or a similar name, consists of two primary components:
* The Shackle (or Long Loop): This is the larger, oblong metal ring that seems hopelessly trapped.
* The Hook Assembly: This is the central piece, typically featuring a hooked end and one or more closed loops or eyelets.
The objective is straightforward: completely separate the shackle from the hook assembly. The challenge is that the solution is almost never a direct pull. The pieces are engineered with cleverly placed curves and openings that allow for disassembly only through a specific sequence of rotations, slides, and passes.
Before making your first move, let’s set the right mindset, directly informed by the frustrations shared in online forums where puzzles sit unsolved for decades.
1. Force is Your Enemy.
If you’re applying significant bending pressure or trying to yank the pieces apart, you’re on the wrong path. These puzzles are precision-cast; the solution exists within the existing clearances. Forcing it can damage the metal or deform the pieces, making a genuine solution impossible. Patience is your primary tool.
2. Observation is Your First Step.
Before you twist anything, take a full minute to visually trace the path of the shackle. Notice where it passes through the hook’s eyelets. Identify the narrowest points and the largest openings. This initial reconnaissance is what separates a quick solve from hours of random fiddling.
3. Embrace the “Aha!” Moment.
The solution involves a counter-intuitive move. It will feel like you’re moving the shackle further into the trap, not out of it. This is normal. As one seasoned solver on Puzzling Stack Exchange notes, the general strategy for metal disentanglement puzzles often involves creating “slack” by moving pieces into temporary, seemingly worse positions to find a new exit path.

The Cast Hook Metal Brain Teaser is a perfect example of this principle in action. It’s a single, solid piece of cast metal with a satisfying heft, designed to be solved and re-solved. Your goal isn’t to break it, but to learn its secret pathway.
Understanding that these puzzles are a test of spatial reasoning and sequence, not strength, is half the battle. With that foundation, we can move on to the precise, step-by-step movements that will free the shackle.
The Essential Mindset and Tools for Solving Metal Puzzles
If you’ve ever stared at a metal puzzle for five minutes—or five years—feeling completely stumped, you’re not alone. The frustration expressed in forums, with posts titled “still stumped” or “any ideas on how to solve this???”, is a universal part of the experience. The key to moving past that frustration isn’t brute force or secret genius; it’s adopting the right mindset. Think of yourself not as someone who is stuck, but as a detective systematically mapping a three-dimensional maze.
The first pillar of this mindset is visual inspection before manipulation. Your eyes are your most powerful tool. Before you twist or pull anything, trace every wire and loop. Identify all the openings, closed paths, and points of contact. Ask yourself: “Where is the object I want to remove (the ‘shackle’ or ‘ring’) in relation to the fixed frame? What is physically blocking its path?” This step is about building a mental blueprint. As noted in discussions on Disentanglement puzzles, success often depends on visualizing the sequence of moves in reverse.
The second pillar is systematic trial, not random fiddling. This is where most people go wrong. They shake, jiggle, and force the pieces, which only reinforces the belief that the puzzle is impossible. Instead, adopt a methodical approach. Choose one potential opening or maneuver and explore it fully. If it leads nowhere, mentally note that dead end and reset. The goal is to gather information, not to instantly find the solution. Each “failed” attempt teaches you about the puzzle’s constraints. This process is detailed in our guide, Why Your Hands Are Lying To You: The Real Way To Solve Metal Puzzles, which explains how proprioception can trick you.
Finally, you must embrace counter-intuition. The solution to most cast metal puzzles involves a move that feels wrong—like moving a piece deeper into a trap or twisting it in a way that seems to tighten the knot. This is the core “aha!” moment. You must create temporary slack or align components in a specific, often non-obvious, configuration to find the new exit path. This principle, that the direct route out is often blocked, requiring an indirect approach, is explored in Stop Forcing The Solution: What Three Ancient Principles Teach About Puzzle Solving.
To support this mindset, you don’t need special gear, but two simple tools are invaluable:
1. A flat, well-lit surface. This allows you to lay the puzzle down and observe it from multiple angles without it rolling away. Good lighting eliminates shadows that can obscure key details.
2. Patience, framed as curiosity. When you feel the urge to force it, pause. Reframe the thought from “I can’t do this” to “What haven’t I tried yet? What does this resistance tell me?”
This philosophical shift transforms the puzzle from a source of frustration into a satisfying exercise in spatial logic. You stop fighting the metal and start learning its language. With this foundation, the specific steps for any puzzle, including the Cast Hook, become a logical application of these principles, not a mysterious trick.
Step-by-Step Solution: Separating the Hook from the Shackle
Now, let’s apply the principles of observation and indirect movement to the specific task at hand: freeing the hook from the shackle. The goal is to maneuver the hook’s curved tip through the small opening in the shackle’s side. The trick is that the hook cannot pass through this opening in its current orientation; you must find the precise alignment that allows it to slip free.
Follow these steps in order. If you get stuck, return to Step 1 and re-check your orientations.
Step 1: Establish Your Starting Position
Hold the puzzle in front of you with both hands. The shackle (the U-shaped piece with the small side opening) should be in your left hand, held steady. The hook (the long, curved piece) will be in your right hand, dangling through the large central loop of the shackle. Visually confirm the small, rectangular opening on the side of the shackle’s left arm. This is the only exit point.
Step 2: Position the Hook for the Exit
With your right hand, rotate the hook so its curved tip (the pointed end) is pointing directly toward that small side opening on the shackle. The hook’s shaft will now be lying diagonally across the large central loop. This aligns the tool with its intended escape route.
Step 3: The First Lift and Slide
Here comes the first non-obvious move. While keeping the hook’s tip aimed at the opening, gently lift the shank of the hook (the straight middle section) upward. Slide this shank through the large central loop of the shackle until the hook’s curved tip is positioned just inside the shackle’s left arm, near the exit hole. The tip should now be nestled in the corner where the shackle’s arm meets its base.
Step 4: The Critical Tilt and Thread
This is the core maneuver. The hook’s tip is too long to exit the small hole straight on. You must tilt it. While the tip is inside the shackle’s arm, slowly rotate your right hand so the hook’s tip points downward. Now, with a slight wiggling motion, begin to thread the very tip of the hook through the small side opening. You are not pulling the whole hook yet; you are just getting the very end of the curve started through the hole.
Step 5: The Pivot and Transfer
Once the tip has begun to protrude from the side opening, stop pulling. This is crucial. Instead, you will now pivot the entire hook. As the tip emerges, use your left hand to guide the shackle. Your right hand will now pull the hook’s long shaft laterally, parallel to the shackle’s arm. This pivoting motion will draw more of the hook’s curve through the opening. You will feel the hook’s bend transferring from inside the shackle’s central space to outside of it.
Step 6: Clear the Bend and Complete Separation
As the hook’s main curve clears the opening, its orientation will naturally change. Continue pulling the hook smoothly and steadily to the side. The entire curved section will slide out of the shackle’s side opening. Once the curve is free, the straight shank of the hook will easily follow, sliding out of the large central loop. The two pieces will now be completely separated.
Step 7: How to Reassemble the Puzzle
To put it back together, simply reverse the process. Insert the straight end of the hook into the large central loop of the shackle. Then, thread the hook’s curved tip back into the small side opening. Carefully pivot and guide the hook back into its starting position inside the shackle’s central loop. A satisfying click or alignment will tell you it’s fully seated.
What to Do If You’re Still Stuck
If the hook won’t thread through the opening in Step 4, double-check your alignment from Step 2. The most common error is not having the hook’s tip pointed directly at the hole before the lift and slide. Also, ensure you are using minimal force. If you meet hard resistance, you are likely trying to pass a part of the hook that is too wide through the opening. Go back, observe, and try tilting the hook at a different angle during the thread.
Mastering this specific sequence of tilt, thread, and pivot is the key to solving not just the Cast Hook, but a whole class of similar disentanglement puzzles. The logic you’ve learned here—finding the correct alignment for an indirect exit—applies directly to more complex designs.

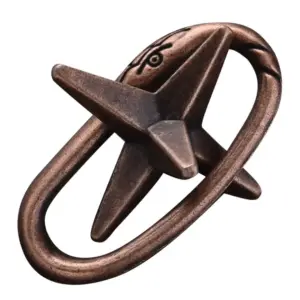
Cast Keyhole Gold & Silver — $13.99
For your next challenge, consider the Cast Keyhole. It applies a similar principle but with a fascinating twist: two independent pieces that must be aligned in three dimensions to find a hidden path. The solution requires the same patient observation and precise maneuvering you’ve just practiced, making it a perfect logical successor to the Cast Hook. You can find a detailed walkthrough for puzzles like this in our Cast Hook Puzzle Solution The Step By Step Guide That Makes Separation Click.
This hands-on process is the essence of mechanical puzzling, a category historically defined by manipulating physical objects to achieve a goal, as seen in the broader world of mechanical puzzles. The Cast Hook is a classic example of a disentanglement puzzle, where the core satisfaction comes from discovering the precise sequence that makes the impossible seem simple.
Visual Troubleshooting: Where Most People Get Stuck
You’ve followed the steps, but the pieces are jammed. The hook won’t budge, or it’s halfway off but now hopelessly locked. Don’t force it—this is the most common moment of frustration, and it’s almost always due to a subtle misalignment. Let’s diagnose the specific stuck states for the Cast Hook and, crucially, how to reverse out of them.
The Hook is Caught on the Inner Ridge of the Shackle
This is the #1 hang-up. You’ve rotated the hook to exit the shackle’s window, but as you pull, it snags. The problem is almost always the orientation of the hook’s “bend.” If the curved part of the hook isn’t perfectly parallel to the flat plane of the shackle’s window, its tip or side will catch on the window’s inner edge.
* How to Fix It: Stop pulling. Gently push the hook back into its central, neutral position inside the shackle. Don’t just wiggle it—fully reset. Then, with the pieces held steadily, re-execute the final rotation. Watch the hook’s curve as it passes through the window opening; it must rotate cleanly without tilting up or down. Think of it like sliding a key into a lock; if the key is twisted, it won’t go in. This mirrors the advice from other solution guides, like WikiHow’s tip to “check the alignment if your ring appears stuck,” but applied to the Cast Hook’s unique 3D geometry.
The Pieces are Twisted and “Bind” Mid-Maneuver
You’re moving the hook along its path, but it suddenly seizes up, feeling tight. This binding occurs when the two pieces are no longer in their optimal “track.” The hook might be pressing against the shackle’s side wall instead of moving freely through the central channel.
* How to Fix It: Apply slight reverse pressure. If you were sliding the hook to the left and it bound, gently nudge it back to the right a millimeter. This often releases the tension. Then, before proceeding, ensure the shackle is held exactly as shown in the solution—its orientation is your guide rail. A minor twist in how you’re holding the shackle can throw the entire internal alignment off.
The Hook is Halfway Off and Now Cross-Locked
A particularly vexing state: the hook’s tip is outside the shackle, but the bend is still trapped inside, and no movement in any direction works. This usually happens if you tried to “cheat” the rotation step by forcing the hook through at an angle.
* How to Fix It: This requires patience. You cannot simply pull it the rest of the way. You must carefully re-insert the hook back into the shackle, following the exit path in reverse. Maneuver the tip back through the window, then deliberately slide the hook back to its starting position in the center of the shackle. It’s a full reset. A clean, aligned retry from the beginning is faster than fighting a cross-locked position.
General Rule: If Stuck, Reverse
This is the golden rule for all disentanglement puzzles. If a move doesn’t work, don’t apply more force. Metal puzzles are precision objects; they are designed to have a solution path that feels smooth when aligned correctly. If it’s not smooth, you’re out of alignment. Back up to the last “free” position and reassess your angles. As noted in discussions on Puzzling Stack Exchange, systematic reversal is a core strategy for complex metal puzzles.
If you enjoy diagnosing these precise mechanical jams, you’ll appreciate puzzles that multiply the challenge. The next level involves managing not just two pieces, but four independent components that must be aligned in harmony.

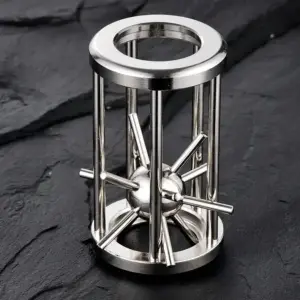
Cast Galaxy 4-Piece Silver — $14.88
For a masterclass in coordinated alignment, try the Cast Galaxy. This stunning 4-piece silver puzzle requires you to troubleshoot the alignment of multiple intersecting orbits simultaneously. Each piece acts as both a lock and a key for the others, meaning a misalignment in one blocks the entire system—a satisfying escalation from the two-piece dynamics of the Cast Hook. Solving it reinforces the troubleshooting mantra: when jammed, reverse, realign, and reassess. Learn more about its unique challenge in our overview of the Cast Galaxy puzzle.
The (Often Harder) Challenge: Reassembling the Puzzle
Congratulations on separating the pieces. Now comes the part that leaves many puzzlers, as one Reddit user put it, staring at “two pieces of metal and no clue” how they ever fit together. Reassembly isn’t just a chore; it’s the true test of whether you’ve internalized the solution. If solving is about finding the hidden path, reassembly is about reverse-engineering and rebuilding the lock from scratch. It’s often harder because you must now create the precise alignment you previously only had to discover.
Think of it this way: separation requires you to find the one “exit” from the assembled state. Reassembly requires you to navigate back through that same exit, but in reverse, and then deliberately re-engage every locking mechanism. Your memory of the final separation move is your starting blueprint.
The Reverse-Engineering Process:
- Start with the End in Mind. Hold the pieces exactly as they were in the final moment of separation—the hook free, the shackle open. This is your starting position.
- Execute the Solution in Reverse. Mentally rewind the step-by-step guide. If the final step to separate was “slide the hook’s tip down through the shackle’s side gap,” then your first reassembly step is to “insert the hook’s tip up through that same side gap.”
- Listen for the “Click.” As you reverse the steps, you will feel the pieces naturally want to settle into intermediate positions. These are the same alignment points you passed through during disassembly. Don’t force it. If a piece won’t rotate or slide into place, you’ve missed an angular alignment. Back up.
- The Final Lock. The last step will be the reverse of the initial “trap.” For the Cast Hook, this typically involves aligning the hook’s bend perfectly within the shackle’s central opening and then performing a slight twist or shift to seat it fully. You should feel a secure, satisfying fit with no wiggle. If it feels loose or misaligned, the pieces aren’t fully interlocked.
This skill of deconstruction and reconstruction is fundamental to a deeper class of mechanical puzzles. If you appreciate the logic of reversing a precise sequence, you’ll find immense satisfaction in puzzles built entirely around that principle.
Why Bother Learning to Reassemble?
Beyond the personal satisfaction, it’s practical. It allows you to “reset” the puzzle for a friend (or for yourself in six months). It transforms the puzzle from a one-time trick into a renewable source of challenge. As defined by the broader category of disentanglement puzzles, the ideal is a closed cycle: from a state of unity, through disentanglement, back to unity. Completing that cycle is what makes you not just a solver, but a puzzle operator.
Beyond the Cast Hook: General Strategies for Any Metal Puzzle
Solving the Cast Hook teaches you more than just one solution; it reveals a universal logic for disentanglement puzzles. The core principles you practiced—finding the “gate,” managing slack, and tracing paths—are the same mental tools used to solve hundreds of other metal brain teasers. By understanding these strategies, you can approach any new puzzle with a systematic plan instead of random twisting.
1. Identify the “Gate” or Opening
Every puzzle has at least one critical opening—a gap, loop, or bend that acts as the primary pathway for separation. In the Cast Hook, it was the specific notch on the shackle. Your first task with any new puzzle is to visually inspect all pieces. Look for the largest opening or the one that seems designed to allow another piece to pass through. Ask yourself: “Which part is meant to come out through where?” This initial reconnaissance prevents you from forcing parts where they don’t belong.
2. Understand Slack vs. Tension
This is the most crucial physical concept. Slack is the free space you create by positioning pieces to maximize an opening; tension is when pieces are pulled tight against each other, locking everything in place. Your goal is always to create slack. As you saw with the hook’s rotation, the correct move often feels counterintuitive—you might twist a piece into the frame to create the necessary room for another part to slip out. If everything feels tight and immovable, you’re applying tension. Stop, backtrack, and look for the move that creates space instead of taking it away.
3. Trace the Path Mentally (or With a Finger)
Before making a complex move, trace the path the escaping piece must take. Follow its entire route with your mind’s eye or your fingertip. Are there narrow clearances? Does it need to rotate at a specific point? This “dry run” helps you plan a sequence and spot dead ends early. This strategy is directly applicable to more complex multi-piece puzzles, where one piece must be maneuvered to clear the path for another.
4. Think in States, Not Just Moves
A puzzle transitions through distinct states—stable configurations where pieces are interlocked in a specific way. The solution is a sequence that moves from one stable state to the next. When stuck, don’t just wiggle randomly. Return to the last known stable state and look for an alternative move. This methodical approach is what experts use on intricate wire puzzles and is a hallmark of solving mechanical puzzles as a category.
5. Apply the Logic to Other Puzzles
These strategies form a toolkit. For example, consider a puzzle where the goal is to join pieces, not separate them. The principles are the same: you must find the correct “gate” (the specific angle of approach), manage slack by aligning the pieces loosely before the final lock, and trace the path each arm must take to nest within the others. The frustration of forced tension is identical—if you’re pushing hard, you’re doing it wrong.
Mastering these universal strategies does more than solve one puzzle; it changes how you see them. You begin to recognize design patterns and appreciate the clever constraints puzzle makers build into their creations. For a deeper dive into this logical framework, explore our guide on Metal Puzzles That Don’t Break: A Veteran’s Guide to Cast Logic. The Cast Hook was your training ground. Now you’re equipped to tackle the wider, fascinating world of mechanical disentanglement.
Frequently Asked Questions (FAQ)
Is forcing the pieces ever necessary?
No, never. If you’re applying significant force, you are on the wrong path. Cast metal puzzles are precision-engineered; the solution always involves a specific sequence of maneuvers, alignments, and rotations that feel smooth when done correctly. Forcing can bend the metal, permanently damaging the puzzle.
My puzzle seems slightly different. Is this solution still valid?
It’s possible. The “Cast Hook” design is classic and has been reproduced by various manufacturers. Minor variations in casting or finish might exist, but the fundamental geometry and solution path are almost always identical. Focus on the shapes and openings described in the steps, not the exact millimeter of your piece.
How can I lubricate my metal puzzle?
For a smoother action, use a dry, non-greasy lubricant. A tiny amount of graphite powder (rubbed from a pencil lead) or a dedicated dry Teflon spray applied sparingly to the contact points works best. Avoid oils or WD-40, as they attract dust and grime, which can gum up the mechanism over time.
What is the difficulty rating of the Cast Hook?
On the common Hanayama-style scale (1=Easiest to 6=Hardest), the Cast Hook is typically rated a 3 (Moderate). It’s an excellent introductory puzzle for adults and older children, offering a satisfying “aha!” moment without being overwhelmingly complex.
Why is reassembling it often harder than taking it apart?
Disassembly often involves finding one “key” motion. Reassembly requires you to reverse-engineer that path precisely while also managing the alignment of both pieces from the start. Your memory of the separation is a forward sequence; doing it backwards is a different cognitive task, which is why it feels like a fresh challenge.
I’ve solved it once but now I’m stuck again. Is that normal?
Absolutely. The first solve can feel like luck. Without understanding why each step works, it’s easy to forget the precise alignments. This is a great sign—it means you’re ready to move from memorizing moves to understanding the logic. Go back through the steps slowly, noting how each piece’s shape creates and blocks pathways.
Can I wash my metal puzzle if it gets dirty?
Yes. Use warm water, mild soap, and a soft brush (like an old toothbrush). Dry it thoroughly and immediately with a soft cloth to prevent water spots or rust. For a deeper clean, you can use isopropyl alcohol on a cloth, which evaporates quickly. Ensure it’s completely dry before attempting to solve it again.
Are there other puzzles similar to the Cast Hook I should try?
Yes. If you enjoyed the “hook and shackle” dynamic, you’ll likely appreciate puzzles that involve navigating a loop through a maze-like frame or interlocking two distinct shapes. The Cast Keyhole is a fantastic follow-up. You can find a detailed walkthrough in our Cast Keyhole solution guide if you need it.
Where can I find solutions for other metal puzzles I own?
For branded puzzles like Hanayama, the manufacturer’s website often has official solutions. For a broad collection of guides, our Metal Puzzle Guide compiles strategies and tips for a wide variety of designs. Community forums like r/mechanicalpuzzles on Reddit are also invaluable for obscure puzzles.
What’s the best way to store these puzzles?
Keep them in a dry place, ideally separated in a drawer, box, or individual pouches. Storing them loosely together in a container can lead to them accidentally interlocking or scratching each other’s finishes.
Is the Cast Hook suitable for children?
For older children (10+), yes, with supervision to prevent frustration. It’s an excellent tool for developing spatial reasoning and patience. For younger children, the small parts and potential for pinched fingers make it less ideal.
I think my puzzle is defective. How can I tell?
Genuine defects are rare. Before concluding it’s broken, ensure both pieces are in their original, unbent shape. Compare them to product photos online. If a piece is visibly bent or has a casting flaw that obstructs a clear opening shown in tutorials, then it may be faulty. Otherwise, the barrier is almost certainly in the technique.
Your Next Puzzle: How to Choose and Where to Find More
Now that you’ve conquered the Cast Hook, you might be looking for your next metallic challenge. The world of metal puzzles is vast, and choosing the right one can be the difference between a satisfying brain workout and a desk-throwing frustration. Here’s how to pick your next puzzle based on what you’ve learned.
First, assess the difficulty. Many specialty retailers, like Puzzle Master, use a standardized 1-10 scale. The Cast Hook typically sits around a 4 or 5—a solid intermediate level. If you want a similar challenge, look for puzzles rated 4-6. If you found the Hook easy, jump to a 7 or 8. If it was a real struggle, a level 2 or 3 puzzle will build your confidence. Don’t just trust marketing terms like “challenging”; seek out these numerical ratings from reputable sellers.
Next, consider the puzzle type. You’ve solved a cast metal puzzle, which involves precisely machined, often chunky pieces. The other main category is wire puzzles (like the classic “two nails” or heart-and-loop styles), which are usually about disentanglement and involve more bending and sliding of thinner metal. Cast puzzles often feel more like a premium object and focus on finding a precise sequence of moves, while wire puzzles can feel more tactile and flexible. Your experience with the Hook has given you a foundation for the cast metal style.
Material and build quality are major buying criteria. A well-made cast puzzle should have a smooth finish with no sharp edges, and pieces should move without forcing or grinding. Cheaper, mass-market puzzles often have rough casting seams that can snag, turning a logic problem into a physical one. This is where brands like Hanayama (frequently mentioned in commercial SERPs) have built their reputation—their extreme attention to detail and machining justifies a higher price point for many enthusiasts. An objection like “it’s just a piece of metal” often melts away when you feel the satisfying click of a perfectly fitted component.
Finally, always check for solution availability. One of the most common frustrations voiced in forums is getting permanently stuck with no way out. Before buying, verify that the manufacturer or retailer provides a solution, either as a PDF, a clear photo guide, or a video. This isn’t cheating; it’s a safety net that makes the puzzle a fun challenge rather than a source of lifelong annoyance. Reputable shops like Kubiya Games or specialty puzzle stores always include solutions or have them readily available on their sites.
For a curated selection of puzzles that match different thinking styles and difficulty levels, our guide to The Best Metal Puzzles for Adults: A Guide for the Over-Thinker breaks down the options to help you find your perfect next challenge.