That Maddening Click: A Preview of Your ‘Aha’ Moment
It’s been on your desk for days. You’ve twisted, turned, and probably even sworn at it. The two pieces of your metal puzzle seem impossibly, irrevocably linked, a tiny cage of frustration in your palm. I know the feeling intimately—my workshop’s “Wall of Shame” is a testament to it. But I promise you, there is a logic to this madness. The frustration you’re feeling isn’t a lack of intelligence; it’s a sign the designer did their job well. They’ve hidden the path in plain sight. This moment of struggle is the first lesson in the patience required for ring puzzles.
Let’s skip ahead to the victory. Picture this: after a series of deliberate alignments—not random force—one ring slips through a specific, almost invisible gap in the other. There’s a distinct, satisfying click as they come apart. That sound is your ‘aha’ moment. It’s the physical proof that you’ve seen what the puzzle was hiding.
This isn’t about having a “eureka” flash of genius. It’s about learning to see differently. Your eyes tell you the rings are a solid, interlocked knot. Your spatial reasoning needs to learn they’re two independent objects sharing a confined space, and there is a precise sequence of maneuvers to grant one its freedom. The core of solving any ring puzzle, from a classic two-ring disentanglement to the notorious Hanayama Cast Ring, lies in identifying that hidden pathway—what I call the “Keyhole.”
Think of it like this: the puzzle is a locked door, and you’ve been trying to kick it down. I’m here to show you the keyhole you missed, and more importantly, how to find it yourself in any similar mechanical puzzle. The “Keyhole Principle” is the single concept behind most of these challenges. Once you internalize it, the frustrating tangle in your hand transforms into a solvable, kinetic sculpture.
Your current struggle is the first, essential lesson. Let’s deconstruct that deception together and turn your stuck-ness into your greatest asset.
Why It Feels Impossible: The Designer’s Bag of Tricks
So, you understand the goal is to find the “Keyhole.” Why does it feel so perfectly, maddeningly hidden? It’s not by accident. It’s by brilliant, deceptive design. That metal puzzle in your hand is a kinetic sculpture of deliberate frustration, employing a few classic tricks to short-circuit your spatial reasoning.
First, consider the materials. That satisfying weight and cool touch—typically stainless steel or a zinc alloy—aren’t just for feel. They create what I call gritty feedback. The pieces don’t slide effortlessly; they offer subtle resistance, making every wrong move feel plausible and every correct one feel like a discovery. The typical 2-inch (5 cm) diameter is another trick. It fits perfectly in your palm, but the small scale means your fingers can obscure the very gaps you need to see.
Now, let’s look at the designer’s core strategies. The most common is mirrored symmetry. The rings appear identical, a perfect loop-within-a-loop. Your brain assumes the solution must be symmetrical, so you try the same twists and turns on both sides, leading to endless, fruitless repetition. The Hanayama Cast Ring, famously rated a 6/6 for difficulty, is a masterclass in this. Its two pieces are almost identical, but with one critical, asymmetrical detail—a slightly wider arc or a subtly different curve—that is the literal key to the entire disentanglement.
Next is the blind pathway. This is the core of the Keyhole Principle. The exit route for one piece isn’t a wide-open gate; it’s a precise alignment of gaps that only exists when the puzzle is held in one exact orientation. From 99% of angles, it’s invisible. You must learn to manipulate the rings into this transient state, a bit like tuning a radio to a specific frequency to hear the station.
Finally, there’s the false solution. This is the designer’s cruelest—and most clever—trick. You’ll find a notch or gap that looks like the obvious exit. You’ll push, twist, and apply gentle force, feeling the metal protest (this is where you should always stop). That notch is a decoy, placed there to exhaust the most obvious attempt and send you back to the start. It’s the puzzle’s sleight of hand, misdirecting your attention from the true, less obvious path. To see how these tricks evolve in more complex forms, explore the design intricacies of orbital ring puzzles.
Think of it like this: you’re not fighting the puzzle; you’re learning its language. The stiffness isn’t a flaw—it’s the puzzle saying “warmer” or “colder.” The hardest metal ring puzzle isn’t hard because it’s complex; it’s hard because it’s simple in a profoundly misleading way. Its components are right there in your hand, and the solution is a sequence of about three to five fundamental moves. The genius is in hiding those moves in plain sight.
Diagnose Your Frustration:
* “They just spin and never separate.” → You’re likely stuck in mirrored symmetry, performing the same rotational move on both pieces. Look for the asymmetry.
* “I see a gap but it won’t go through!” → You’ve found a false keyhole. The real exit requires a different alignment first.
* “It feels like it should just pop apart here!” → You’re at the threshold of the blind pathway. You have the right alignment, but now one piece needs a specific tilt or slide, not force.
(And to answer a common question that comes from my old jeweler’s bench: no, you should not wear the Hanayama Cast Ring as jewelry. While it’s beautifully machined, the constant friction against clothing and skin will wear down the precise tolerances that make the solve possible, and the patina from your skin can eventually make the movement gummy.)
These tricks aren’t flaws; they’re the heart of the mechanical puzzle experience. Understanding them is the first step in disarming them. Now, let’s move from understanding the deception to mastering the universal principles that defeat it.
The Three Universal Principles of Disentanglement
Now that we’ve peeked behind the curtain at the designer’s bag of tricks, you can stop being their victim and start thinking like a puzzle solver. The frustration of a seemingly impossible metal puzzle doesn’t come from a lack of intelligence—it comes from not knowing what to look for. You’ve been wrestling with the object; it’s time to analyze the system.
After years at the jeweler’s bench and my own Wall of Shame, I’ve found that nearly every ring puzzle, from the classic Chinese ring to the modern Hanayama Cast Ring, obeys three core principles. Internalize these, and you’ll stop memorizing rote steps for one puzzle and start understanding a whole category of them. These are the three ancient principles of puzzle solving applied to modern cast metal.
1. The Keyhole Principle: Your 80% Solution
This is the cornerstone. Every disentanglement puzzle contains at least one “keyhole”—a specific gap, opening, or pathway in one piece that another piece’s segment (the “key”) must pass through to achieve separation. The deception lies in the fact that this keyhole is rarely accessible when you first look for it.
Think of it like this: You have a key on a crowded keyring. To remove it, you must first maneuver it to the single, narrow opening in the ring. The other keys block the path; you must rotate and slide the target key into just the right position relative to that exit. Your two ring metal puzzle is the same. The rings are not magically fused; they are arranged so that the only possible exit is hidden behind other segments of the same rings. Your primary job is to manipulate the pieces to create the alignment where the key slides into the keyhole.
The most common mistake is spotting a gap and trying to force a piece through it. That’s a false solution. The true keyhole only appears when the puzzle is in a specific, often counterintuitive, configuration. (This is where most people apply force—don’t! You’ll mar the metal and cement your frustration.) Finding the keyhole is a 3D search for alignment, not a 2D test of strength.
2. Managing Slack & Tension: The Kinetic Dance
Puzzles are not static. This principle is all about feeling the gritty feedback in your hands. Slack is the freedom of movement between pieces; tension is where they bind and lock. Solving is a continuous trade between the two.
When pieces are tense and locked, you cannot force a move. Instead, you must create slack elsewhere. Often, this means moving a piece away from where you ultimately want it to go, or rotating one ring in the opposite direction to open up a millimeter of space in a critical junction. It’s a subtle, tactile negotiation.
Imagine threading a needle. If you pull the thread taut, you can’t guide it through the eye. You leave a little slack in the thread to allow for precise maneuvering. Your hand puzzle operates on the same mechanical truth. The “sweet spot” isn’t about power; it’s about finding the configuration where the binding tension releases and transforms into usable, navigable slack. This is where hand-eye coordination meets spatial reasoning—you are physically feeling the geometry unlock.
3. Tracking Rotational Axes: Seeing in 3D
This is the mental leap. Most people see the rings and think in terms of two dimensions: spinning them in the plane of their desk. The solution almost always requires rotating a piece along an axis you haven’t considered yet—tilting it into the third dimension, perpendicular to its obvious plane of movement.
Each loop or segment of your puzzle can rotate on multiple axes. The puzzle is solved when the correct segment is aligned with the keyhole and rotated onto the correct axis to pass through it. You must mentally track these axes. Is this loop currently spinning like a Ferris wheel? You may need to stop and tilt it to spin like a merry-go-round instead.
A simple exercise: Hold your puzzle in one hand. With the other, grasp one ring and explore only its possible rotations. Not to solve, just to learn. Can it tilt forward and back? Can it twist like a dial? This conscious cataloging of movements separates the solver from the random fiddler. It turns aimless fidget-quality manipulation into directed investigation.
These principles are not steps; they are lenses. You apply them simultaneously.
1. You manage slack and tension to maneuver the pieces.
2. This allows you to align a key segment with the true keyhole.
3. Which often requires you to rotate a piece onto a new axis to finally slip it through.
When you hit a wall, don’t just try moves at random. Diagnose: “Do I have the right keyhole alignment? If not, where can I create slack to achieve it? Does achieving that require a new rotational axis?” This framework is your logic engine. It transforms the experience from a test of patience into a soluble mechanical puzzle of applied geometry.
With these three principles in mind, you’re ready to apply them directly to the classic puzzle in your hand.
Diagnose Your Frustration: A Stuck-Point Flowchart
Now you have the three principles in mind, but your fingers are still tangled in metal. This is where theory meets the gritty feedback of the hand puzzle in your palm. Random trial and error is the enemy. Instead, use this text-based diagnostic guide. Match your physical sensation to the scenario below—it will point to the principle you’re likely violating and offer a targeted hint to get you flowing again.
Stuck Sensation: “The pieces lock up the moment I try to slide one through a gap.”
* Likely Culprit: Violating Principle 1 (Slack & Tension). You’re trying to move the key segment without first creating the necessary space.
* The Hint: You’re pulling directly against the immovable object. Stop. Reverse your move. Before pushing the segment toward the exit, experiment with moving the other piece into a position that gives the first piece room to breathe. Create slack in the system, then attempt the pass.
Stuck Sensation: “I can wiggle a loop partway through a hole, but it won’t go all the way. It feels like it’s hitting an invisible wall.”
* Likely Culprit: Violating Principle 2 (True Keyhole Alignment). You’ve found a gap, but not the gap. This is the most common false solution.
* Hint: The path isn’t straight. You’ve aligned the loop with one opening, but the full thickness of the metal needs a perfectly clear channel. Rotate both pieces slightly—often just a few degrees—and feel for a different alignment where the loop sits fully within the silhouette of the exit path. Listen for the difference between a scraping sound and a clear, silent slide.
Stuck Sensation: “Everything moves freely in one plane, but the solution seems to require a move that feels impossible or like bending.”
* Likely Culprit: Violating Principle 3 (Axis Rotation). You’re exploring all moves in the starting orientation, but the solution requires you to think in 3D.
* Hint: The puzzle is asking you to change its fundamental orientation. Does the ring in your left hand only swing side-to-side? Try tilting its entire plane forward or backward, as if you’re turning a page in a book. This axis shift is the spatial reasoning leap that most solvers miss. (This is where most people force it—don’t!)
Stuck Sensation: “I got one piece completely free, but now the second is more trapped than ever.”
* Likely Culprit: Principle 1 and 3 in tandem. You took the first available exit, not the correct sequence. In multi-stage disentanglement puzzles, order matters.
* Hint: Re-join the pieces and start over. Your first separation likely used up all the available slack, stranding the second piece. The initial moves should feel like a coordinated dance, not a solo escape. Focus on moves that improve the position of both pieces, even if neither is close to freedom yet.
Stuck Sensation: “It feels stiff and gritty, like the metal is fighting me even when I think I have the right move.”
* Likely Culprit: This may be a maintenance issue, not a logic one. Forcing here can damage a quality cast metal puzzle.
* Hint: A quality puzzle should move with precise resistance, not grinding grit. If it’s new, some mild abrasive from casting may remain. A dry, graphite-based lock lubricant applied sparingly to the contact points can work wonders. Never use oil—it attracts dust and creates a mess. If it’s an heirloom piece, a professional cleaner for stainless steel or zinc alloy might be needed.
Treat this as your troubleshooting guide. When you feel that familiar surge of frustration, pause. Identify the sensation, recall the principle, and apply the hint. This method turns dead ends into diagnostic data, which is the mark of a true solver.
A Principle-Driven Walkthrough: Solving the Classic Two-Ring
Now, with our diagnostic chart nearby and the three principles fresh in your mind, let’s apply them to a physical object. We’re going to walk through the solution for a classic two-ring puzzle—the kind that’s kin to the iconic Hanayama Cast Ring. Grab your puzzle. Don’t think of this as memorizing a sequence; think of it as a guided conversation where you learn to listen to the metal. Your goal is to understand why each move works, transforming what feels like random twisting into informed spatial reasoning.
First, identify the two key states of your puzzle. Let’s call the piece with the obvious gap or opening the “C-Ring” (shaped like a capital C). The other, often a more complete but still interrupted loop, is the “Omega Ring” (shaped like Ω). Your objective is to navigate the solid portion of the Omega Ring through the gap in the C-Ring. This is the heart of the Keyhole Principle.
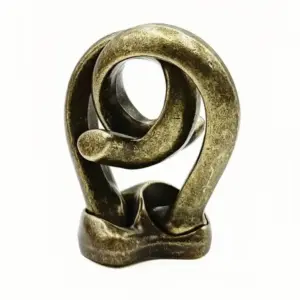
Here is a fantastic example of the form, the Interlocking Double-Ring Lian Puzzle. Its clean, classic design makes it perfect for learning these core techniques.

Step 1: The Initial Alignment (Finding the “Sweet Spot”)
Hold one ring in each hand. Observe how they interact. You’ll notice there are positions where the rings seem to bind tightly, and others where they have a bit of wiggle room. Your first job is to find the alignment that maximizes that wiggle room—the “sweet spot.” This is almost always when the gap of the C-Ring is positioned opposite the thickest or most obstructed part of the Omega Ring. You’re not trying to force a separation yet; you’re just finding the state of maximum potential energy, like winding up before a throw. (This is where most people apply constant, grinding force—don’t! Force is your last resort, not your first move.)
Step 2: The Pivot and Slide (Applying Axis and Slack)
With the rings in the sweet spot, focus on the Omega Ring. Your goal is to pivot it so one of its ends can pass through the gap in the C-Ring. This is a two-part move:
1. Pivot: Tilt the Omega Ring, rotating it along its own axis so one end points toward the C-Ring’s gap. You’ll feel the metal slide against itself—this is normal.
2. Slide: Now, using the slack you identified, slide that pointed end directly through the gap. Do not try to go around the C-ring; go through its opening. This is the literal application of the Keyhole Principle. You should now have one end of the Omega Ring protruding through the C-Ring’s gap.
Step 3: The Negotiation (The Dance of Two Pieces)
This is the step that feels impossible. You have one end through, but the other end is still trapped. This is where Simultaneous Movement is non-negotiable. You cannot free the Omega Ring by only moving it. You must now move both rings in a coordinated fashion.
* Gently rotate the C-Ring, guiding the trapped portion of the Omega Ring along its inner contour.
* As you do this, also adjust the angle of the Omega Ring, feeding more of its length through the keyhole.
Think of it like threading a needle where both the needle and the cloth can move. You’re manipulating the shared negative space between them. (If things bind, stop. Return to the sweet spot and start Step 2 over. You likely lost alignment.)
Step 4: The Clear Path (Executing the Keyhole Principle)
After a few careful adjustments, you’ll reach a moment of sublime clarity. The entire length of the Omega Ring will be aligned such that its final, obstructing end can now pass cleanly through the same gap. There will be no twist, no force—just a smooth, linear slide. This is your ‘aha’ moment. The Omega Ring will come free.
Why This Works (The Principles Recap):
1. Keyhole: You used the C-Ring’s gap as a literal passageway.
2. Axis & Slack: You pivoted on the Omega’s axis to align it, and used inherent slack to make the slide possible.
3. Simultaneous Movement: You moved both pieces in concert to navigate the trapped portion.
Putting It Back Together: Reassembly is simply the reverse, but viewed through the principle lens. Align the Omega Ring to pass its end through the C-Ring’s gap, then negotiate both pieces back into their interlocked position. It requires the same coordinated dance. If you’ve mastered the take-apart, the put-together will solidify the lesson. For a dedicated step-by-step puzzle ring solution guide, that resource builds on these same fundamentals.
You’ve just done more than follow steps. You’ve learned to see the hidden pathways in a cast metal puzzle. You’ve felt the sweet spot and understood that true solving in a disentanglement puzzle isn’t about strength, but about precise negotiation. This skill is now transferable. The triumph isn’t just the separated rings in your hand—it’s the newfound confidence in your spatial reasoning. You are no longer just stuck; you are a solver equipped with principles.
The Second Half of the Puzzle: Reassembly Demystified
You’ve done it. The two pieces sit separate in your palm, a hard-won victory. But now you’re staring at them, thinking, “Okay… how do I get them back?” This is the moment where many solvers, flush with triumph, hit a second wall of frustration. Reassembly feels like trying to remember a path through a forest in reverse—everything looks familiar, yet wrong. Let’s demystify it.
The short answer is: it is the reverse of the solve. But the long, more useful truth is that reassembly fails when you only reverse the motions without reversing the principles. You’re not just performing steps backwards; you are finding the entry path—the precise spatial corridor the designer left for the pieces to interlock. This is where your understanding of the Keyhole Principle and Simultaneous Movement pays double dividends.
Here’s your principle-driven guide to reassembling a classic two-ring metal puzzle:
- Identify the Gate. Just as you found the “keyhole” gap to escape, you must now align the pieces so that same gap becomes the entrance. Position your C-Ring and Omega Ring exactly as they were in the final move of your solve, but now an inch apart.
- Initiate the Dance. Slowly move the end of the Omega Ring through the C-Ring’s gap. This is not a forceful push; it’s a deliberate insertion. You are retracing the path of inherent slack you exploited during the separation.
- Navigate the Negotiation (This is the tricky bit). As the rings begin to interlock, you will reach the mirrored version of the “stuck point” from the solve. Here, you must again apply Simultaneous Movement. Don’t just shove one ring; rotate and adjust both in concert, allowing them to fold into one another. You’ll feel the same sweet spot of alignment—a gentle, gritty feedback that says you’re on the right track, not forcing a false solution.
- Seat Them Home. The final click into the fully interlocked position is deeply satisfying. You haven’t just reassembled it; you’ve understood the assembly.
This act of re-puzzling unlocks the object’s true fidget-quality. A solved puzzle on a shelf is a trophy. A puzzle you can solve, reassemble, and solve again in a smooth, meditative flow is a kinetic companion for your hands and mind. It becomes less of a one-time test and more of a tactile exercise in spatial reasoning.
A Note on Care: If your puzzle feels stiff during this process, a microscopic drop of synthetic clock oil or dry Teflon lubricant on the pivot points can work wonders. Never use WD-40 or household oil—they attract dust and gum up. Wipe the excess off thoroughly with a cloth. The goal is to preserve the satisfying patina and precise feedback, not make it feel loose.
Mastering reassembly completes the cycle. It transforms the object from a problem to be conquered into a system to be understood and enjoyed, time and again. This confidence—knowing you can navigate both out of and into the entanglement—is the final seal on your solver’s license.
Care, Feeding, and the Ethics of a Little Oil
That final note on care from the reassembly section is worth expanding on, as it bridges the gap between solving your first metal puzzle and developing a long-term relationship with it. If your disentanglement puzzle has started to feel gritty or stubborn, you’re facing a common crossroads. Your immediate question—should I use oil?—has a nuanced answer rooted in the ethics of preservation.
First, the cardinal rule: forcing is the enemy. Applying brute force to a stainless steel or zinc alloy cast mechanical puzzle doesn’t just risk bending a delicate component (which can render it permanently unsolvable); it also grates the metal surfaces, creating microscopic burrs that increase friction. The satisfying click of a perfect move should come from alignment, not coercion. If you find yourself applying significant pressure, stop. You’ve likely missed a keyhole principle alignment or are trying to push a component around a gap instead of through it.
Now, to the oil. A quality cast puzzle is engineered for repeated solving without wear. The gritty feedback you feel is often just a combination of manufacturing residue and skin oils that have attracted dust. Before considering lubrication, give it a thorough clean: a soft toothbrush, warm water, and a drop of mild dish soap. Rinse and dry it completely with a soft, lint-free cloth. This alone restores the intended feel for many puzzles.
If stiffness persists in a specific pivot or slide, a minimalist approach is key. The goal is not to make it feel loose, but to restore its designed smoothness. Here’s the jeweler’s apprentice method:
1. Use a synthetic clock oil or a dry PTFE (Teflon) lubricant. These are non-gummy and designed for fine mechanics.
2. Never use WD-40 or household 3-in-1 oil. They attract dust and will create a sticky sludge over time.
3. Apply a single, microscopic drop to the point of friction. Use a toothpick or pin—not the bottle’s applicator.
4. Work the puzzle to distribute the lubricant, then wipe away every trace of excess with a cloth. Your fingers should feel metal, not oil.
This preserves the patina—the unique sheen that develops from honest handling—while protecting the precision of the puzzle. A well-maintained puzzle isn’t just a solved object; it becomes a reliable fidget toy for your desk, a tactile system you can navigate with quiet confidence for years. For more on ensuring longevity, the guide on maintaining your metal puzzles delves deeper into cast metal logic.
Ultimately, care is about respect for the object’s intent. You’re not just maintaining a piece of metal; you’re preserving the clarity of the feedback it gives your hands, ensuring every future solution is earned through reasoning, not force.
Leveling Up: Applying Your Skills to Complex Rings
The same respect for gritty feedback that guides your maintenance routine is the exact mindset you need for more intricate designs. You now hold the three universal principles—the Keyhole Principle, aligning pathways, and managing slack. These aren’t just for one puzzle; they’re the foundation for understanding any metal disentanglement puzzle you encounter next. The category is vast, officially known as a Disentanglement puzzle, a sub-genre of mechanical puzzles.
The core logic doesn’t change as you add more rings or asymmetrical shapes; it simply layers. With a puzzle like a four-ring design, you’re not solving one massive knot. You’re applying the principles sequentially, solving one pair of rings at a time to create a new, temporary keyhole for the third, and so on. Your job is to find the starting point—the two pieces with the most immediate play between them—and begin the cascade.
This is where spatial reasoning becomes a dance. You must keep a mental map of which rings are in a “solved” state relative to each other as you work on the next pair. The common mistake here is losing track and reversing progress (a false solution in the middle of a solve). Go slow. If you hit a wall, backtrack two moves and look for a different alignment you may have missed.
Another leap comes with asymmetry. Many complex ring puzzles, like the notorious Hanayama Cast Ring II, feature pieces that aren’t uniform. Here, the Keyhole Principle is absolute, but the keyhole itself is hidden along a specific, non-obvious axis of the irregular shape. The puzzle’s challenge is in convincing your hands that the correct path exists where your eyes see none. Rotate the pieces systematically, studying how the asymmetrical profiles can mesh and create that crucial opening.

You’ll also encounter a distinction in form: cast metal puzzles versus wire puzzles. Cast puzzles, like the Hanayama series, are solid, with a precise, milled feel. Their pathways are defined by grooves and channels. Wire puzzles are more about open loops and bends. While the principles are identical, the tactile feel differs—wire puzzles often have more flex and require a lighter touch to feel for alignment. A cast puzzle’s difficulty is in its precision; a wire puzzle’s is often in its springy deception.
This is what Hanayama puzzle difficulty levels (like the Cast Ring’s 6/6 stars) truly measure: not raw complexity, but the depth of the sleight of hand in disguising those fundamental pathways. When you look at a new, more complex puzzle, don’t see an insurmountable wall. See a series of familiar gates waiting to be unlocked in sequence. For a deeper dive into selecting your next cerebral challenge, our guide on more advanced metal puzzles applies this principle-first thinking to a wider range of designs.
Your hands have now been trained to see what they feel. That is the real solution, the transferable skill. Whether it’s three rings or six, symmetrical or bizarrely shaped, you’re no longer just twisting metal—you’re conducting a kinetic symphony you’ve learned to read.
Your Next Kinetic Conquest: A Curated Shortlist
So, the symphony is complete. You’ve separated, reassembled, and now feel the satisfying gritty feedback of that first metal puzzle conquered. That initial, maddening frustration has transformed into a fluent language in your fingertips. Where do you point that newfound spatial reasoning next? Your next disentanglement puzzle shouldn’t be a random grab, but a deliberate step that stretches a specific skill. Here are two principle-focused recommendations, each introducing a new twist on the linked rings concept.
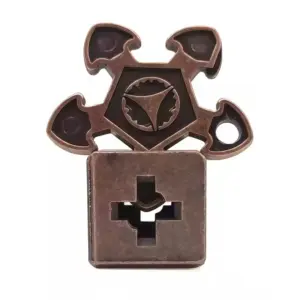
First, for a beautiful test of symmetry and alignment, consider a design like the Love Interlocking Arrow Cross Rings Puzzle. This type asks you to apply the Keyhole Principle not once, but in multiple dimensions, as you navigate symmetrical arrowheads through precise openings. It’s a lesson in maintaining orientation—a perfect evolution from your foundational skills.
Next, to truly bend your perception, seek a puzzle like the Metal Orbit Ring Cast Puzzle. This introduces a “wraparound” pathway, where a ring must travel in a loop that feels impossible until you find the specific axis of rotation. It’s the ultimate test of visualizing motion in three dimensions, turning a simple loop into an orbital path.

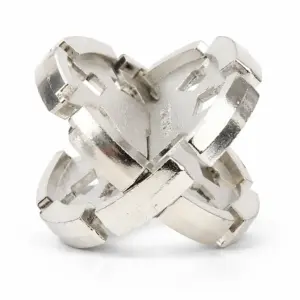
The classic next step, of course, is the Hanayama Cast Ring II. It takes the core principle of its predecessor and layers in a deceptive third element, forcing you to manage two separate disentanglement sequences in a precise order. It’s the logical, more complex sequel.
When you’re ready to browse a wider field, use your new principle-first lens. Don’t just look at a puzzle rating like “level 6”; ask what it’s hiding. Is the keyhole rotated? Is the pathway obscured by a sculptural element? Your actionable next step: explore our curated list of metal puzzles with this empowered perspective. Choose the one that intrigues, not intimidates. The desk that once held a source of frustration now holds a gateway to your next kinetic conquest. Go find it.
Want to explore the broader world of puzzles? The history and taxonomy of these ingenious objects are fascinating. Learn more about the general category they belong to by reading about Mechanical puzzles on Wikipedia.