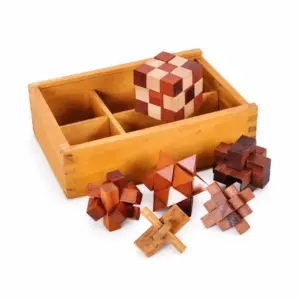
6")
The ‘Click’ That Hooks You: What You’re Really Building (Besides a Model)
Listen for it.
It’s the sound of the final gear in a wooden clock engaging, a crisp click as the last tooth catches. It’s the soft thock of a marble dropping cleanly onto a track you built with your own hands. That sound is the payoff. It’s the audible, tactile punctuation mark on hours of focus, separating the frustration of a fiddly piece from the pure eureka moment of a mechanism coming to life.
You’re not just snapping together laser-cut parts. You’re buying an antidote.
An antidote to the digital scroll, the infinite inbox, the screen-glazed eyes. These 3D wooden puzzles for adults trade pixels for grain. They replace notifications with tangible progress. You’re not consuming content; you’re conducting a quiet, personal orchestra of cause and effect. One piece connects to another, which moves a third, which spins a fourth. It’s applied physics you can hold.
So, what are you really building for? Is it for the silent, meditative focus of constructing a skyline? That’s one type of satisfaction. Is it for the kinetic joy of cranking a handle and watching a mechanical model car’s pistons fire? That’s another. Or is it the gift of watching someone else experience that click—making a 3d puzzle gift for husband or a partner less about the object and more about the shared triumph over complexity?
This is the core truth competitors miss. Your goal dictates your kit. Building a static cathedral is a different mental exercise than engineering a working marble run. One is a patience game, a meditation on symmetry and structure. The other is a logic puzzle in three dimensions, where a misaligned support spells cascade failure.
The appeal isn’t that it’s simply “hard.” Are 3d wooden puzzles hard? That’s the wrong question. They are precise. They demand attention, not innate genius. The challenge isn’t a vague struggle; it’s a series of small, solvable problems. A gear doesn’t mesh? You likely reversed a piece. A wall won’t slot in? You probably missed the dry-fit step the pictogram glossed over. The difficulty is in the details, and the victory is in deciphering them.
You are building a skill ladder. Your first kit teaches you to read the language of precision-cut birch plywood, to understand grain direction, to master the gentle punch-out of pieces. It teaches you the sacred rule: sort the pieces first. It shows you why that no glue required design philosophy, when executed well with tight tolerances, leads to that profoundly satisfying click.
Forget the generic “hours of fun.” You’re buying a focused, finite journey with a definite end—a physical trophy for your shelf that says, “I figured this out.” Now, let’s figure out which journey is yours.
The Builder’s Spectrum: A Quick-Quiz Guide to Your Puzzle Personality
So you’re convinced a box of precision-cut wood holds a worthwhile journey. Good. But with hundreds of kits out there—from serene skyline 3D jigsaw builds to clanking mechanical models with a hundred moving parts—choosing wrong can turn a meditative weekend into a desk-pounding frustration. This isn’t about “what’s cool.” It’s about what fits your brain, your hands, and your tolerance for the fiddly.
Think of it as matchmaking, not shopping. You need to identify your primary builder’s temperament. Let’s skip the vague descriptions. Answer this one question honestly: What’s the moment you’re picturing when you close the box for the last time?
Your answer places you on the spectrum. Here are the four core types.
The Meticulous Engineer
The Moment You Crave: The flawless operation of a complex system you assembled. That first turn of the crank that brings a gear train to life, moving pistons or turning clock hands with perfect, silent synchronicity.
Your Motivation: You appreciate elegant engineering in miniature. The build is a reverse-engineering project. You’re less about the finished object sitting on a shelf and more about the hidden logic that makes it work. You enjoy deciphering step-by-step instructions that feel like technical schematics.
Your Natural Habitat: Forum threads debating gear ratios in wooden marble run kits or modding UGEARS models for smoother operation.
The Patience Tax: Low to none. You possess it in spades. In fact, you’ll willingly spend an extra hour sanding a stubborn axle for a 5% improvement in spin. Your frustration comes from kits with sloppy tolerances or “dumbed-down” mechanisms that sacrifice realism.
Your Puzzle Type: Complex mechanical wooden models to build. Think functional model cars with working transmissions, wooden mechanical music box kits with programmable drums, or intricate orreries. These are the best 3d puzzles for engineers.
Brands to Scout: ROKR (for their more sophisticated mechanics), UGEARS (for their signature style), WoodTrick (for robust mechanical sets).
Starter Suggestion: Don’t shy from mid-range complexity. Start with a functional model that has a clear mechanical payoff, like a working vending machine or a safe with a combination lock.
The Patient Artist
The Moment You Crave: Placing the final delicate spire on a breathtaking cityscape or architectural marvel, then stepping back to admire the silhouette against the light.
Your Motivation: The creation of a beautiful, display-worthy object. The process is a form of active meditation. You relish the repetitive, almost ritualistic act of slotting piece after piece, watching a complex, static form emerge from a flat board. The satisfying click for you is visual, not mechanical.
Your Natural Habitat: Carefully lighting and photographing your completed DIY kits as collectible art pieces.
The Patience Tax: High, but of a specific kind. You have immense focus for repetitive detail but may lack the Engineer’s love for troubleshooting kinetic systems. Your frustration comes from pieces that don’t fit cleanly, marring the final aesthetic.
Your Puzzle Type: High-detail architectural wonders (castles, cathedrals, cityscapes), animal sculptures, or intricate music boxes where the mechanism is secondary to the ornate exterior. These are less about movement and more about form and shadow.
Brands to Scout: Robotime, Rolife, and certain SiamMandalay or Intrism architecture series known for artistic design.
Starter Suggestion: Opt for a visually stunning but structurally straightforward model. A detailed lighthouse or a pagoda with clear, layered construction is ideal. Avoid the most fragile, lace-like structures for your first build.
The Impatient Tinkerer
The Moment You Crave: The rapid, tangible progress. Completing a recognizable sub-assembly in a single sitting. You want a steady drip of eureka moments.
Your Motivation: You want the hands-on engagement and the accomplishment, but your free time is fragmented. You’re a beginner adult looking for a 3d puzzle for beginners adult that won’t languish half-built for months. You might be testing the waters to see if this hobby sticks.
Your Natural Habitat: Building on the kitchen table over a few evenings, prioritizing kits with clear, modular stages.
The Patience Tax: Low. It’s your kryptonite. A single confusing step or a poorly illustrated instruction can derail your entire motivation. You need clear wins.
Your Puzzle Type: Models with logical, chunked assembly phases. A wooden marble run kit where you build one module at a time and can test it immediately is perfect. So are simpler mechanical models with fewer pieces (sub-200) or robust, chunky vehicle designs without a million tiny gears.
Brands to Scout: Look for entry-tier kits from major brands. UGEARS’ smaller models (like the Tractor), ROKR’s basic desk toys, or Wood Trick’s beginner vehicle kits.
Starter Suggestion: This is crucial. Choose a kit advertised for newcomers, with a sub-4-hour “advertised” build time (which you now know means 6-8 for you). Read reviews specifically about clarity of instructions.
The Gift-Giver
The Moment You Crave: Presenting the finished, impressive object and witnessing the recipient’s genuine surprise and delight.
Your Motivation: You’re seeking the perfect 3d puzzle gift for husband, partner, or friend. The build experience is secondary to the “wow” factor of the final product. You’re curating an experience and a trophy. Key considerations are universal appeal, display-ability, and a lack of frustrating pitfalls for the recipient.
Your Natural Habitat: Reading “wooden city puzzles review” threads specifically for giftability and finish quality.
The Patience Tax: A concern, but for someone else. You’re trying to avoid giving a gift that becomes a chore. You need a kit that balances impressive results with a forgiving build.
Your Puzzle Type: Go for high visual impact with moderate complexity. A stunning, mid-sized architectural model or a beautifully designed, functional item like a music box or desk organizer is ideal. Avoid the most difficult 3d wood puzzles or anything overly fragile unless you know the recipient’s temperament aligns with the Engineer or Artist.
Brands to Scout: Robotime and Rolife for their beautiful, artistic finishes. ROKR for their elegant functional pieces like working clocks or music boxes.
Starter Suggestion: Choose a kit with a theme meaningful to the recipient (a car for an auto enthusiast, a ship for a sailor). Prioritize kits renowned for stellar instructions. And always, always include a small set of fine-grit sandpaper and a pair of tweezers in the gift—a pro move they won’t know they need until they do.
Found your type? This self-identification is your first and most important filter. It moves you from overwhelmed browsing to targeted searching. Now, let’s decode what those categories—mechanical, static, marble run—actually mean for your hands and your schedule.
Decoding the Jungle: Mechanical Marvels, Static Sculptures, and Marble Mayhem
So you’ve narrowed your temperament. Now you need to decode the landscape. When we talk about 3D wooden puzzle kits for adults, we’re really talking about three distinct genres, each delivering a different flavor of satisfaction. Choosing the right one is less about what looks cool and more about what kind of process you—or your giftee—will genuinely enjoy. Let’s strip away the marketing and look at what you’re actually signing up for.
The Mechanical Marvels: For the Engineer’s Soul
This is the category that first hooked me. We’re talking about mechanical wooden models to build that actually do something. Think gear trains, cranks, pistons, and flywheels. The end goal isn’t just a statue; it’s a functional machine made of birch plywood.
What you’re building for: The deep, tactile satisfaction of cause and effect. You’re not just assembling; you’re engineering. The moment you turn the crank and a series of linked gears whirrs to life, moving a piston or turning a clock hand, is a pure eureka moment. It’s applied physics you can hold in your hand.
The process: It’s a logic puzzle in three dimensions. You’ll be dry-fitting gears, aligning axles, and testing tension. The instructions are critical here—a good set will explain why a gear ratio is set a certain way, while a poor one will leave you with a locked-up mechanism.
Common themes: Model cars with working transmissions, wooden mechanical music box kits, working trebuchets, and complex clocks. Brands like UGEARS and ROKR dominate here, each with a distinct feel. UGEARS often has a stiffer, more industrial aesthetic, while ROKR leans toward elegant, decorative function.
The end result: A conversation piece that begs to be interacted with. A warning: they are often more delicate than they appear. That satisfying click of meshing gears comes from precise tolerances; ham-fisted play will strip them. It’s a classic form of a mechanical puzzle, where the challenge is both in the assembly and in understanding the mechanism itself.
 7")
The Static Sculptures: For the Patient Artist
If the mechanical model is a working engine, the static puzzle is a cathedral. Here, the complexity lies in form, not function. These are the architectural wonders, the detailed animal sculptures, the intricate 3D jigsaw puzzles that build into a single, stunning object.
What you’re building for: The meditative rhythm of creation and the awe of a finished display piece. The satisfaction is visual and structural. It’s about watching a skyline emerge from a stack of laser-cut boards or seeing the delicate rigging of a ship like the Galleon (which we explore in our deep dive into building a galleon ship model) come together.
The process: This is often about repetition and precision. You might assemble 50 identical window frames for a cityscape. It requires a steady hand and patience, but the cognitive load is different—less about dynamic systems, more about spatial reasoning and following a complex assembly guide. Brands like Robotime and Rolife excel in this category with breathtaking detail.
Common themes: Famous world architecture (Eiffel Tower, Big Ben), dinosaurs, ships, and complex geometric shapes.
The end result: A collectible display trophy. It’s fragile, often static, and exists purely as a testament to your focus. Dusting it, however, becomes its own puzzle.
The Marble Mayhem: For the Kinetic Tinkerer
Enter the wooden marble run kit. This genre blends elements of the first two: you build a static structure (often with mechanical elements like lifts or triggers) designed for a kinetic purpose—guiding a marble on a thrilling, clattering journey.
What you’re building for: The joy of building a system for play. The satisfaction is twofold: the pride in the constructed track and the hypnotic, repeatable entertainment of watching the marbles race through it. It’s cause-and-effect at its most visceral.
The process: You’re an amusement park engineer. You must ensure each section aligns perfectly or the marble will jump the track. Testing is constant and part of the fun. These kits can be deceptively complex, with multi-level lifts powered by hand cranks or even small electric motors.
Common themes: Complex roller coasters, spiral towers, and labyrinthine runs. The focus is on creating the most entertaining path for that little steel ball.
The end result: An interactive display. It’s sturdier than a static sculpture but has moving parts that can wear. It’s a model you don’t just look at—you use it, making it a fantastic piece for an office or living room that invites interaction.
 8")
So, map it back to your spectrum. The Engineer lives for Mechanical Marvels. The Artist finds solace in Static Sculptures. The Tinkerer and Gift-Giver might both be drawn to the accessible wonder of Marble Mayhem. Understanding this jungle is key to picking a fight—er, project—you can actually win. Now, let’s talk about what separates a quality kit from a splintery disappointment.
The Unboxing Reality: How to Spot a Quality Kit in a Sea of Splinters
You’ve identified your puzzle tribe. Good. Now comes the crucial part: not getting burned by a beautiful product photo masking a box full of frustration. The difference between a transcendent building experience and a splintery chore lies in three things: the wood, the words, and the wiggle room.
Not All Plywood is Equal: The Birch Standard
The phrase “laser-cut plywood” is not a guarantee. It’s a starting point. The gold standard is precision-cut birch plywood. Why birch? It’s a dense, fine-grained hardwood that lasers cleanly, leaving smooth edges that fit together with a satisfying snick instead of a forced crunch. Cheaper kits use softer woods or inferior ply that splinters when you punch out pieces, leaving fuzzy tabs that need sanding before they’ll slot together. You can often spot this in product reviews—look for complaints about “rough edges” or “pieces that don’t fit.” That’s your red flag. The good stuff feels sturdy in your hand, smells vaguely of a campfire when laser-burned, and its pieces release from the board with minimal persuasion.
The “No Glue Required” Fine Print
This is a hallmark of reputable DIY kits from brands like ROKR, UGEARS, and WoodTrick. It means the kit is engineered for friction-fit, self-assembling construction. Pins, slots, and gears are designed to lock together. But here’s the shop teacher truth: “required” and “recommended” are different. For any mechanical model with moving parts—gears, cranks, a music box mechanism—a tiny drop of wood glue on non-moving structural joints (like a frame or base) is a smart play for long-term stability. It prevents the model from becoming a wobbly conversation piece after six months on the shelf. For purely static display models, you can often skip it entirely. Always test-fit first—dry-fit is your best friend. (And if you do decide to glue, our complete guide to gluing wooden puzzles has you covered).
Judging the Manual: Your Lifeline or Your Downfall
A quality instruction booklet is the difference between flow and fury. The best ones, often from ROKR, use clear, wordless diagrams from multiple angles, show orientation with shaded pieces, and highlight the new pieces added in each step. The catastrophic ones? They’re vague, use a single confusing perspective, or skip steps entirely, leading to your own personal eureka moment of realizing you’ve built the last hour backwards. Before buying, hunt down a PDF of the instructions online. If you can’t make sense of it in two minutes, imagine doing it with 300 pieces on your table.
The Tool Truth
The box says “no tools required.” Technically true. Wisely false. Here’s what you actually need:
* Essential: A small block of fine-grit sandpaper (200+ grit). For cleaning up the rare burr or gently easing a stubbornly tight joint. A pair of tweezers for placing those fiddly small gears or pins.
* Nice-to-Have: A self-healing cutting mat to protect your table and give pieces grip. A small rubber mallet or a block of wood to tap large pieces together without marring them. A dab of beeswax or candle wax to lubricate moving gear trains for that smooth, satisfying click.
Where to Buy and What to Avoid
Stick to reputable specialty retailers or the official brand stores on major platforms. Read reviews that mention build experience, not just delivery. Be wary of kits dramatically cheaper than the average; you’re likely paying the patience tax in splinters and poor instructions. Look for phrases like “high precision” and user-uploaded photos of the completed, functioning model. And remember, the most beautiful marble run in the photos is useless if the instructions don’t show you how to align the tracks.
Your confidence comes from knowing what to look for. It turns the overwhelming unboxing into a methodical inspection. You’re not just opening a box; you’re appraising a project. And with that sorted, we can finally tackle the most persistent myth in this hobby: exactly how long this is going to take.
The Patience Tax: Debunking the ‘3-5 Hour’ Build Time Myth
You’ve found a reputable brand and a quality kit. You’ve laid out your tools. Now, the box says “Build Time: 4-6 hours.” You block out a Saturday afternoon, full of optimism. Here’s the cold, hard truth from the garage workbench: you’ll be lucky to be halfway done by Sunday night. This is the Patience Tax—the delta between marketing idealism and the beautiful, frustrating reality of making something intricate with your own hands.
Let’s demystify this. In my experience, and corroborated by deep dives into Reddit and model-making forums (like the insights found in this veteran reviewer’s 200+ solve report), you should mentally double the advertised time for your first build. That 4-6 hour kit? Plan for 8-12. A “12-hour” complex mechanical model? That’s a solid weekend project, maybe two for a newcomer.
Why the disconnect? The advertised time is a best-case scenario for an experienced builder who doesn’t pause, doesn’t make mistakes, and whose pieces separate from the birch plywood frames like butter. Reality is messier.
| Advertised Time (Hours) | Beginner Realist Time (Hours) | Key Factors |
|---|---|---|
| 2-3 (Simple ornament) | 4-6 | Organizing, careful punching, dry-fitting. |
| 4-6 (Basic model car, small music box) | 8-15 | Fiddly gears, aligning moving parts, re-reading step-by-step instructions. |
| 8-12 (Mechanical marble run, large kinetic model) | 15-25+ | Sub-assemblies, testing functionality mid-build, the sheer scale. |
| 12+ (Grand architectural puzzle) | 20-35+ | Repetitive structures, handling hundreds of nearly identical pieces, endurance. |
The tax is levied in three main currencies:
1. The Fiddly Factor. No time estimate accounts for the minute you’ll spend chasing a 3mm wooden pin that shot across the room. Or the five minutes carefully sanding a laser-cut tab that just won’t slot in without threatening to snap. A single gear mechanism with a tight mesh can eat an hour as you test, adjust, and gently coax it into that satisfying click. These aren’t setbacks; they’re the project.
2. The Learning Curve. The first hour is just understanding the language of the DIY kit. How firmly do you punch out pieces? How do you interpret the sometimes-ambiguous diagrams? Which way does this odd-shaped connector face? Your brain is building a new schema. By kit number three, you’re fluent. For kit number one, you’re deciphering hieroglyphics.
3. The “Dry-Fit” Principle. Rushing is the enemy. The hallmark of a good builder is dry-fitting—assembling parts without final pressure to ensure alignment. This is non-negotiable, especially for mechanical models. It adds time upfront but saves you from the soul-crushing experience of having to disassemble three interconnected layers because one gear is binding.
So, what’s a realistic formula? For your first 3d wooden puzzle, take the advertised time, multiply by 1.5. Then add 2 hours for organization, tool fumbling, and general acclimation. That’s your ballpark. A kit claiming 5 hours is likely a 9-10 hour commitment. It sounds daunting, but it’s honest. This isn’t about discouragement; it’s about patience as a deliberate ingredient, not an accidental byproduct.
This time, by the way, is the point. The advertised “3-5 hours of fun” is a relic of a different mindset. You’re not buying an afternoon’s distraction. You’re buying 15 hours of focused flow state. It’s the deep engagement that makes the final eureka moment—when the crank turns and the whole gear train whirrs to life—worth every minute of the tax paid.
Treat the build time on the box like a car’s MPG rating: achievable under perfect, laboratory conditions. Your journey will have traffic, wrong turns, and scenic stops. And that’s where the real story—the one you’ll tell when someone admires the finished model on your shelf—is written.
Curated Pathways: The Best First Kits for Each Builder Type
Armed with a realistic sense of the patience tax and an understanding of your own builder’s temperament, the final step is simple: pick your first battle. This isn’t about the “best” puzzle in the world; it’s about the best one for you. The one that will end up on your shelf, not in a drawer of abandoned dreams. Here are my curated starting points for each archetype we identified, drawn from the garage bench and countless student experiments.
For The Meticulous Engineer
You don’t just want to build; you want to understand. The satisfaction comes from seeing cause and effect, from tracing force through a gear train. You crave a moving, functional outcome. For you, the best starter kit is one with visible, logical mechanics and a clear payoff.
Skip the static skyline. Go for a mechanical wooden model with a single, elegant function. The 3D Zodiac Owl Mechanical Clock Puzzle is a standout first project. It’s not the simplest, but it’s perfect for your mindset. You’re building a working clock with a pendulum and escapement mechanism. Every piece has a purpose you can deduce. The build teaches fundamental horology—you’ll see how the gear ratios translate to minute and hour hands. The instructions are clear, and the final product isn’t just a display piece; it’s a functional conversation starter that actually keeps time. The satisfying click of the escapement is your eureka moment. For more on why this kind of project is so compelling, read about why your next weekend needs mechanical chaos.
 9")
Brand philosophy note: ROKR (the maker of this clock) and UGEARS dominate this space. ROKR often leans into elegant, display-worthy mechanics like music boxes and clocks. UGEARS is the mad scientist—more gears, more moving parts, more vehicular mayhem. For a first model car kit, UGEARS’ simple truck models are a solid, if slightly more fiddly, entry point. Their design is brilliant but their tolerances can be tight. A little sandpaper on the dowels is your friend.
For The Patient Artist
Your victory is visual. You want a beautiful, static sculpture—a testament to patience and precision. Complexity is welcome, but chaos is not. You need a kit with an aesthetic reward that matches the meticulous effort.
Architectural models are your sweet spot. Think wooden city puzzles like the Parisian skyline or a detailed pagoda. These are essentially 3D jigsaw puzzles in the best way, where the architectural logic guides you. The Father and Daughter Bicycle model, however, is a beautiful hybrid. It’s a mechanical model in that the wheels turn and the pedals spin, but the build is less about complex gearboxes and more about crafting a delicate, sentimental sculpture. The process is meditative, the result is charming, and it won’t throw a brain teaser of misaligned gears at you in the final stage.
 10")
For a pure, stunning display piece, brands like Robotime (Rolife) excel. Their building facades and dollhouse-style kits are precision-cut from good birch plywood and focus on creating a collectible scene. The difficulty is in the hundreds of pieces, not in confounding mechanics. You can think of them as the ultimate test of what makes a durable, beautiful model—what lasts after 200 solves.
For The Impatient Tinkerer
You love the idea but fear the marathon. You want action, interaction, and a relatively quick path to fun. Your kryptonite is a 20-step gear assembly before anything moves.
Your gateway drug is the wooden marble run kit. Look for a mid-sized model with multiple tracks and a hand crank. The satisfaction is immediate and repeatable: load a marble, turn the crank, and watch the show. It’s engineering you can play with. Brands like WoodTrick and Cuboro make fantastic ones. The build is straightforward—you’re constructing a pathway, not a watch. It’s the perfect project for a weekend, and the final product is genuinely entertaining, answering the “what do I do with it?” question definitively. It’s a functional kinetic sculpture.
For The Strategic Gift-Giver
You’re selecting a project for someone else. The key is matching their personality, not yours. But a universal principle: when in doubt, choose a kit with broad appeal and a clear, noble purpose. A wooden mechanical music box kit is the unsung hero of gifting. It has the mechanics the Engineer appreciates, the aesthetic the Artist admires, and the delightful, tangible function that charms everyone. It feels special.
Avoid the most difficult 3d wood puzzles for a first gift. That’s a statement, not a welcome. Instead, opt for a mid-range piece count (200-300) from a brand known for step-by-step instructions. And always, always include a note about the patience tax. It’s the most thoughtful part of the gift—managing expectations. A simple “This claims 4 hours, but the experts say 8. Take your time with it” is worth more than the kit itself. It grants permission to enjoy the process, which is the entire point. For a stellar gifting idea that combines a brain teaser with beautiful results, check out our take on why this treasure box is a brain-boosting gift.
Pro-Tips From the Garage: Assembly, Sanity, and That One Stubborn Piece
You’ve picked your kit. The box is on the bench. The journey from a stack of birch plywood sheets to a functional model is where the real character is built—yours and the puzzle’s. This is where theory meets tactile reality. My shop-class mantra applies here: slow is smooth, and smooth is fast. Let’s talk about navigating the actual assembly guide.
First, organization is not optional. I don’t care what the slick marketing says. Sort the pieces. Lay out all the sheets and use small containers—egg cartons, ice cube trays, the little plastic cups I know you saved from last Thanksgiving’s pudding. Group by sheet number, shape, or size. This single act pays a massive patience tax dividend later. You’re not just sorting wood; you’re building a mental map of the project.
Now, the cardinal rule you must follow: dry-fit everything. This is the single most important piece of advice for any DIY kit, mechanical or static. Before you commit to pressing a tab into a slot with any force, assemble the section loosely. Feel how the pieces want to align. Check for laser-cut burrs or slight misalignments. I once spent an hour trying to force a gear train, only to realize I’d mounted a bracket one rotation off. The instructions failed to mention that. A quick dry-fit would have shown me. This practice is your primary puzzle solution. It’s a perfect example of why observation beats brute force every single time.
When you encounter that one stubborn piece—and you will—stop. Don’t force it. Forcing precision-cut plywood is a one-way ticket to a splintered, useless part. Examine it. Is the tab slightly oversized? A few gentle passes with the included sandpaper or a fine nail file can make all the difference. Is the slot packed with chaff from the laser-cutting process? A toothpick can clear it. Often, the issue isn’t the piece, but the angle of approach. A slight twist or a different entry sequence works wonders. This is where the meticulous mindset pays off.
Regarding instructions: treat them as a step-by-step guide, not an infallible gospel. Brands like ROKR and UGEARS have gotten better, but illustrations can be ambiguous. Look ahead two or three steps to understand the purpose of the part you’re attaching. Context is everything. If something looks odd, it probably is. And for the love of all things mechanical, don’t punch out all the pieces at once. Remove them from their sheets as the manual dictates. It keeps parts organized and prevents the horror of nearly identical, loose gears rolling into a confusing pile.
Your most important tool isn’t in the box. It’s your ability to walk away. Hit a wall? Feeling frustrated with a complex linkage? Set it down. Make a cup of tea. The solution often presents itself when you’re not staring directly at the problem. This isn’t quitting; it’s strategic recalibration. I’ve solved more brain teasers at the kitchen sink than at my workbench. Sometimes, stepping back is the ultimate puzzle solution.
Finally, remember what you’re building towards. That satisfying click of the final gear meshing, the first successful marble run. Each minor frustration is just a plot point in the story of your finished mechanical model. Embrace the fiddly bits. They’re what make the eureka moment so profoundly rewarding. Now go on. Your bench is waiting.
From Box to Trophy: Finishing, Sealing, and Displaying Your Masterpiece
So you’ve conquered the fiddly bits, heard that final satisfying click, and your mechanical model sits complete on your bench. Now what? For many, this is where the guide ends. But a true hobby isn’t just about the build—it’s about preserving the accomplishment. You didn’t just assemble a kit; you engineered a collectible. Let’s turn it from a project into a trophy.
First, address the elephant in the room: durability. Can you play with it? For most mechanical models, the answer is a qualified ‘sort of.’ That intricate gear train you built from birch plywood is designed for demonstration, not daily driving. Cranking it gently is part of the joy. Letting a child treat it like a Tonka truck is a recipe for heartbreak. Display-focused 3D jigsaw architecture models are even more delicate. Understand its purpose. This isn’t a failure; it’s the nature of precision. The broader category of puzzles has always been about mental engagement first, ruggedness second.
To give your masterpiece a fighting chance against dust, humidity, and curious fingers, a simple finish works wonders. This is where your DIY kit truly becomes your own. Start with a light sanding. Use fine-grit paper (220+) to gently knock down any laser char or minor splinters on the edges. Don’t overdo it—you’re not reshaping the piece, just polishing the high precision cuts.
Next, seal it. Humidity is the silent enemy, causing wood to swell and warp over time. A clear, matte spray varnish (light coat, from a distance) or a rub-down with pure beeswax will protect the material without altering its natural look. It locks in your effort and makes dusting a breeze. This step is especially crucial for intricate gear mechanisms you don’t want to seize up.
Finally, display with intention. This thing tells a story of patience and focus—don’t hide it on a cluttered bookshelf.
* Give it a Stage: A simple LED puck light inside an architectural model or a lantern creates dramatic shadows and highlights the craftsmanship.
* Create a Vignette: Group a few related models together—a model car, a cityscape building, a music box—to create a dedicated hobby corner.
* Functional Art: Models with moving parts deserve to be interacted with. Place them where guests can gently engage the mechanism. It’s a conversation starter that begins with, “Wait, you built this?”
 11")
A piece like the lantern above is a perfect example of a build destined for display—a functional nightlight that showcases the complex latticework you assembled. It’s a permanent monument to your focus.
From box to trophy. The final step isn’t in the assembly guide; it’s on your shelf. A little finishing and thoughtful placement transforms your puzzle from a transient activity into a lasting piece of personal engineering. It’s the period at the end of the sentence. The proof that your patience paid off in a tangible, enduring form. Now, go find the perfect spot for it. You’ve earned it.
The Final Connection: Smart Buying, Trusted Sources, and Red Flags
So your masterpiece has its spot on the shelf. Now, perhaps you’re eyeing that empty space next to it, ready to find your next project. This is where the hunt begins—and where a bit of strategy separates a satisfying purchase from a splintered mess of frustration.
First, source matters. The digital flea market of large, generic platforms is a minefield for these DIY kits. You can find deals, yes. But you’ll also find countless knock-offs with blurry, stolen product photos and descriptions that simply copy-paste “challenging and educational.” Your goal isn’t just a box of pieces; it’s a predictable, quality experience. For that, go to the specialists.
Prioritize dedicated hobbyist retailers or, better yet, buy direct from the brand’s own website. Sites that cater to model builders or mechanical models consistently stock authentic ROKR, UGEARS, and WoodTrick kits. They vet their suppliers. They also tend to have detailed product specs and real customer build photos in the reviews, which are gold. For that brain teaser or intricate music box, this is your safest path.
Red Flags in a Product Listing: A Short Checklist
* Vague Material Specs: If it doesn’t explicitly state “birch plywood,” be wary. “High-quality wood” is a meaningless phrase.
* Stock Photos Only: A legitimate kit will have photos of the actual laser-cut sheets, the completed model from multiple angles, and often a screenshot of the assembly guide.
* The Glue Question: If a listing heavily promotes “no glue required,” that’s standard. If it’s silent on the matter, assume you’ll need some—which isn’t a deal-breaker, but it’s a clue about design philosophy.
* Too-Good-To-Be-True Pricing: A 500-piece, complex mechanical kit for $19.99 is not a bargain. It’s a warning about material thickness, laser precision, and instruction quality.
For the gift-giver, this advice is doubly important. The last thing you want is to give a puzzle gift for husband that leads to hours of confusion. A kit from a reputable source is a gift of a guaranteed experience, not a potential chore. (For a deeper dive on gifting, our look at the brain-boosting treasure box is worth a read).
Your informed purchase is the final, satisfying click in this whole process. You’ve moved from curiosity to clarity. Now, take that confidence, find a trusted source, and pick the puzzle that calls to your hands. Remember, at its core, this is a journey into mechanical puzzles—a centuries-old tradition of marrying mind and material. Your next collectible awaits.