From Frustration to First Clue: Identifying Your Wooden Cube Puzzle
You’re staring at the scattered pieces on the coffee table for the third night in a row. The smooth wooden blocks feel good in your hand, but they refuse to fit back into that satisfying solid cube. Don’t worry—it’s not magic, it’s mechanics. And the first mechanic’s rule is: know your material. Before we apply any force or logic, we need to identify which of the three major families your wooden cube puzzle belongs to. This is your first clue.
Think of it like identifying wood in my old shop class. Is it the open grain direction of oak or the tight, smooth feel of maple? Each brain teaser has its own fingerprint. Let’s run a quick diagnostic. Look at the pieces in front of you and ask these three questions.
The 30-Second Visual Guide
Does it have an elastic cord running through many small, individual cubes?
- If YES: You have a Snake Cube Puzzle. This classic consists of 27 cubes (forming a 3x3x3 larger cube) connected by an elastic string running through their centers. Your goal isn’t to assemble separate pieces, but to “fold” the snake into its cubic shape. It’s all about rotation and finding the correct path.
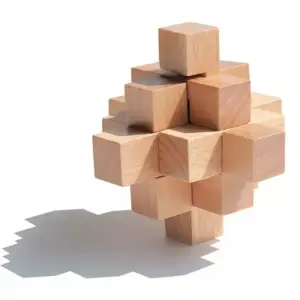
Are the pieces notched, with rectangular cuts that look like they should slot together, and do you likely have 6 or 12 pieces?
- If YES: You have an Interlocking Burr Puzzle. These are precision-cut wooden pieces (often from beech or walnut) with 90-degree notches. The challenge is a 3D locking mechanism where pieces slide together from multiple directions, creating a stable cube that seems to defy logic. The classic 6 piece puzzle version is a perfect starting point.
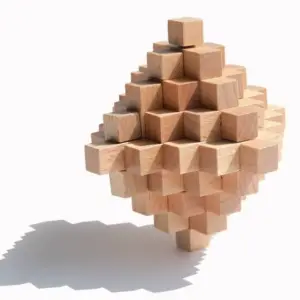
Do you have 7 unique, chunky pieces, each made of 3 or 4 small cubes glued together in different shapes (like an L, a T, or a zigzag)?
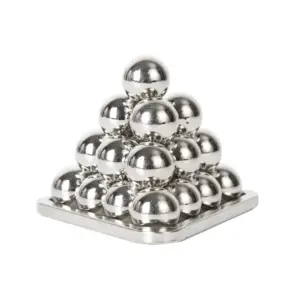
- If YES: Congratulations, you’re holding a Soma Cube or a similar style puzzle. Invented by Piet Hein, this is a 3×3 cube challenge where you build the cube from seven specific polycubes. It’s a beautiful exercise in spatial reasoning, where the shape of the negative space is as important as the pieces themselves.
Still holding a piece, looking unsure? Let’s get more descriptive.
If it’s a Snake Cube: The elastic string gives it flexibility. You’ll feel a slight “give” when you twist segments. The cubes are typically uniform and small. If you try to solve it like a jigsaw, you’ll hit a wall. It’s a pathfinding exercise.
If it’s an Interlocking Burr Puzzle: The wood is usually thicker, and the craftsmanship is in the notched pieces. Run your finger over a notch; it should be clean and square. You might have a simpler 6 piece puzzle or a more complex 12-piece variant. The key is that the pieces don’t just stack; they weave.
If it’s a Soma/Style Cube: The pieces are substantial. You might have a long 3-long piece that’s just three cubes in a row, and more complex shapes that look like corners or benches. They feel like architectural blocks. Your job is to become a builder, constructing the cube’s perimeter and filling its interior.
Identifying your puzzle type is the moment frustration turns to focus. You’re no longer facing a vague, impossible block of wood. You’re facing a specific mechanical puzzle with a known set of rules. You’ve just completed the most important step most guides skip.
Now, with your puzzle identified, we can move from “What is this?” to the universal mindset that will help you solve it. Let’s talk about the two rules that apply to any wooden cube puzzle in your hands.
The Woodshop Mantras: Two Unbreakable Rules for Any Cube
Now that you know what you’re building with, we shift from identification to mindset. Forget random trial-and-error. In my shop class, we called this next phase trial assembly—a logical sequence guided by two unbreakable rules. These are the principles that answer that burning question: How can I solve it without looking up the exact solution?
Rule 1: Never Force It. Your Fingertips Are Your Best Tool.
If a piece won’t slide or a cube won’t rotate, stop. These puzzles are precision-cut from woods like beech or walnut. The grain direction and the clean, 90-degree angles of the notches are designed for a specific path. Forcing can stress the elastic in a snake cube puzzle or, in a delicate burr puzzle, create tiny burrs that ruin the perfect rotation lock. Good tactile feedback feels like a smooth slide or a satisfying ‘click,’ not resistance. If it’s stuck, you’ve likely missed a needed rotation or are trying the wrong sequence. Back up one step and reconsider.

54‑T Cube Puzzle — $18.99
Rule 2: Think About the Air. The Negative Space is Your Blueprint.
This is the master key. Don’t just stare at the pieces. Look at the gaps between them—the negative space. In a soma cube, the hollows inside your growing structure dictate which polycube fits next. For a snake cube puzzle, you’re folding the chain to fill a 3x3x3 grid of empty cubes. And for an interlocking burr puzzle, the complex void at the center is what the notches are designed to create and occupy. Your job isn’t just to put pieces together; it’s to assemble the air. Ask yourself: “What shape of emptiness am I currently building, and which piece is shaped to fill it?”
Master these two rules, and you’ve already done the hardest work. You’re no longer just pushing wood; you’re reasoning with space and material. This mindset is what lets you assemble any variant you find, from a classic 6-piece burr to a complex 54-piece beast. For a deeper dive into this tactile philosophy, our article on the physics of the click when solving wooden puzzles explores it further. Now, let’s apply these mantras to your specific puzzle.
Solving the Interlocking Burr: Building the ‘Starting Cage’
Let’s apply that thinking about negative space directly to the most structurally fascinating of the bunch: the interlocking burr puzzle. If you’ve identified yours as a collection of notched sticks, you’re holding a tiny wooden building. And just like any good structure, you don’t start with the roof—you build a solid frame first. That’s where most folks get lost; they try to assemble it like a jigsaw puzzle, face-on. The secret is remembering our second rule: pieces slide in from multiple directions. Your goal isn’t just to stack, it’s to create a stable, three-dimensional cage that the remaining pieces will lock into from the sides and top.
Think of the classic 6-piece burr. It’s not one cube, but six identical-looking (but critically different) notched pieces that create a symmetrical, star-like void in the center. Every notch is a precise 90-degree cut, and when they align, they create channels for other pieces to slide through. Your first ‘aha’ moment comes when you stop trying to force pieces together and start looking for three pieces that can form a mutually supportive corner—what I call the ‘Starting Cage’. This is the foundational technique most guides skip, but it’s the difference between frustration and flow.

Here’s your step-by-step visual logic for building the Starting Cage:
- Lay out your pieces. For a standard 6-piece wooden cube puzzle, you’ll likely have pieces with notches at the ends, in the middle, or combinations thereof. Sort them by their notch pattern. Identify the key piece—often the one with a central notch that will become the heart of the assembly.
- Form the first ‘L’. Pick up two pieces. Orient them so their notches face each other and interlock at a right angle, like two sides of a picture frame. Slide one into the other until they seat firmly. This is your first joint. Feel that satisfying tactile feedback? That’s the rotation lock beginning to form.
- Add the third to complete the cage. Take a third piece. This one will slide into the notches of the first two, but from the perpendicular direction. You are now building in 3D. You should end up with a stable, three-legged corner that stands on its own. This is your Starting Cage. It’s not the first layer; it’s the anchor. (This is also the answer to “My puzzle looks like three interlaced pieces—how does that work?” You’ve just built it!).
- Slide in the fourth and fifth pieces. These will typically enter from the open sides of your cage. Look at the negative space your cage creates. Which notch pattern fits into that specific gap? Gently slide the next piece in, often from the top or the open face. It will click into place, locking the first three pieces more tightly. Repeat for the next piece. Your structure will now feel surprisingly solid.
- The final piece is the keystone. This is the most common sticking point. If the last piece won’t fit, don’t force it. The issue is almost always the orientation of one of the pieces already in place. The fix is to backtrack just one step. Slightly loosen or remove the fifth piece, rotate it 90 or 180 degrees, and reinsert it. You’ve changed the shape of the final negative space. Now, that last piece should slide home with a definitive, perfect click.
This logical sequence of building a cage, then filling it, is the core of how a burr puzzle works. It’s a mechanical puzzle of the highest order, where precision-cut notches create a hidden internal lattice—a principle perfected by designers like Jürg von Känel. For a deeper exploration of this specific puzzle’s history and variations, our burr puzzle complete guide is a great resource.
Common Sticking Points & Fixes:
* A notch is catching: Check the grain direction. Pieces should slide smoothly along the grain. If it’s catching, you’re likely trying to slide against the grain or have a piece upside down.
* The last piece won’t fit: As above, this is an orientation issue in the previous pieces. Backtrack one step and try a different rotation. This solves 95% of “last piece” problems.
* The cage feels wobbly: Your initial three-piece interlock isn’t fully seated. Disassemble and ensure each piece slides all the way into its mate’s notch. A wobbly start makes a wobbly finish.
Mastering the Starting Cage method transforms this brain teaser from a baffling bundle of sticks into a comprehensible architectural project. You’re not just memorizing steps; you’re learning to see the structure. And when that final keystone slides into the 6 piece puzzle, you’ll understand the quiet genius of this ancient wooden cube puzzle design. If you hit a true wall, sometimes a full trial assembly reset is needed—take it apart, lay the pieces out neatly, and begin the sequence again with fresh eyes. For a focused walkthrough on that reset mindset, see six piece wooden cube puzzle solution.
Solving the Snake Cube: Focus on the Holes, Not the Snake
So, your fingers just finished the satisfying slide-and-lock of a burr puzzle, or perhaps you skipped ahead because the knotted mess in your hand is clearly something else entirely. Good. You’ve identified your beast. Now, if what you’re holding is a long, wiggly chain of 27 little wooden blocks strung on an elastic string, you’ve entered a different kind of workshop. This is the realm of the Snake Cube. And the biggest mistake people make? Staring at the snake. The secret is to look at the holes it needs to fill.
Think of it like this: you’re not folding a snake into a cube. You are constructing a hollow, 3x3x3 grid in the air, and your job is to thread this single, continuous piece through every single one of its 26 internal connections in one unbroken path. The cube already exists in potential; your cord of blocks is the raw lumber you’re using to frame it out. This shift in perspective—from “fold the snake” to “fill the grid”—is your most powerful tool.
The Core Principle: The Invisible Cage
A classic Snake Cube puzzle has 27 cubes. When solved, it forms a perfect 3×3 cube. Your mind’s first job is to ignore the temptation to randomly twist and instead visualize that empty framework. Imagine a graph paper box, three units high, wide, and deep. The center of each face is a cube, each edge is a line of cubes, and each corner is… well, a corner.
Your elastic string allows rotation between each block, but only at 90-degree angles. This isn’t a floppy rope; it’s a series of precise, potential right-angle turns. The puzzle is a logic path, not a wrestling match.
Step-by-Step: Building the Perimeter First
Most failed attempts happen because people try to solve from one end inward, which quickly boxes you into a corner (literally). The professional’s method is to build the outer shell—the perimeter of the cube—first. This creates a stable scaffold to fill in the middle.
Step 1: Find Your Starting Straight.
Lay the snake out completely straight. Look for the longest uninterrupted straight run of cubes. You’ll often find a segment of 4 or 5 in a row. This will form one crucial edge of your final cube. Mentally designate this as your “base.”
Step 2: Form the First “U” (Two Adjacent Edges).
Now, make the first 90-degree fold at the end of that straight segment. Your goal is to create two sides of the cube that meet at a corner—an “L” shape, but we’re going for three sides, a “U”. Continue folding the next segment so it runs perpendicular to the first, then fold again so the third segment runs parallel to the first. You should now have a three-sided channel. This is the beginning of your outer frame.
Step 3: Complete the Loop.
This is the critical logical sequence. Continue making folds, always aiming to use the next segment of blocks to trace another outer edge of your imagined 3×3 grid. Your focus should be: “Does this block sit on an outer face or an inner one?” The first 12-15 blocks should almost exclusively be dedicated to outlining the cube’s skeleton. If you find yourself pointing a segment into the center of the imaginary box too early, you’ve likely taken a wrong turn. Back up.
Step 4: Fill the Interior Grid.
Once your outer shell is mostly formed, you’ll have a U-shaped or C-shaped cage of blocks with a “tunnel” in the middle. Now, your remaining snake segments are for filling this center. You’ll rotate them to weave in and out of the structure you’ve built, filling the center layer and finally the core. This is where you must focus on the holes. Look at the empty 2x2x2 space inside your frame. Which direction does the next segment need to go to pass through it? The path is now constrained and logical.
Step 5: The Final Twists.
The last 3-4 blocks are notoriously tricky. The elastic string is under tension, and space is tight. Here, tactile feedback is key. Gently push and guide the final pieces. Often, the last block requires a slight compression of the whole structure to slip into its home. Don’t force it; instead, slightly relax the pressure on the cube and let it find its rotation lock. That final, solid click is your reward.
Common Sticking Points & Fixes
- “I’m stuck with blocks left over!”: This means you mis-assigned an outer edge block to the interior early on. You’ve made the interior “tunnel” too long. Disassemble back to where you last had a clean three-sided frame and take the other turn at the junction.
- “The ends won’t meet!”: The beauty of a single string is that the ends must meet if the path is correct. If they don’t, your overall path is winding outside the 3×3 grid boundaries. Straighten it out and mentally count sides and blocks: each face of the cube should have a 3×3 grid of block ends. No face should have a protrusion.
- “It’s just trial and error!”: It feels that way only if you’re not visualizing the grid. Stop moving your hands and move your mind first. Trace your current assembly. Ask: “Is this block currently forming part of the outer layer (face), the middle layer (edge), or the core?” Correct its placement accordingly.
This method removes the “magic” and replaces it with spatial reasoning. You’re a carpenter framing a tiny house. For a deeper dive into why our instinct to just “remember the folds” often fails, take a look at The Snake Cube Solve: Why Your Visual Memory Is Lying To You. And if you want the full veteran’s playbook, from untangling to that final satisfying snugness, solve the snake cube puzzle walks you through every nuance. Remember, the snake isn’t the puzzle. The empty space is. Fill the space, and the cube appears.
Solving the Soma Cube: The One Rule for 7 Peculiar Pieces
So you’ve mastered the snake’s winding path. Now, let’s talk about a different kind of beast—one that’s all about distinct characters working as a team. Where the snake is a single entity you fold, the Soma Cube is a committee of seven unique wooden shapes, each with its own personality, asking to be assembled into a perfect 3×3 cube. The good news? If you can identify a single, critical rule about how these pieces relate to the cube’s structure, 80% of your frustration will vanish.
First, lay out your seven pieces. Don’t think of them as a jumble; think of them as your woodshop toolbox. You have all possible non-linear shapes you can make from gluing three or four little cubes together. You’ll see one shape that looks like a chair, another like a bent screwdriver, a simple L, a zigzag, and so on. The challenge feels immense because the combinations seem endless. But here’s the woodshop teacher’s secret: The puzzle isn’t about forcing pieces in; it’s about giving the most awkward pieces their proper home first.
Here is a beautifully crafted version where color-coding each piece can help you visualize their unique roles in the assembly.

Now, for that one rule I promised. Find the classic 3-cube L-shaped piece. This is your key piece. Here’s the rule: In the final 3×3 cube, this L must always occupy a corner, wrapping along two of the cube’s edges. It cannot be tucked entirely inside the cube or laid flat against just one face. Its job is to define that 90-degree junction. This isn’t a trick; it’s geometry. The cube has only eight corners, and this L-shaped piece is literally built to fill one of them. If you try to place it elsewhere, you’ll always run out of space for the other six shapes.
Let’s build using logic, not luck.
Step 1: Start with the L. Place it into a corner of your imagined 3×3 grid. Let it sit so its short arm runs along one bottom edge and its long arm runs up the adjacent side. You’ve now claimed a corner.
Step 2: Add the largest, most obstructive piece next. Look for the piece that looks like a little staircase or a “zigzag” made of four cubes. This is your bulkiest, most inflexible member. It often fits snuggly around or opposite your corner L, helping to form the first solid layer. Trial assembly is your friend here—try this piece in a few orientations that hug the L or fill the opposite corner.
Step 3: Build the first complete layer. Your goal is to complete a solid 3×3 layer (often the bottom). Use the smaller, more maneuverable pieces—the T, the little bent “screwdriver,” the chair—to fill in the gaps around your foundational L and zigzag. This is where your spatial reasoning gets a workout. Ask yourself: “Does this shape fill the negative space I have left, or is it creating a new hole I can’t fill later?”
Step 4: The second layer is a filter. The remaining pieces must now fill the middle and top. A common sticking point is the last piece not fitting. If that happens, the issue is almost always one layer below. Don’t force it. Gently disassemble just the top two layers and look at the arrangement of your bottom layer. Is it truly flat and solid 3×3? Often, a piece is slightly proud or sunken, blocking the final rotation lock.
To answer your questions: Yes, there are multiple solutions—240 distinct ways to assemble a Soma Cube, in fact. But they all follow the same principles, starting with the L in a corner. And can a 10-year-old solve this? Absolutely. It’s a fantastic exercise in shape recognition and patience. The “aha!” moment when they discover the corner rule for the L-piece is a real confidence builder. It’s not about raw brainpower; it’s about learning to see the logical sequence.
When you finally guide that last piece into place and feel that solid tactile feedback of a perfect cube in your palm, you’ve done more than solve a puzzle. You’ve conducted a meeting of seven unique shapes and given each one a proper job site. That satisfying ‘click’ is the sound of a committee in perfect agreement.
The Satisfying Click: Why Solving Feels So Good to Your Hands and Brain
That final ‘click’ of wood against wood? It’s a committee adjourning in perfect agreement. You just felt it. But why does that moment feel so profoundly good, especially after a bout of quiet frustration? It’s more than just finishing a task. It’s a deep, human satisfaction wired into our hands and our spatial reasoning.
Your brain loves a specific kind of victory. When you wrestled with the burr puzzle’s starting cage or mapped the Snake Cube’s negative space, you weren’t just moving blocks. You were building a 3D model in your mind’s eye and testing it against reality. That final, solid tactile feedback is your brain’s reward for a prediction made correct. It’s the physical proof of a mental leap.
In a world of swipes and pixels, a wooden cube puzzle is an antidote. There’s no undo button, no algorithm doing the work. The mechanical puzzle (a classic category of Puzzle) insists you be present. The grain under your thumb, the snug resistance of a notch finding its home—this is problem-solving you can feel. It engages a different, quieter part of your focus. Unlike solving a Rubik’s Cube by algorithm, here you are the architect, feeling your way through the structure itself.
This satisfaction is ancient. It’s the same quiet pride a craftsperson feels when a joint slides together without force, or when the final piece of a 3×3 cube locks the whole assembly solid. You’ve participated in a small act of creation and order. You didn’t just follow steps; you understood a system. As I explored in a piece on solving the wooden cube, this is where geometry beats brute force every time.
So, when you set that completed cube on the shelf, you’re not just displaying a solved brain teaser. You’re displaying a little monument to your own patience and perception. It’s a reminder that sometimes, the best way to solve a complex problem is to pick it up, turn it over in your hands, and listen to what the wood is trying to tell you. Ready to try another? That shelf of mine didn’t fill itself.
When the Pieces Still Rebel: A Woodworker’s Troubleshooting Guide
So, you’ve felt that satisfying click of success, or maybe you’re still staring at a few stubborn blocks that refuse to cooperate. This is the moment where many wooden cube puzzle attempts are abandoned on the shelf. But in my shop, this is where the real learning begins. Every failed fit is the wood giving you feedback. Let’s decode it.
First, the most powerful tool in your toolbox: the mental reset. If you’ve been trying for too long, your spatial reasoning gets fatigued. You start forcing pieces, convinced you’re one rotation away. Stop. Put the brain teaser down. Get a glass of water. When you return, disassemble everything. I mean it—take the whole thing apart. A clean slate is better than a frustrated memory. This is the single best way to find those wooden cube puzzle instructions lost in your head.
Now, with pieces laid out, troubleshoot the common gremlins.
Problem: The piece almost fits, but won’t seat fully.
This is almost always a subtle issue of orientation. For a burr puzzle, check the grain direction on every notch. A piece might be mirrored. For a Soma Cube, remember the one rule: no piece orientation is invalid. Try rotating that troublesome piece through every axis—you might be surprised. I’ve written more on this precise sticking point in my guide, why your wooden puzzle solutions aren’t working.
Problem: The puzzle is jammed or stuck mid-disassembly.
Don’t force it. Apply gentle, reversing pressure. Think about the path the piece entered on and try to backtrack its exact logical sequence. With interlocking burr puzzles, pressure often needs to be relieved from multiple sides at once. Wiggle, don’t yank.
Problem: You’re sure you followed the steps, but the final cube is lopsided.
Go back to the core principle for your puzzle type. For a Snake Cube: did you truly build the 3×3 cube perimeter first, focusing on the negative space? Count sides and blocks. A classic 27 cubes Snake must form a perfect hollow frame before the interior fills. For a Soma Cube, ensure your base layer is perfectly flat and three blocks wide.

Snake Mouth Escape Puzzle — $13.99
“Can a 10-year-old solve this?” Absolutely. The barrier isn’t age, it’s approach. Guide them toward observation and the tactile feedback of the wood, not just random trial and error. The process builds incredible patience.
If you’ve reset, checked orientations, and are still stuck, it’s time to seek a fresh pair of eyes—digitally. Online puzzle communities are fantastic. When asking for help, take a clear, well-lit photo from multiple angles. For a 6 piece puzzle like a classic burr, specify if it’s notched or smooth. Often, someone can spot the one piece that’s 180 degrees out of place. For diagram-based help, search using your puzzle’s specific name (e.g., “Pagoda Burr CAD drawings” or “snake cube puzzle solution 27”). Sometimes looking at a technical drawing or a modeling prototype image can reveal the assembly order.
Remember, there’s no failure here, only feedback. Each mis-fit teaches you more about the puzzle’s internal logic than an easy solve ever could. As I note in why most wooden puzzle attempts fail, the win isn’t just the solved cube—it’s the understanding you carve out for yourself. Now, take a breath, pick up those pieces, and let’s try one more trial assembly. You’ve got this.
Reader Situation and Fast Answer
So, you took a breath. You’ve read through the tailored guides for your specific wooden cube puzzle, absorbed the troubleshooting tips, and maybe even peeked at a community diagram or two. You’re no longer just staring at scattered pieces—you’re looking at a system. You understand the negative space in a Snake Cube, the key piece in a burr, and the mandatory orientations in a Soma Cube. That feeling you have now? That’s the shift from frustration to a methodical, confident focus. You’re not trying to force magic; you’re ready to apply mechanics.
Let’s crystallize that into one final, fast-action roadmap. Your situation is common: you have a disassembled brain teaser on the table and the goal is a perfect 3x3x3 cube. The fastest answer isn’t a secret move—it’s your new mindset.
- Identify. Don’t Assume. Use the flowchart from the start. Snake, Burr, or Soma? Knowing the family your puzzle belongs to instantly gives you the core principle to apply. This is the first step to any effective wooden puzzle cube solution.
- Apply the Universal Mindset. Remember the two rules: respect the wood’s grain direction (pieces usually align with it), and always look for the first stable connection, not the final shape. Build a foundation.
- Execute Your Type’s Strategy. For a Snake Cube puzzle, fill the perimeter of the cube first. For a classic six-piece burr puzzle, build the starting cage. For the Soma Cube, place the L-shaped piece correctly first. Follow the step-by-step solution logic, not just the motions.
- Listen for the Click. When a piece seats perfectly, pause. That tactile feedback is your confirmation. If it grinds or forces, that’s your signal to backtrack one step and check a rotation.
You’ve moved from asking “How do I solve this?” to understanding how it solves. The triumph isn’t just in the final, satisfying ‘click’ of the last piece—it’s in knowing you could guide someone else to do it. You’ve engaged in pure spatial reasoning, a core skill for all Mechanical puzzles, and that confidence stays with you long after the cube is back together on the shelf.
Your next step is specific: Go pick up those pieces right now. Don’t wait. Apply the principle for your puzzle type, move slowly, and feel the logic unfold in your hands. You’ve got this.