Stop Twisting Blindly: First, Identify Your Wooden Cube Puzzle
You’re holding a tangled snake of wooden blocks that supposedly forms a perfect cube. You’ve twisted it every which way, and it’s still a mess. Don’t worry — the solution isn’t about strength, but about finding a pattern. Let’s start by identifying exactly which puzzle you have.
Why does this matter? Giving you a single set of step-by-step snake cube solution instructions is useless if you own a different type of wooden cube puzzle. The strategy for an interlocking burr is completely different from a folding snake. Take 60 seconds to run through this visual checklist. It will save you an hour of confusion.
Look at the pieces in your hands. Which of these three most common puzzles do you have?
1. The Snake Cube (The Most Likely Culprit)
* What it looks like: A long, flexible chain of 27 small wooden cubes connected end-to-end. It’s currently a wiggly line or a tangled knot.
* Key Feature: An elastic string runs through the center of all the cubes, allowing them to swivel 90 degrees where they meet. You can fold the chain.
* Count the Cubes: The classic Snake Cube has 27 cubes—exactly the number needed to build a 3x3x3 larger cube. If you have 64 cubes, you’re aiming for a 4x4x4, but the 3 by 3 by 3 cube is the standard.
* Goal: Fold the chain into a solid cube where every face is 3 cubes wide.
* If it’s a mess: To reset it to a straight line, find one end and gently work backwards, straightening each joint. Don’t force it; the elastic can wear out.
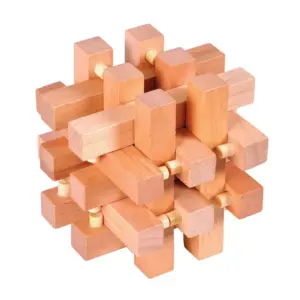
2. The Burr Puzzle (The Interlocking One)
* What it looks like: A set of 6, 9, or 12 notched wooden sticks or chunky pieces. They are completely separate or may be partially assembled into a cross-like shape.
* Key Feature: No string. Pieces lock together via notches and grooves. The most famous is the 6 piece wooden cross puzzle.
* Goal: Assemble the pieces into a solid, often symmetrical, cube or ball where they all interlock tightly.
* If it’s apart: You have individual pieces. A wooden burr cube puzzle solution involves understanding how the notches align, not folding a chain.
3. The Soma Cube (The 7-Piece Set)
* What it looks like: Seven unique pieces, each made of 3 or 4 small cubes glued together into L-shapes, a T-shape, and other forms. They are loose.
* Key Feature: All pieces are rigid; they don’t bend or fold. You have exactly 27 small cube units total.
* Goal: Assemble these seven specific shapes into a 3x3x3 cube. This tests a different kind of spatial reasoning.
Still unsure? Ask yourself: “Are my pieces connected by a string?” If YES, you have a Snake Cube Puzzle. Proceed with this guide. For a dedicated walkthrough, see our comprehensive guide on how to solve the snake cube puzzle. If NO, you likely have a burr or soma cube. Jump to the “Beyond the Snake” section later in this guide for starting points.
This article will primarily guide you through solving the common 27-piece wooden snake cube. The principles you learn about segment lengths and corner formation are the master key. Think of it like learning musical scales before a song—it’s the foundational logic that makes the wooden puzzle cube solution for a 3x3x3 grid finally click.
First, let’s get your snake back to square one—literally. If it’s a knotted mess, here’s how to reset it:
1. Find one end cube. This is your anchor.
2. Gently pull and straighten the chain from that end, working cube by cube.
3. Ensure each pair of cubes is aligned in a perfect straight line. You should end up with a long, rigid rod of 27 cubes.
Now, with a straight snake, you’re ready to learn the language of the puzzle. The next section breaks down the core concepts of segments and the grid—the “why” that most guides skip. This understanding turns a memorized trick into a transferable skill.
The Hidden Logic: Why Segments & Corners Are Your Secret Weapons
Now that your snake is a straight chain, you might be tempted to start folding randomly. Resist that urge. Just as you wouldn’t stuff a suitcase without a plan, solving this wooden cube puzzle requires a mental map. The key is to stop seeing 27 individual cubes and start seeing the segments.
A segment is a group of cubes connected in a rigid, straight line. They are the puzzle’s building blocks. Your first task is to run your fingers along the chain and count blocks. Here’s how:
* Start at one end. Hold the first cube.
* Feel for the fold. Gently bend the chain at the junction between cubes. If it bends, you’ve found the end of a segment.
* Count the cubes in that straight section. Most classic 27-cube snakes have segments of 2 or 3 cubes.
Why does this matter? Because the solution isn’t a random dance of 27 moves; it’s a precise folding of these longer segments into a 3x3x3 grid. You’re not filling a solid block—you’re constructing a hollow, three-dimensional frame. The eight corners of that final cube must be occupied by the ends of your segments. Forming these corners first is your primary goal; it creates the stable skeleton the rest of the puzzle wraps around.
Think of it like expertly folding a fitted sheet. You find the corners first and work from there. If you try to fold the middle first, you get a tangled mess. The same is true here. If you end up with extra blocks sticking out, it’s almost always because a corner of your 3x3x3 grid is in the wrong place, occupied by the middle of a segment instead of an end.

7 Color Soma Cube Puzzle — $21.88
This principle of corner-first construction is the master key to interlocking cube puzzle solutions, whether your pieces are connected by an elastic string or not. For a deeper exploration of this mindset, our article on solving the wooden cube with geometry breaks it down further. For example, a Burr puzzle or a Soma cube also relies on creating a stable internal frame—the “core”—from specific pieces before the outer layers lock into place. Understanding this transforms the task from trial-and-error to targeted spatial reasoning.
Here’s the insight most guides omit: the middle segments of your snake are not filler; they form the cube’s core. After you establish the eight corners, the longer internal segments weave through the center of the 3 by 3 by 3 cube, interlocking everything. This is why simply following a memorized “fold left, then right” sequence often fails—if you don’t understand you’re building a frame, your core segments have nowhere to go, and the puzzle pops apart.
To build this mental model, picture the final cube. Trace your finger along one edge. It holds three cubes. Your segments must bend at precise 90-degree fold points to lay along these edges. Every time you make a fold, ask: “Am I placing this segment end into a corner of my imaginary grid, or am I laying it along an edge?” This focus is what will help you develop solving skills that work for any wooden snake cube.
Now, let’s apply this logic with a universal pre-solve checklist.
Your Pre-Solve Checklist: The 3 Things to Do Before Making a Single Fold
Now that you’re picturing the 3x3x3 grid and the role of corners and core, don’t start folding just yet. Think of this like packing a suitcase: if you just throw things in randomly, it won’t close. But if you lay everything out first, you can see what fits where. This checklist is that “lay everything out” moment for your wooden cube puzzle. It addresses the most common starting question: “Which end do I begin with?” and sets you up to see the logic unfold.
Follow these three steps before attempting any solution sequence. This will give you control and turn a tangle of cubes into a manageable project. For a different perspective on preparation, you might enjoy our broader guide, Beyond The Frustration: A Real World Wooden Block Puzzle Cube Solution Guide.
1. Find Your Starting Point: Orient the Puzzle
Don’t pick up the Snake Cube Puzzle and start twisting from a random cube. First, examine both ends. One cube will often have a more prominent or visible hole where the elastic string enters. This is your ideal starting cube. If you can’t find a hole, look for any unique mark, a slightly different wood grain, or a cube with slightly rounded edges. Designate this as your “End A.” Starting from a consistent point is crucial because all folding instructions—including the step-by-step solution in the next section—are built from a fixed beginning. This simple act eliminates half the confusion right away.
2. Understand Your Material: Straighten the Chain
Gently pull the entire chain of cubes taut until it’s in a long, straight line. Don’t yank it—just apply light, even pressure to remove any slack from the internal elastic. This does two critical things. First, it proves your puzzle is complete and functional; you can verify it has exactly 27 cubes. Second, and more importantly, it lets you feel the “joints”—the points between cubes where a 90-degree fold is possible. As you hold it straight, run your other hand along the chain to feel these natural hinges. This tactile understanding is what will help anyone, including someone looking for a wooden puzzle for a 6 year old or older child, develop solving skills based on feel, not just sight.
3. Map the Pattern: Note the Segment Lengths
This is the secret key that most guides skip. While the chain is straight, don’t just see a line of cubes—see groups. A “segment” is a run of 2 or 3 cubes connected in a straight line. Your mission is to silently count sides and note the pattern from your starting end. For the most common 27-piece puzzle, a classic pattern might be: 3, 2, 2, 3, 2, 2, 3, 2, 2, 3, 2, 2, 3.
Say the pattern out loud or write it down. Why? Because this pattern directly dictates where your corners will be. A segment of 3 cubes, when folded, wants to occupy one edge of the big cube plus start wrapping around a corner. A segment of 2 cubes often helps fill in an edge or complete a face. By knowing this pattern, you’re no longer following rote folds—you’re predicting where the chain wants to go next to fit into your mental 3 by 3 by 3 cube. This transforms the difficulty from frustrating to a satisfying spatial exercise.
Is this too hard for a 10-year-old? Not at all. A child might need help with steps 1 and 3, but the tactile nature of step 2 is perfect for them. The core challenge is spatial reasoning, which is a fantastic skill to develop at any age. With a patient guide (you, after mastering this checklist!), it becomes a rewarding collaborative puzzle.
Step-by-Step: Solving the Classic 27-Piece Snake Cube (With Visual Logic)
Armed with your pattern and a clear mental image of the 3x3x3 grid, you’re ready to move from theory to action. This is where we stop thinking about a tangled snake and start building a cube, one deliberate 90-degree fold at a time. Remember the elastic string running through the 27 cubes? It’s your friend, allowing the chain of cubes to bend—but only at the gaps between each small cube. Our goal is to methodically form the eight corners of the larger cube. Let’s begin.
Before We Start: A Quick Note on Solutions
You asked: Is there only one solution? For the classic Snake Cube Puzzle, there are actually multiple ways to fold it into a cube. However, they all follow the same core logic of corner placement. The sequence I’ll show you is the most intuitive and reliable, building the cube from the bottom up like you’re constructing a building. How long should it take? For a first-timer following this guide, 10-20 minutes is common. If it takes longer, that’s perfectly fine—you’re building new spatial reasoning pathways. For a focused, sequential breakdown, you can also follow this step-by-step guide to the 27-block snake cube.
Phase 1: Laying the Foundation (The First Layer)
We’ll start by creating the solid bottom face of the cube. Think of this as setting a firm plate on a table before stacking dishes.
1. Identify Your Starting Segment. Hold your straightened puzzle. Look at the pattern you noted. Find one of the segments of 3 cubes. This will be our anchor. Position it horizontally on your table.
2. Form the First Two Corners. Look at the next segment in the chain (likely a segment of 2). Fold it straight down at a 90-degree angle from the end of your 3-cube anchor. Now, look at the next segment. Fold it across, parallel to your original anchor, to start forming the bottom face’s perimeter. Your puzzle should now look like an “L” shape from above.
3. Complete the Bottom Square. Continue following your chain, making folds that keep all cubes flat on the table. Your goal is to create a 3×3 square. This is where knowing your segment pattern helps you predict the next fold. A segment of 3 will want to run along an entire side; a segment of 2 will fill in part of an edge. Keep going until you have a perfect 3 cubes by 3 cubes square lying flat. This is your triumphant first layer!
* Visual Check: Run your finger around the edge. You should feel a complete square of 9 cubes. All other cubes are dangling off one side of this square, ready to be folded upward.
Phase 2: Building the Walls (The Second Layer)
Now we build up the sides. Imagine you’re putting walls around the edges of that bottom plate.
4. Fold the Dangling Chain Upward. Find the cube in the dangling chain that is connected to the center cube of one edge of your bottom square. Fold the entire dangling chain straight up at this connection point. You are now building the vertical layer.
5. Navigate the First Vertical Corner. Look at the segment pattern in the upright chain. Your next few folds will wrap the chain around one of the bottom square’s corners to start forming the vertical edge. This is a critical moment. You are using a segment (often a 2-cube segment) to create the vertical part of a corner.
* Why this works: Each corner of the final cube is made from three cubes that meet. Right now, you’re connecting the bottom face to a vertical column.
6. Complete the Second Layer’s Perimeter. Continue folding the upright chain around the perimeter of the bottom square, keeping it exactly one cube high. You are essentially creating a “fence” that is one cube tall all the way around. When this is done, you’ll have a bottom layer of 9 cubes, and a middle layer that’s just a hollow square of 8 cubes (the center of the middle layer is empty).
Phase 3: Forming the Lid (The Final Layer and Lock)
The dangling chain is now much shorter. You’re in the home stretch, constructing the top face like fitting a lid on a box.
7. Fold Up to Start the Top. The chain will now be coming off the middle of one wall. Fold it upward again to start building the top face at the second vertical level.
8. Create the Final Corners. This is the most satisfying part. You will now guide the remaining chain across the top of the cube. With each fold, you’ll be snapping the final corners into place. Follow the natural path of the chain—it will want to fill in the remaining gaps in the 3 by 3 by 3 cube grid. The segment lengths will now perfectly align to complete the top edges.
9. The Final Lock. The last 2-3 cubes will feel like they have nowhere to go. This is normal. Gently push the final segment into the last remaining hole in the grid. You may need to slightly adjust neighboring cubes with your fingers to ease it in. The elastic string has enough give. A firm, but careful, press will seat it flush.
* Click of Satisfaction: When the last cube slides into place, you won’t hear a click, but you’ll feel it—a perfect, solid wooden cube puzzle in your hands. That’s the moment of satisfaction.
Visual Logic Recap & Common Wrong Turns
- The Core Principle: You didn’t just memorize a sequence. You built a cube by methodically filling a 3x3x3 grid, using the segment lengths to dictate where corners must form.
- Stuck with a Bump? If you have one segment stubbornly sticking out, you likely made a fold that deviated from the strict grid. The most common error is folding a segment diagonally in your mind instead of at a true 90-degree angle. Don’t force it. Backtrack by unfolding the last 2-3 moves and ensure each fold is a perfect right angle, aligning cubes squarely with your mental grid.
- Does it Look Like a Mess Halfway? That’s okay! The intermediate stages often look chaotic. Trust the process of building the layers. The middle segments are the key to forming the cube’s core—they act as the binders that hold the layers together.
You’ve now done more than solve a puzzle. You’ve learned a step by step snake cube solution based on logic, not luck. This wooden puzzle cube solution 3x3x3 is a skill you now own. You can take this cube apart and solve it again, anytime.
Stuck? Here Are the 3 Most Common Wrong Turns (And How to Fix Them)
You’ve felt the triumph of forming that perfect 3x3x3 cube. But now, as you try to solve it again without the guide, you hit a wall. Your cube looks lopsided, a segment juts out awkwardly, and frustration starts to creep back in. This is normal—it means you’re internalizing the logic, not just memorizing a sequence. Every master solver I know, from beginners to those designing their own interlocking structure puzzles, hits these same snags. Let’s diagnose the three most common incorrect configurations, sourced from real user struggles on forums and in my workshop, and learn how to systematically backtrack.
Think of these not as failures, but as the puzzle giving you feedback. Your job is to listen to it.
1. The Protruding Segment (The “Stubborn Flagpole”)
What it looks like: You have what seems like a nearly complete cube, but one 2 or 3-cube segment sticks straight out from the side or top, ruining the perfect shape. You have 26 cubes in a rough cube, and one lone ranger refusing to tuck in.
* The Cause: This is almost always a grid alignment error. You likely folded a segment between the imaginary layers of your 3x3x3 grid instead of within a layer. It’s like trying to place a book on a shelf but missing the shelf entirely—it just leans out into space. You deviated from the strict right-angle folding rule.
* The Fix:
1. Don’t force it. You cannot muscle a protruding segment into place. This will stress the elastic string.
2. Backtrack 3-4 folds. Gently reverse your last few moves.
3. Re-analyze the grid. As you re-fold, physically trace the row of cubes with your finger. Ask: “Is this segment running along the X, Y, or Z axis of my target cube?” Ensure every new segment lays flush against the growing form, filling the grid squarely.
2. The Hollow Center (The “Picture Frame”)
What it looks like: You’ve built what appears to be the outer shell of the cube, but it feels unstable and you can see or feel a gap in the middle. The structure might even collapse when you let go.
* The Cause: You built the edges and corners but neglected the core. Remember the key principle we discussed: the middle segments are the key to forming the cube’s core. You may have folded all the longer segments to the outside, leaving no “binder” pieces to occupy and stabilize the center of the 3x3x3 grid. It’s like building a box but forgetting to put anything inside to keep its walls apart.
* The Fix:
1. Completely reset to a straight chain. This is the cleanest path forward.
2. As you solve again, pay special attention to segments of length 2. In the classic 27 cubes puzzle, these shorter segments are often the ones that must fold into the center to act as structural support, locking the outer layers together. A great guide on spatial memory calls this “The Snake Cube Solve: Why Your Visual Memory Is Lying To You“—we instinctively want to wrap things around the outside, but the solution requires invading the center.
3. The Collapsed Spiral (The “Twisted Knot”)
What it looks like: The puzzle becomes a tight, knotted spiral where cubes are fighting for the same space. Rotation feels impossible, and the elastic is under visible tension.
* The Cause: You lost track of the puzzle’s topology by making two consecutive folds in the same plane. Imagine you folded a segment left, then immediately folded the next segment left again—you’ve created a U-turn that traps the following chain. You’re no longer building out into three dimensions; you’re coiling the chain back onto itself.
* The Fix:
1. Gently relieve tension. Don’t pull; carefully rotate the knotted section to find the fold that’s under the most strain.
2. Undo to the last “clean” 90-degree turn. Find the last point where the cube was correctly oriented in 3D space.
3. Apply the “Suitcase Packing” Rule. My favorite analogy: packing a suitcase. You can’t just stack everything flat. You must alternate directions to fill the volume efficiently. After any fold, your next fold should typically aim to fill an adjacent face of the growing cube, not double back on the face you just created.
Your Universal Troubleshooting Mantra
When you get stuck, stop. Breathe. Then ask these three questions in order:
1. “Is my mental 3x3x3 grid still intact?” Visualize the empty cube. Does every block in your hand occupy a unique, square space in that grid?
2. “Was my last fold a true 90-degree turn?” This is the root of 80% of errors. Check it.
3. “Can I backtrack 2 moves without force?” If not, you’ve made an error earlier. A full reset is faster and less frustrating than fighting for five minutes.
This process of diagnosing and correcting is how you develop solving skills that transfer to any wooden cube puzzle. You’re not just learning a sequence; you’re learning to see space. Now, let’s look at how these principles apply to other, more complex puzzles.
Beyond the Snake: Solving Principles for Burr & Interlocking Cube Puzzles
Now that you’ve mastered the flexible chain of a Snake Cube, you can apply that same spatial reasoning—visualizing that 3x3x3 grid—to solve puzzles that don’t have an elastic string to guide you. These interlocking cube puzzles, like the classic Burr or Soma Cube, rely on clever notches and precise alignment. The goal remains the same: build a solid cube. But instead of folding, you’re fitting together discrete pieces. These fall under the broader category of mechanical puzzles, where the challenge comes from manipulating physical objects.
Think of these as a three-dimensional jigsaw puzzle. Your job is to find the unique orientation where every notch aligns and every piece occupies its specific space in the grid.
The 6-Piece Burr Puzzle: Finding the “Key”
The classic Six-Piece Burr is a marvel of simple complexity. You have six identical-looking notched pieces, and the interlocking structure feels impossibly solid when assembled. The core principle? One piece acts as the “key” that locks the entire assembly together.
Here is your starter strategy:
1. Identify the Notches. Hold a piece. Notice it has rectangular sections cut away. These create channels for other pieces to pass through.
2. Build a Stable “Cross” First. Your first goal isn’t the full cube, but a central cruciform shape. Take three pieces and interlock them at their centers to form a symmetrical three-way cross. This becomes the puzzle’s core.
3. Slot in the Remaining Pieces. The final three pieces encase this cross. They must be added in a specific sequence so their notches align with the channels of the core.
4. The Locking Piece is Last. The final piece you slide in is the true “key.” It threads through the assembled framework, locking everything in place. If you force it, the sequence is wrong.
The satisfaction of the Burr puzzle is the solid clunk as the last piece seats home—a perfect puzzle cube solution with no glue required, just pure geometry. For a dedicated deep dive, check out our complete guide to the six-piece burr puzzle.

The Soma Cube: Seven Shapes, One 3x3x3 Grid
Invented by Piet Hein, the Soma Cube uses seven unique pieces, each formed from three or four small cubes glued together. The challenge is to assemble them into a perfect 3 by 3 by 3 cube. This is where your ability to mentally fill that grid is tested.
Your starter tip: Begin with the hardest piece to place. The piece that looks like a “corner” (three cubes in an L-shape) or the awkward “T” shape often dictates the solution. Try placing it in a corner of your mental grid first. The remaining pieces will then fill the spaces around it, much like solving a spatial packing problem.

The Universal Thread: Visualize the Grid
Whether it’s 27 connected cubes, 6 notched pieces, or 7 unique shapes, the fundamental skill is the same. You are not randomly twisting or forcing parts. You are methodically assigning each wooden block to a specific coordinate in an invisible 3x3x3 framework. This shift in mindset—from “How do these fit?” to “Where does this belong in the grid?”—is how you truly develop solving skills that apply to nearly any wooden cube puzzle. It’s a classic example of the broader challenge and joy found in puzzles of all kinds.
The Final Twist: How to Reset, Resolve, and Own Your New Skill
That shift to visualizing the 3x3x3 grid is your most powerful tool—not just for solving, but for gracefully taking your Snake Cube Puzzle apart and, most importantly, solving it again on your own. The journey from a tangled chain to a perfect cube is now a skill you own. Let’s complete the cycle.
How to Reset Your Cube to Its Straight Shape
You’ve triumphed. The solid cube is in your hands. To respectfully return it to its starting state—a valuable skill for storage or sharing—reverse-engineer the process with purpose. Don’t just pull; trace the elastic string’s path.
1. Identify a Corner. Choose one corner of the solved wooden cube puzzle. This is where three segments meet at 90-degree folds.
2. Gently Unfold. Instead of forcing, think: “Which segment was folded last?” Gently reverse the final folds, straightening one segment out from the corner. You’re not dismantling a block tower; you’re following the chain’s natural hinges.
3. Work Systematically. Continue unfolding, following the chain out from the cube’s core. The cube will naturally unravel back into its long, straight shape of 27 cubes. This controlled reset prevents stress on the elastic string and prepares you for a fresh solve.
Your Challenge: Solve It Again, Without the Guide
This is where memorization ends and understanding begins. Place the straight chain on the table. Can you build the cube using only the principles of segments and corners?
* Recall the Start: Remember, you began by forming one corner using three segments. Find that starting point again.
* Think in Layers: Your goal isn’t “the next twist,” but “completing the first 3×3 layer.” Guide the chain to fill that invisible grid.
* If You Get Stuck: Pause. Look at the segment lengths. Is a corner missing? Is a segment too long for the space left in your mental grid? Backtrack one or two folds—this isn’t failure, it’s strategic recalibration. You are now developing solving skills that are truly your own. For more on this mindset, see our guide on how to solve a puzzle cube.
The Real Satisfaction: Owning the Skill
Anyone can follow a step-by-step list once. The true confidence comes from knowing you can do it again, and that the logic of segments and corners can help you approach other interlocking structure puzzles. You’ve moved from frustration through focused clarity to a tangible, spatial triumph.
Hold the solved cube one more time. Then, confidently take it apart. You are no longer just following instructions—you understand the solution. That’s the quiet, deeply satisfying click of a puzzle mastered. Well done. (And if you’re curious about the world’s most famous cube, the principles here are different but the joy of spatial problem-solving is shared; learn more about the Rubik’s Cube separately).
Reader Situation and Fast Answer
You’re holding a perfect 3x3x3 cube. The tangled wooden snake is gone, replaced by solid, satisfying right angles. That feeling of triumph is real. But the clock is ticking. A friend asks, “How did you do that?” or worse, someone bumps the table. The puzzle scatters. Panic starts to creep back in.
This is the true test. Can you get back here without the guide? The fast answer is a confident yes. You don’t need to memorize a sequence; you now understand the solution. The core logic of segments and corners is your new, permanent toolkit. Let’s solidify that confidence.
Your Situation: Puzzle solved, but the skill feels fresh. You want to own it.
Your Fast-Action Plan:
1. Reset Intentionally. Don’t just pull it apart. As you unravel your solved Snake Cube Puzzle, trace the path of the elastic string. Notice how each 90-degree fold you undo was creating one of the 8 necessary corners for the 3 by 3 by 3 cube.
2. Solve Again, Voice First. Put the guide aside. Lay the chain straight. Talk yourself through the first three folds out loud: “I need a corner. This two-block segment is my first edge. I fold the next three-block segment up to make a right angle…” This verbalizes your spatial reasoning, locking in the step-by-step logic.
3. Time Your Second Solve. The first solve might have taken 20 minutes. The second, using your internalized principles, will likely take 5. That drastic reduction is proof you’ve moved from following instructions to understanding the interlocking structure.
Your New Baseline: If you get stuck on this second attempt, it’s not a failure. It’s a diagnostic. Stop and ask: “Which invisible cell in my 3x3x3 grid is this segment trying to fill?” This focus on the grid, not just the next twist, is the hallmark of a true solver. You are now equipped to develop solving skills that transfer beyond this single wooden cube puzzle.
Your next step is simple: Take the cube apart, place it on the table, and build it again. The satisfaction won’t be in the result, but in the smooth, knowing journey your hands now make. You’ve untangled the puzzle, and the method, for good.