Before the Click: The Universal Language of Frustration
Your knuckles are white. You’ve turned the same six-piece burr puzzle over for the twentieth time, and it still looks like abstract art, not a cube. Before you throw it—or yourself—out the window, take a breath. This isn’t magic; it’s mechanics. Let’s solve this together. I know that feeling intimately—the grainy texture under your thumb, the maddening half-millimeter of wiggle that leads nowhere, the silent accusation from a collection of wooden blocks that should fit. In my puzzle cafe, I’ve seen it on a thousand faces. That’s the universal language of frustration, and it’s where every great wooden brain teaser cube solution begins.
I’m the guy who spent a whole morning dismantling a ‘Devil’s Knot’ a customer left behind, not out of genius, but out of stubborn, tactile curiosity. I listened to the wood’s chatter, felt the direction of the grain under tension, and noted the precise ‘snick’ when a piece found its home. That’s what we’re going to do with your puzzle. I have a shelf in my workshop lined with disassembled burrs and snakes and crosses, not as trophies, but as a library of mechanical principles. The goal today isn’t just to copy steps for one puzzle. It’s to learn how to see.
Right now, you’re holding a 3D problem. Most guides will try to sell you a single map for a single maze. But what if your maze isn’t on their list? That’s the gap I lived in for years. So, we’re going to build a compass instead. Whether it’s a 27-unit snake cube aiming for a 3x3x3 form or a classic 6-piece burr of beech or walnut, the foundational thinking is transferable. You are not just looking for a solution; you are learning to become a solver. This is the art of the mechanical puzzle, a craft that dates back centuries and relies on the physical properties of the material.
The frustration you feel is a signal. It means you’ve exhausted random trial-and-error—the least efficient method known to puzzling kind. Good. That phase is over. Now we move to diagnosis. Is your puzzle a long, jointed chain? A handful of notched bars? A collection of odd, polygonal blocks? The first step to clarity is simply identifying what genus of beast you’re dealing with. (This is where most guides fail you—they assume you already know its commercial name.)
So, let’s transition from hopeless turning to purposeful observation. Set the puzzle down. Look at it as if you’ve never seen it before. Run your fingers along its seams. This is the shift from frustration to hope. In the next section, we’ll use a simple visual flowchart to diagnose exactly which family your wooden cube puzzle belongs to, because you can’t apply the right principles until you know what you’re holding. The path to the final, satisfying click starts with this single, calm moment of inspection.
The Diagnosis: Which Wooden Cube Are You Actually Holding?
You can identify your wooden cube puzzle by its fundamental structure, with most falling into four clear families based on their pieces and movement. The two most common are the 27-unit snake cube, a flexible chain aiming for a 3x3x3 form, and the classic 6-piece burr, a solid-feeling interlocking cross made from precision-cut hardwoods like beech or walnut. Recognizing which one you hold is the critical first step to applying the correct solving strategy.
So, you’ve set it down. Now, pick it up again, but this time, diagnose it. Let’s build that mental flowchart. Start with the most obvious question: Is it a single, jointed chain?
If yes, you’re holding a Snake Cube. It’s a series of small cubes (typically 27 for a 3x3x3 final shape) connected by elastic or short ropes running through their centers. It’s floppy, kinetic, and feels like a segmented toy in the hand. Its goal is not to come apart, but to be folded into a perfect, solid cube. Listen to the subtle clack of the wooden blocks pivoting against each other. The challenge here is purely sequential and algorithmic—finding the correct folding path. You are looking for a wooden snake cube puzzle solution step by step that focuses on the folding sequence.
If it’s not a chain, ask: Is it a collection of several identical-looking notched bars or sticks?
If yes, you likely have a Burr Puzzle or Cross Puzzle. The classic 6-piece burr feels substantial, heavy for its size, with a satisfying density. Run your thumb over the faces; you’ll feel the complex notches and interlocking joints. The wood grain is usually visible and consistent across pieces—this is precision-cut hardwood. When solved, it forms a symmetrical, often cross-like, solid cube. The pieces do not bend; they only slide and rotate against each other along specific axes. Your goal is to discover the one precise sequence that allows the “key piece” to slide free, causing the entire structure to gracefully disassemble. This is where you’ll need a wooden cross puzzle solution or a 6 piece wooden cube puzzle approach.

If the puzzle is a set of 3-10 odd, polygonal blocks—some looking like L-shapes, some like corners—you probably have a Soma-style Cube or Block Assembly Puzzle. Think of it like a 3D jigsaw where the tabs are the voids in the final cube. The pieces are chunky, often lacquered, and each has a unique, irregular shape. They don’t interlock with notches; they simply pack together to fill a cubic space. The tactile feedback is about fit and balance, not sliding mechanics. The goal is purely structural: arrange all pieces into a solid cube. For these, you are looking for interlocking cube puzzle instructions.
Finally, if you have what looks like several small, solid cubes fused together in a seemingly impossible configuration, you might have an Interlocking Cube or “Impossible” Object. These are often solved, with no obvious seams. They feel like a solid, carved block of wood. The challenge is discovering the hidden sequence of slides and rotations that exploits the internal tolerances (often less than 1mm) to unlock it. There is no disassembly in the traditional sense—just a miraculous separation. Knowing how to take apart a wooden cube puzzle of this type requires immense patience.
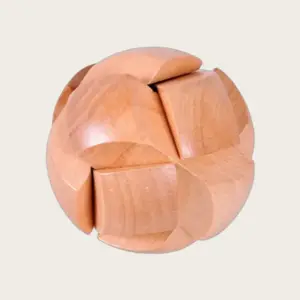
And what about that wooden puzzle ball? It’s its own category: a sphere composed of interlocking, curved wooden pieces that must be rotated around a central axis in a specific order to come apart. The feel is spherical, of course, with seams following great circles around the ball.
Now you know your opponent. This diagnosis moves you from generic frustration to targeted strategy. In the next section, we’ll translate this identification into action with the universal principles that govern all 3D wooden puzzles, whether you’re looking for a wooden snake cube puzzle solution or cracking the 6 piece wooden cube puzzle logic. The path forward is no longer a mystery—it’s a mechanic.
The Puzzle Solver’s Mindset: Four Principles for Any 3D Maze
Now that you’ve diagnosed your puzzle, the solution lies not in brute force but in a solver’s mindset built on four universal principles. For instance, the classic snake cube’s 27 segments must align via specific rotations, not random folding, and forcing can damage hardwood burr puzzles with tolerances often finer than 1mm. By learning to read the grain, spot the key piece, sequence moves, and map internal voids, you develop the spatial reasoning that applies to any interlocking 3D puzzle, transforming a baffling block into a logical mechanical dance.
Memorizing steps for one puzzle is a temporary fix; it’s like learning a single magic trick by rote. But understanding the underlying principles is learning the art of illusion itself. In my puzzle cafe, I watch people struggle because they’re hunting for a memorized sequence from a video, their fingers working against the wood’s natural logic. The real breakthrough comes when they stop trying to remember and start learning to see. This mindset shift—from follower to detective—is what turns novice fiddlers into confident solvers. Let’s build that detective’s toolkit by looking at ancient principles for solving puzzles.
First Principle: ‘Read the Grain’ and Feel for Tolerance.
As a carpenter, I learned that wood has a voice. It speaks through its grain and its fit. Every wooden puzzle is a lesson in material science. Run your thumb along the edge of a piece. Do you feel the long, continuous lines of the grain? That direction is the wood’s strength axis; pieces often want to slide with the grain, not against it. Now, think about tolerance—the precise gap between interlocking parts. In a well-made burr puzzle, this can be less than the thickness of a sheet of paper. When you push or twist, listen and feel. If you hear a dry, rasping sound—what I call ‘wooden chatter’—that’s the wood fibers protesting. You’re forcing. Stop. That chatter is your warning before a snap or a permanent wear that ruins the satisfying ‘snick’ of a perfect lock. Tactile feedback is your guide. Let the puzzle tell you what it wants to do.
Second Principle: Identify the Key Piece.
Every puzzle has a hero. In a jigsaw, it’s the corner piece. In a wooden cube puzzle, it’s the key piece—the one with unique notches, an unusual length, or a distinct shape that dictates the entire structure. For a six-piece burr, it’s often the only piece with a notch that passes fully through another block. In a snake cube, it’s the end cube or the segment that initiates a critical 90-degree turn. Your first task is to audit all pieces. Lay them out. Which one looks different? Which one, if removed, would make the whole assembly crumble? That’s your key. Finding it cuts the complexity in half. This is a core tip for solving 3D puzzles: start with the outlier. It’s the anchor for your spatial reasoning.
Third Principle: Think in Sequences, Not Force.
Wooden cube puzzles are not pull-apart toys. They are 3D mazes where the path is a series of slides and rotations. This is especially true for interlocking cubes and burr puzzles. You must think like a lockpick: apply gentle pressure in one direction, feel for a slight give, then translate that into a slide or a quarter-turn. This is where I introduce the ‘First Five Moves’ Principle. When you’re utterly stuck, with no clue how to start, don’t aim to solve. Aim to learn. Make five deliberate, gentle moves: push, slide, twist, nudge. Note what moves even a millimeter. This exploratory sequence teaches you the puzzle’s hidden grammar—its allowable motions. It reveals which piece is meant to move first. Often, the solution path is a choreography of 10-15 such motions, each setting up the next. Forcing skips the dance and breaks the stage.
Fourth Principle: Map the Void.
What isn’t there is as important as what is. Look for the negative space—the internal void. A solved cube is solid, but during assembly, there must be empty channels for pieces to slide through. Your job is to visualize these tunnels. In a burr puzzle, the complex star-shaped void in the center is where the six pieces interlock. Your sequence must create that void piece by piece. Similarly, with a snake cube, you’re folding the chain to fill a 3x3x3 grid perfectly; the “void” is the empty cell your next segment must occupy. Search for symmetry. Most of these puzzles are beautifully balanced; if one side has a notch, the opposite side likely has a corresponding protrusion. Mapping the void turns a blur of wood into a clear architectural plan.
Contrast this with merely following an algorithm. An algorithmic approach (like for a snake cube) gives you a set of turns: right, left, down. A structural approach (for a burr puzzle) asks you to understand why those turns work—how they align notches to create internal space. This mindset merges both. It teaches you to decode the algorithm yourself by understanding the structure. You begin to feel the solution in your hands before you see it with your eyes.
So, before you search for a wooden burr puzzle solution diagram, apply these principles. Hold your puzzle. Read its grain. Find its key piece. Explore its sequence of motions. Envision its hollow heart. This is how you build genuine puzzle-solving confidence—not for one cube, but for the next one, and the one after that. The final ‘click’ becomes not a relief, but an expected reward for listening closely to the mechanics in your hands.
Deep Dive 1: Taming the Wooden Snake Cube (The Algorithmic Thinker)
That structural thinking—understanding the void and the symmetry—is your bedrock. Now let’s apply a different mental muscle to one of the most common wooden cube puzzles: the snake. Unlike a burr puzzle you deconstruct, the snake cube is about folding a 27-segment chain into a perfect 3x3x3 cube. This is a puzzle of pure sequence, an exercise in algorithmic thinking where every 90-degree turn counts.
Your starting point is crucial. Unfold everything until the puzzle is a single, straight rod of 27 small cubes connected by elastic or string running through the center. (If it’s a 64-piece chain aiming for a 4x4x4 cube, the principle is the same, but our target is the classic 3x3x3). Listen for the subtle “snick” of each joint—the grain direction of the wood often makes folding one way feel slightly stiffer than another. This tactile feedback is your first clue; note it. You may want to consult a veteran’s guide to solving the snake cube for more advanced nuances.
The goal is not random folding. You are building a stable, three-layer structure from the ground up. We’ll build the bottom face (9 cubes), then the middle layer, then the top. The sequence is a set of precise, memorizable turns. Here is your step-by-step snake cube puzzle guide, starting from the straight chain.
- Create the First “L”. Hold the chain horizontally. Count four cubes from one end. Fold the fourth cube downward 90 degrees. You now have a vertical segment of three cubes hanging down, with the rest of the chain extending horizontally from its top.
- Form the Bottom Row. From this new corner, count three cubes along the horizontal arm. Fold the third cube downward again. You should now see the start of a 3-cube-long row forming at the bottom.
- Complete the Bottom Layer. This is the rhythmic part. Continue folding every three cubes: next fold is toward you (or away) to continue the bottom row, then downward to start the next row back across. Follow this sequence of turns, always counting three segments between folds: Down, Across, Down, Across, Down. When done, you will have a flat 3×3 grid of nine cubes—the complete bottom layer of your final cube. The remaining chain will be sticking up from one of the bottom layer’s corners.
- Build the Middle Layer. Now you work vertically. The chain wants to spiral around the structure you’ve made. The rule changes: you now fold every two cubes. From the corner, fold the chain so it runs up the side of your bottom layer for two cubes, then fold to run across the top of the bottom layer for two cubes, building the middle. The sequence is: Up, Across, Up, Across, Up.
- Cap the Top Layer. You should now have the bottom and middle layers complete, with the remaining chain forming a “C” shape around the top. To fill the top layer’s nine spots, you return to folding every three cubes. The final moves will tuck the last segments into place, often requiring a slight push to snug the final cube home against the tension of the internal cord.
Why won’t my snake cube form a perfect cube? Two reasons dominate. First, a miscount. If you are off by one segment at any point, the entire geometry fails, leaving you with an extra cube dangling or a face incomplete. Second, folding in the wrong plane. Each fold must be a clean 90 degrees in the correct direction relative to the growing structure. If your cube feels loose or gappy, you likely have a fold pointing “out” instead of “in.” (This is the tricky part—go slow).
The beauty of this puzzle is its algorithm. Once you learn the 3-2-3 pattern of folds, you can solve it reliably. It teaches you that some puzzles are about perfect, repeatable execution. To how to reassemble wooden cube snake from a tangled state, don’t fight the knots. Gently work it back to the long, straight starting rod. Feel for the natural straightening of the cord inside; forcing it can snap thin joints or stretch the elastic, ruining the precise tolerances.
When it finally clicks into that solid 3×3 block, you’ve done more than followed steps. You’ve learned to trust a sequence, to feel the rhythm of construction, and to diagnose by shape when you’ve strayed from the path. It’s a different kind of thinking from the burr puzzle, but just as vital in your solver’s toolkit.
Deep Dive 2: Conquering the 6-Piece Burr (The Structural Thinker)
If the snake cube was about memorizing a folding dance, then the classic six-piece burr is about understanding architecture. Your goal isn’t a path but a structure—an interlocking cube held together by nothing but precise cuts and cunning internal voids. The solution relies on a specific, non-negotiable assembly sequence where even a half-millimeter error in grain direction can block the final lock. Its tolerance is often less than 1mm, a testament to the precision of hardwood like beech or walnut.
Now, put down the snake. Pick up your burr. This puzzle demands you stop looking for a sequence and start seeing a skeleton. Finding a six-piece wooden cube puzzle solution is about finding the logic in the notches.
Your first and most critical task: find the key piece. This is the cornerstone of the entire structure. On a classic 6-piece burr, it’s often the only piece that doesn’t have a long, rectangular notch running down much of its length. It might look more like a simple “L” or have a unique set of smaller notches. Lay your six pieces out on the table. Examine their profiles. One will stand out as the architect of the group—this is your starting point for both disassembly and reassembly. If your puzzle is already together, look for the piece that, when the cube is held, seems to have its end grain facing out differently than the others; it’s often the one you can almost wiggle, but not quite.

To how to take apart a wooden cube puzzle of this type, you must reverse-engineer that architecture. Don’t pull. Instead, identify the axis of movement. The key piece is usually not the first to come out; it’s often the last to be released or the first to be placed. Gently test slides along the three axes (left-right, forward-back, up-down). You’re searching for the one piece that has just enough clearance to slide about a centimeter. Listen and feel for tactile feedback—a subtle give, not a creak of protest. That first slide will unlock the next piece’s movement in a different direction. The disassembly sequence is a precise three-step tango of slides and rotations. (Write it down if you need to! The sequence for reassembly is its exact reverse.)
Now, for the main event: how to solve a 6 piece wooden cube puzzle from a pile of parts. This is where structural thinking clicks into place.
- Start with the key. Hold your identified key piece. This often forms the central “cross” or core of the wooden cross puzzle solution. Orient it so its unique notches are facing you.
- Build the first layer. Slot two other pieces onto the key piece. They will interlock with it and with each other, forming a stable, three-piece subunit. This subunit should be solid—it shouldn’t fall apart if you pick it up. The notches must align perfectly; if they don’t, you have the wrong pieces or the wrong orientation. Check the grain direction—pieces usually assemble with the grain running lengthwise for strength.
- Add the remaining three. Here’s the crux. You won’t just drop these in; they must be slid into place from specific directions, one after the other, to fill the internal voids around your core. The fourth and fifth pieces typically slide in perpendicular to each other, locking the first three together more tightly.
- The final lock. The sixth and final piece is the keystone. It slides in along the last open axis, and when it meets zero resistance and seats fully, you’ll hear and feel it—that definitive, satisfying snick as all internal tolerances align and the cube becomes one solid object. That sound is your triumph.
What if you get lost mid-assembly and everything feels loose? Reset. Dismantle back to your stable three-piece core. That’s your home base. This is far more reliable than trying to force a misaligned piece and risking damage.
This structural approach is the opposite of the snake’s algorithmic style. The burr doesn’t care about a memorized fold pattern; it cares about load-bearing geometry and sequential access. You’re not following steps, you’re building a timber-frame cabin in miniature. Mastering this teaches you to visualize negative space, to think in terms of load paths, and to appreciate that sometimes, the most important piece isn’t the one that moves first, but the one that holds everything together.
For a deeper exploration of burr puzzle history and variations, our complete guide to the six-piece burr puzzle and our six piece burr puzzle solution guide offer further insights.
When the Pieces Rebel: Advanced Troubleshooting & Rescue
That satisfying snick of a perfect fit is the goal, but more often you’ll hear its evil twin: the dry, grating protest of wood on wood. When a puzzle resists, it’s not being impossible; it’s communicating. Your job is to listen. The number one cause of permanent failure—damaging those fine sub-1mm tolerances—is forcing. This is your rescue guide for why your wooden puzzle solutions aren’t working and how to fix it.
First, diagnose the protest. Apply gentle pressure. Do you feel a smooth, consistent resistance, or a gritty, shuddering vibration? That gritty sensation is wooden chatter. It’s the sound of interlocking notches or tenons grinding against each other out of alignment. This is your absolute stop sign. It means the sequence is wrong. Forcing now will compress fibers, swell the wood with moisture from your hands, and permanently alter the fit. (I’ve seen more puzzles “solved” with a hammer than I care to admit—they’re never the same.)
So you’ve stopped forcing. Now what? Backtrack with intent. Don’t just randomly wiggle. Reverse your last three to five moves slowly, paying attention to the release of pressure. The goal is to return to a known stable state. For a snake cube, this might be a straight line. For a burr, it’s often the stable three-piece core we built earlier. This is why mental or even quick physical notes (snapping a phone pic) during assembly are lifesavers. If you’re utterly lost, a full, gentle disassembly is smarter than persisting in confusion.
But what if you’re already holding a pile of disassembled pieces—the scenario most guides ignore? Don’t panic. Lay every piece out with the grain direction visible. Your first task isn’t to solve, but to catalog. For a burr, group pieces by shape: find the ones with unique notches or lengths—your likely key pieces. For an interlocking cube, look for the piece with the fewest or most complex cuts; it often dictates the assembly order. You’re conducting an archaeological dig, reconstructing logic from ruins.
If a piece is genuinely jammed and won’t reverse, apply deliberate, gentle rotation, not pull. Many locks are disengaged by a slight twist or tilt, not a straight-line retreat. Examine the seam: can you see where the interlock is? Sometimes, pressing inward on an adjacent piece can release the pressure on the stuck one. Use padded tools if needed—a wooden clothespin or a rubber band for grip—never metal pliers that will mar the surface.
Finally, reset your mind, not just the puzzle. If frustration is boiling over, put it down. Your spatial reasoning shuts down under stress. The puzzle will wait. When you return, you’ll often spot the obstructing alignment or the correct starting orientation you missed before. This isn’t failure; it’s part of the tactile dialogue between you and the craftsperson who made it.
Caring for Your Wooden Companion: More Than Just a Solution
Solving the puzzle is a triumph of mind over mechanics, but true mastery means preserving that delicate dialogue between wood and hands for years to come. Proper care ensures the fine tolerances—often less than 1mm—that make the solve possible aren’t compromised by grime, humidity, or force. Treat your puzzle like the precision wooden craft it is, and it will offer a lifetime of satisfying clicks.
Think of the puzzle not as a static object, but as a breathing, moving system. Wood expands and contracts with humidity. A burr puzzle that slides perfectly in a dry winter might become frustratingly tight in a humid summer. If pieces feel stuck, don’t force them. Place the whole assembly in a ziplock bag with a small desiccant packet for a day to gently draw out moisture. Conversely, a puzzle that’s too loose might benefit from resting in a normally humidified room (around 40-50% relative humidity is ideal). This sensitivity is why forcing is the cardinal sin—you’re not just fighting the interlock, you’re warping the material itself.
Cleanliness is next to solve-liness. Oils and dirt from your hands can build up in the notches over time, attracting dust and creating a sticky grime that gums up the works. To clean, never soak the wood. Instead, use a barely damp microfiber cloth to wipe each piece down, then immediately dry it thoroughly with another cloth. For stubborn grime in tight joints, a soft-bristled brush (like a clean, dry paintbrush) can dislodge debris. Once a year, a microscopic dab of food-grade mineral oil on a cloth, rubbed onto the pieces and then completely buffed off, can help condition dry wood and maintain a smooth feel—but less is profoundly more.
Storage is strategy. Don’t toss your solved or disassembled puzzle into a drawer where it can rattle against other objects. Store it in a dedicated box or soft pouch. For a disassembled burr or interlocking puzzle, keep all the pieces together in a small bag so none go wandering. Avoid direct sunlight and heat sources like radiators, as these can cause uneven drying and warping. The shelf in my workshop? It’s away from the window, and each puzzle has its own spot.
Finally, handle with intention. Your puzzle is a map of spatial reasoning carved in wood. The care you give it extends the conversation from a single solution to a lasting partnership. When you place it back on the shelf, ready for the next challenger, you’re not just storing a toy. You’re curating a piece of craftsmanship, ensuring its quiet snick of perfect alignment remains just as satisfying for the next pair of curious hands.
Your Next Challenge: Building a Puzzle-Solver’s Confidence
So you’ve mastered your puzzle and learned to care for its wood. Are these exercises good for your brain? Unequivocally, yes. A study in the journal Nature found that regular engagement with spatial reasoning puzzles like these can enhance neural plasticity, essentially giving your brain’s problem-solving pathways a vigorous workout. You’re not just solving a cube; you’re training patience, three-dimensional visualization, and systematic logic every time you listen for that final snick. This is the broader world of the puzzle, where every challenge is a step toward sharper thinking.
That shelf of disassembled puzzles in my workshop isn’t a trophy case—it’s a gym. And you’ve just earned your first set of mental weights. The confidence you built by identifying the key piece, reading grain direction, and trusting a sequence over force is your new toolkit. Now, let’s apply it to something new.
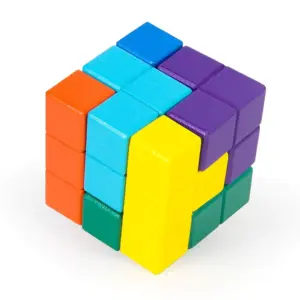
For a brilliant next step that solidifies the structural thinking from the burr puzzle while introducing color-coded creativity, look no further. This is a classic wooden cube puzzle for beginners with over 240 possible solutions, making it less about one right answer and more about exploring forms.

7 Color Soma Cube Puzzle — $21.88
When you’re ready to level up, seek puzzles that demand new applications of your logic. Where to buy wooden cube puzzles? Start with curated lists that separate the satisfying from the soul-crushing. Our guides to the top 3D wooden cube puzzles and the top brain teaser puzzles for all ages are built from the workshop bench up, prioritizing quality craftsmanship and clear thinking challenges.
For a truly elegant test of the principles you’ve learned—especially identifying internal voids and symmetry—this interlocking T-shape puzzle is a minimalist masterpiece. Its solution is a profound lesson in negative space.

54‑T Cube Puzzle — $18.99
Your next challenge isn’t a specific puzzle. It’s this: pick up any new wooden brain teaser. Feel its weight. Examine its joints. Apply your ‘First Five Moves’ principle. Remember, you are no longer a person staring at abstract art with white knuckles. You are a puzzle solver. Now go find the quiet click that proves it.