Held in Your Hand: The Cold, Silent Galaxy
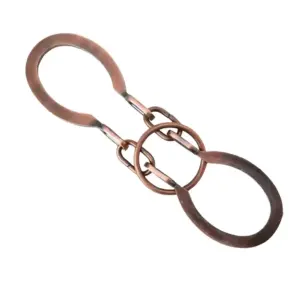
You’re turning it over. The four pieces are cold, locked in a perfect, silent orbit. You’ve pulled, you’ve twisted, but nothing gives. It looks simple—just four pieces. But they move in unison, locking in ways that defy simple pulling. The Hanayama Cast Galaxy is a 4-piece interlocking metal puzzle, officially rated a 3 out of 6 for difficulty, though its requirement for simultaneous motion makes it a formidable first encounter. This guide is your tactile companion, not just a sequence of moves, to navigate that precise machined labyrinth.
Feel its weight—solid, about palm-sized, with a satisfying heft from quality zinc alloy. Notice the two distinct finishes, often silver and gold, which are your visual anchors in the coming steps. The surfaces are smooth, designed to glide, but they catch with purpose. Right now, they’re just stuck.
You are not missing something obvious. The core of the Galaxy’s challenge is that its pieces cannot be pulled apart individually; the solution is entirely in understanding their interlocking relationship and executing a coordinated series of rotations. This is why brute force fails. Will you damage it if you force it? Yes. If you apply significant bending pressure, you can permanently warp the slender channels or pegs. The satisfying ‘clunk’ of a correct move requires no muscle, just precise alignment. If it’s not moving, the puzzle is telling you the current axis is wrong.
You likely found this page because other guides—a fast-forward video or a bare-bones PDF—showed the what but not the why. They left you mimicking motions without a mental model. Here, we build that model. We’ll use cardinal-direction language and close-up photos to act as your spatial reasoning partner. The frustration ends now.

The Galaxy typically retails between $12 and $20, a standard range for the acclaimed Hanayama Cast series. If you’re assessing it before a purchase, know this: it’s an excellent cast metal puzzle solution to seek if you appreciate mechanical elegance over raw, baffling difficulty. For a deeper look at its place in the collection, consider our Hanayama puzzle buy guide. Let’s stop guessing and start solving with clarity.
The Machinist’s Mindset: Thinking in Interlocking Motion
Solving the Cast Galaxy requires adopting a machinist’s perspective, where the answer lies not in pulling but in orchestrating simultaneous, axial rotation of all four pieces—a precise mechanical dance that makes its Hanayama 3/6 difficulty rating feel accurate for methodical thinkers. This pivot from random tugging to coordinated motion is your path from frustration to clarity.
You’ve likely been exploring the puzzle’s external pathways, feeling pieces catch and stop. This is the puzzle’s fundamental lesson: it is a system of interlocking constraints. Each piece’s movement is permitted only when the others are in a specific, cooperative alignment. Think of it not as a lock to be broken, but as a precision assembly where every component must glide along its intended path in unison. Forcing a piece only binds the system tighter, risking damage to those fine machined finishes.
This principle is the core of any worthwhile disentanglement puzzle guide. The Galaxy, like many sophisticated Hanayama puzzle solutions, is engineered to be understood, not overpowered. Your primary tool is observation, and your language must shift. Instead of “this piece won’t come out,” ask, “what rotation does this channel allow?” Instead of pulling, you will command: Rotate the silver arm clockwise relative to the gold frame. Slide the notch along the groove until it clears.

This mindset transforms the puzzle from a baffling object into a readable mechanism. The satisfying tactile feedback—the soft click of a piece seating into a new position, the smooth glide of metal on metal—becomes your diagnostic tool. If a move feels gritty or resistant, it’s likely incorrect. The correct sequence will feel inevitable, each motion creating the space for the next. This is the “grammar” of mechanical puzzles, a logic explored in our guide on the mechanical grammar of brain teasers.
Hold your Galaxy now with this intent. You are no longer trying to escape the puzzle; you are learning its language of movement. The following steps are a direct translation of that language. Trust the simultaneous motion, follow the cardinal directions, and the entangled pieces will begin their deliberate orbit apart.
Disassembly Decoded: The Step-by-Step Orbital Unlock
Taking apart the Cast Galaxy is a six-stage sequence of precise, interdependent rotations of its four pieces. It cannot be forced apart; the solution requires moving the two primary components—often a silver piece and a gold base—through a specific, simultaneous three-step axial rotation that aligns internal channels. The following cast galaxy puzzle solution step by step translates this 3D maneuver into clear, cardinal-direction language you can execute.
With the machinist’s mindset now engaged, you’re ready to move from theory to tactile practice. Hold your assembled Galaxy so one of the larger, curved arms of the silver piece points directly toward you. This is your starting orientation. The goal of the first phase is to achieve the crucial alignment where the pieces can begin their separating slide. You will feel points of catch and glide; this is the tactile feedback confirming you’re on the correct path. For more foundational principles on this type of puzzle, you might explore our thoughts on cast metal puzzle disentanglement.
Step 1: The Initial Positioning.
Rotate the entire puzzle so you’re looking at its “side” profile, not the top. Identify the two most prominent pieces: one will typically have a wider, C-shaped arc (often silver), and the other forms a twisted central hub (often gold). Grip the puzzle firmly but gently in both hands, with your thumbs on the silver C-shaped piece and your fingers supporting the gold hub from beneath. Your initial goal is not to pull, but to understand the current locked state.
Step 2: The First Simultaneous Motion.
This is the core of the disentanglement. You must move two pieces as one unit. Here is the exact maneuver:
* With your right hand, grip the silver C-shaped piece.
* With your left hand, grip the gold hub piece AND the smaller, hooked silver piece that is currently locked through it. Treat these two as a single block.
* Now, rotate your right hand (the silver C) clockwise relative to the fixed block in your left hand. Perform a full 180-degree turn.
You will feel a new alignment slot into place. A channel within the gold hub will now be positioned directly under a protrusion on the C-shaped piece.
Step 3: The Key Slide & Pivot.
Maintain this new orientation. Now, shift your grip slightly. Continue holding the gold hub and small silver piece as a block with your left hand. With your right hand, focus on the silver C-shaped piece. Instead of rotating, you must now slide it axially—think of gently pushing it “downward” through the plane of the hub. As you apply this slight downward pressure, simultaneously pivot the C-shaped piece just a few degrees counter-clockwise.
This is the ‘Aha’ Moment Visualized. If done correctly, the C-shaped piece will disengage from the central lock with a smooth, unforced glide. It will now be separate, hanging loosely but still entangled by the final, smaller piece. This is the most common sticking point; if you meet resistance, return to Step 2 and ensure you completed the full 180-degree rotation before attempting the slide-pivot.
Step 4: Liberating the First Piece.
With the large C-shaped piece now mobile, carefully maneuver it around the remaining assembly. Its path is now free. Gently thread it out and away from the other three pieces. Set this first solved component aside. You are now holding a three-piece assembly.
Step 5: The Second Unlock.
The remaining entanglement mimics the first. Again, identify the two pieces that move as a block—now the gold hub and the remaining small, L-shaped silver piece. The final free piece is the other hooked silver piece. Repeat the principle: rotate the free piece (the hooked one) clockwise relative to the hub block, find the new alignment, then execute a slight axial slide and pivot. The second piece will release.
Step 6: The Final Separation.
You now hold just the gold hub and the two small silver pieces. Their interlocking is now simple. One will slide out directly along its now-cleared channel. The last two pieces will then fall apart in your hands with a gentle, satisfying click.
Remember, forcing any step risks damaging the machined finish. If a move jars or grates, backtrack. The correct sequence feels deliberate and smooth. For those seeking a permanent reference, this process is what many seek in a hanayama cast galaxy solution pdf, but here it is enriched with the crucial “why” behind each turn. The puzzle is now in its four constituent parts. The greater challenge, often overlooked, awaits: putting it back together.
Reassembly: The Hidden Test (With Foolproof Instructions)
So, you’ve triumphed. Four separate pieces sit before you. For many, this is where a cold dread sets in. Disassembly required following a hidden path; reassembly demands you build that path yourself, backward, from memory. It is, without doubt, the more intellectually demanding half of the Cast Galaxy puzzle solution. Where disassembly is a process of discovery, reassembly is a test of true understanding. This is your path to mastery.
Your initial relief has given way to a new focus. Let’s channel that into a methodical reconstruction. We will work backward through the disassembly steps, but with a crucial shift in perspective. You are no longer finding openings; you are architecting them. The goal is to re-create the precise, interdependent simultaneous motion that defines the assembled state.
The Machinist’s Reversal: Building the Lock
Lay your four pieces on a flat, well-lit surface. Identify the gold central hub (piece A) and the three silver pieces. Note the two distinct silver types: the two mirrored, hook-like pieces (B and C) and the smaller, L-shaped spacer (D). This L-shaped piece is the linchpin of the entire structure.
Step 1: Forming the Core Trio.
Pick up the gold hub (A). Take the small L-shaped silver piece (D). Your first task is to nest it partially into the hub. Align it so its longest leg sits in the broad channel of the hub, with its shorter leg protruding outward. Do not attempt to seat it fully yet. This creates a combined “core block.”
Now, take one of the hooked silver pieces (B). The key is to engage it with the core block, not just the hub. Slide its hooked end into the channel of the gold hub, simultaneously allowing the curve of its hook to capture the protruding leg of the L-piece (D). This requires a slight pivot and slide. When correct, all three pieces (A, D, and B) will move as a single, locked unit. This is your first critical checkpoint. If they jiggle independently, backtrack. The tactile feedback should be solid.
Step 2: Introducing the Second Hook.
You now hold the core trio. The final hooked piece (C) must be added to create the familiar, seemingly inseparable galaxy. This is the most nuanced maneuver and the heart of the how to put together cast galaxy challenge.
Hold the core trio in your non-dominant hand. With your dominant hand, present the final hooked piece (C) to the assembly. Its path is not a direct insertion. You must rotate this free piece counter-clockwise around the core block, letting its geometry trace the orbital path it will eventually occupy. You are not forcing; you are aligning.
You will feel a specific alignment where the tip of this hook finds a narrow gap between the first hook (B) and the body of the hub. This is the ‘Aha’ Moment Visualized. At this exact point, execute a compound move: a slight axial slide inward, combined with a minute pivot. The piece will glide into place, its inner curve settling against the hub and its outer form interlocking with the first hook.
If it resists, you are likely one degree off in rotation. Do not apply pressure. Withdraw, rotate a hair more, and try the slide-pivot again. The correct alignment feels inevitable, a satisfying convergence.
Step 3: Seating the Final Lock.
With all four pieces loosely interlocked, the final act is to complete the engagement of the L-shaped piece (D). Your previous moves have created the space for it. Apply gentle, even pressure to push this L-piece fully home along its channel into the gold hub. You will feel a definitive catch as it seats completely. This action finalizes the interlocking of all components, removing the last bits of slack.
The puzzle is now whole. Test it by trying to pull pieces apart directly—they shouldn’t budge. Instead, feel how they move in concert, a tiny metal galaxy orbiting its own fixed rules.
Why This Feels Like the True Challenge
Reassembly is harder because it asks for proactive spatial reasoning. During disassembly, the correct moves are discovered through exploration of the existing constraints. For reassembly, you must hold the memory of those constraints in your mind and impose them upon the separate pieces. You are building the jail from the inside. This is why clear cast galaxy puzzle instructions for reassembly are rare—they require explaining a constructive principle, not just documenting a discovered path. For structured guidance on puzzles of similar complexity, see our resource on Hanayama cast puzzle solutions by level.
The Desk Test: Solved and Unsolved
Now, as a collector, you’ll appreciate the Cast Galaxy in both states. Unsolved, it’s a quiet enigma for visitors. Solved and reassembled, it becomes a superior fidget object. The smooth, weighted simultaneous motion of the pieces, gliding within their engineered tracks, is a tactile pleasure that rivals any purpose-built desk toy. It transitions from a static puzzle to a dynamic artifact of clever design.
You have not just solved a puzzle. You have understood a mechanism. You can now confidently disassemble and reassemble your Galaxy at will, appreciating the elegance of its design each time. This cycle of understanding is the highest satisfaction a puzzle like this can offer—far beyond the initial moment of separation.
Why It Works: A Brief Mechanical Appreciation
The satisfying clunk of the final separation is no accident. It is the direct result of a design where every curve and notch on the puzzle’s precisely 4 interlocking metal pieces serves a dual purpose: to create a seemingly impassable lock and to provide the exact pathway for its release. Understanding this transforms the solve from a series of memorized moves into an appreciation for elegant, functional form.
As a machinist, I see the Galaxy not as a “brain teaser” but as a minimalist kinetic sculpture. Each piece is a cam, a lever, a key. The solution hinges on the relationship between the pieces’ axial rotation and their linear slides. When you performed the final, simultaneous quarter-turn and pull, you weren’t just “doing the trick.” You were aligning the deep, internal channels of the gold pieces perfectly with the protruding flanges of the silver ones. For that one instant, the engineered obstacles became open gates. The machined finish isn’t just for looks; it reduces friction just enough to allow for that smooth, weighted glide when everything is aligned, and provides just enough resistance to catch when it’s not. This is the tactile feedback that guides you.
This is the core principle of high-quality disentanglement puzzles, a category formally defined as puzzles where the goal is to separate a single piece or the entire assembly (source: Wikipedia). The solution is built into the problem. The constraints are the instructions. The Cast Galaxy masters this by making the constraints interdependent. You cannot move one piece without affecting the orientation of another. This forces the simultaneous motion that is the heart of the puzzle. It feels complex because your brain is tracking multiple relationships at once, but the mechanism itself is beautifully simple—a lesson in achieving complexity through a few perfectly arranged parts.
That final release feels so good because it’s a physical confirmation of a correct mental model. You didn’t force it; you fulfilled its design intent. This is why forcing the puzzle is so futile and damaging—you’re fighting against the very geometry that contains the answer. For more on this philosophy of respecting a puzzle’s internal logic, especially with vintage or delicate metals, the principles in metal puzzles that don’t break resonate deeply.
As a collector, this is what I display: a conversation about cleverness. The Hanayama Cast Galaxy sits on my shelf not as a conquered challenge, but as a respected piece of design. Every so often, I pick it up just to run through the solution, not to solve it, but to feel that perfect mechanical interaction once more—the smooth rotation, the precise alignment, the solid, conclusive release. It’s a tiny, orbital ballet of metal, and now you know the steps.
Cast Galaxy in the Constellation: Difficulty & Comparisons
So, you’ve navigated the solution—both apart and together—and felt that precise, machined interlocking for yourself. Where does this specific flavor of challenge sit within the wider universe of Hanayama puzzles? Hanayama officially rates the Cast Galaxy difficulty as a 3 out of 6. This is an accurate starting point, but the puzzle’s deceptive nature leads many seasoned solvers, including myself, to argue it’s closer to a solid 3.5. The rating reflects its logical, non-trick solution path, but the necessity for coordinated, simultaneous motion adds a layer of spatial reasoning that can stump solvers expecting a simple sequential unlock. For a comprehensive review of its deceptive nature, you can read our dedicated Cast Galaxy puzzle review.
This brings us to the inevitable comparison: Cast Galaxy vs Cast Marble. While both are rated a “3,” they test different skills. The Cast Marble is a pure logic puzzle; its solution is a sequence of slides and rotations that feels like navigating a tiny, metallic maze. There’s little ambiguity—each step logically follows the last. The Galaxy, in contrast, introduces a dexterity element. You must hold two pieces in a specific alignment while rotating a third. It’s less about discovering a hidden sequence and more about physically executing a coordinated maneuver you’ve conceptually understood. Marble is a puzzle for your mind; Galaxy is a puzzle for your mind and your fingers.
Is the Cast Galaxy good for a newcomer to metal puzzles? With your newfound mastery, you have the perspective to advise. I’d say yes, but with a caveat. It’s an excellent second puzzle. Start with something truly sequential like Cast Loop (rated 2) or Cast Key (rated 2) to build confidence in basic disentanglement logic. Then, graduate to the Galaxy. It teaches the critical lesson that not all puzzles solve themselves one piece at a time. That lesson in simultaneous motion is foundational for tackling the true beasts in the series, like the devious Cast Enigma or the relentless Cast Vortex, which are chronicled in our guide to 7 ruthless cast puzzles.

Cast Coil Pocket Puzzle — $18.99
For those who enjoyed the Galaxy’s demand for coordinated manipulation, a natural next step is the Cast Coil. It shares that need for a gentle, precise touch and understanding of how curves interact under constraint, as detailed in our Cast Coil Pocket Puzzle review. Ultimately, the Galaxy occupies a sweet spot. It’s challenging enough to provide a genuine “aha” moment and a deep sense of accomplishment, yet its solution is fair and reproducible once you internalize its singular, elegant trick. It’s not a puzzle that relies on obscurity or brute force, but on a clear, albeit cleverly hidden, principle of motion. That is the mark of great design in the world of mechanical puzzles.
Care, Handling, and the ‘Desk Test’
The satisfaction of solving the Cast Galaxy shouldn’t be a one-time event. With proper care, this precision-machined object can shift from a source of temporary frustration to a permanent, satisfying fixture on your desk, offering tactile feedback for years. The anodized color finishes are durable but not impervious; with deliberate handling, they will retain their distinct luster through hundreds of cycles of assembly and disassembly.
Caring for the Machined Finish
The colored finishes on the pieces are anodized, a hard, oxide layer that resists wear far better than paint. It will not simply “rub off.” However, all metals are subject to oils, acids, and abrasives from your skin and environment.
* Clean gently. Use a soft, lint-free microfiber cloth. For fingerprints or minor tarnish, a tiny amount of isopropyl alcohol on the cloth can cut the grease. Wipe dry immediately.
* Avoid abrasives. Never use scouring pads, metal polish, or harsh chemicals.
* Store thoughtfully. Keep it in a dry place. The included felt pouch is ideal for preventing scratches during storage or travel. If you’ve lost the pouch, any small soft bag will do.
If a Piece Goes Missing
It’s a collector’s quiet dread. The pieces are unique and not sold separately. Your first recourse is a thorough search—check sleeves, under furniture, and in carpet piles. If truly lost, contact Hanayama customer service through the retailer where you purchased the puzzle. While not guaranteed, they are sometimes able to assist. This is a compelling reason to keep the puzzle assembled or in its pouch when not in active use.
The ‘Desk Test’ — From Puzzle to Artifact
On my own workbench, a solved Cast Galaxy has passed the ultimate test: it’s no longer in a drawer. In its disassembled state, the four separate pieces become a sublime fidget set. Their weight is perfect for rolling in your palm, and their curves invite idle tracing as you think. The contrasting metals catch the light, each piece a standalone sculpture.
When reassembled, it becomes a conversation piece. Hand it to a curious colleague. They’ll heft it, feel the solid clunk of the interconnected pieces, and attempt the intuitive pulls. Watching their process, you’ll appreciate the elegance of the design anew. The puzzle teaches a lesson in perceived complexity and simple, interdependent motion—a lesson that sparks discussion long after the solution is known.
This dual nature is its enduring value. It transitions seamlessly from a challenging mechanical problem to a tactile artifact of clever design, much like the broader category of interlocking metal disk puzzles. Treat it with the respect its engineering deserves, and it will provide a lifetime of subtle satisfaction, both in the solving and in the quiet moments after.
Reader Situation and Fast Answer
You’ve successfully navigated the disassembly and triumphant reassembly of your Hanayama Cast Galaxy. The pieces now sit either separated on your desk or reassembled into that familiar, satisfyingly solid orb in your palm. Your immediate question is likely pragmatic: what’s next? For a puzzle owner who has just achieved mastery, the answer is a shift from problem-solving to appreciation and sharing. The Cast Galaxy, now understood, transitions into a tactile artifact rated 3 out of 6 by Hanayama for difficulty—a perfect gateway into more complex metal puzzles.
You are no longer stuck. You hold the solution, both literally and mentally. The frustration you began with has been transformed into a precise understanding of its interlocking motion. This is where the true value of a quality machined puzzle reveals itself. It doesn’t become obsolete after solving; it becomes a reference point, a teacher, and a beautifully weighted conversation piece.
So, take a final moment. Run your thumb over the machined finish of each piece, feeling the precision that allows them to glide and catch. Then, decide its purpose. Will it live on your shelf as a solved trophy, a reminder of a clever mechanical principle understood? Or will you keep it assembled on your desk, ready to hand to a curious friend, watching their eyes as they encounter the same elegant lock you now know how to navigate?
Your specific, actionable next step is this: don’t shelve it and forget it. Re-solve it once more, this time without the guide, simply to feel the confidence of known movements. Then, place it where you can see and handle it. Let it serve as both a personal milestone and an invitation to others—a small, cold-forged galaxy of interdependent motion, waiting to be explored.