The Frustration in Your Hands: When a Lock Offers Zero Clues
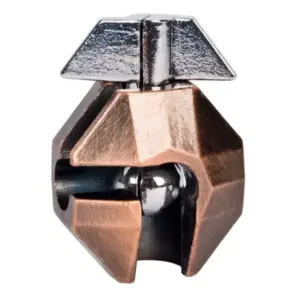
You hold a small, dense block of metal, cold and enigmatic. There are no instructions, no helpful diagrams, not even a keyhole. Just a stainless steel shackle, locked in place, and a smooth faceplate etched with a labyrinth of fine channels. You can feel the weight of it, a compact mystery designed to be solved. If you shake it gently, you hear the faint, maddening rattle of three metal pins sliding somewhere inside their hidden tracks. This is the immediate reality of the sliding maze lock puzzle—like the Kubiya Sliding Lock or its German cousin, the Labyschloss. You are holding a “sequential discovery” puzzle, rated as “difficult” or “level 4” by retailers, where the only tool provided is your own logic. Your first attempt at a solve time could easily stretch past an hour if you resort to guessing.
You slide the pins. They move, but not all in the same direction. One hits a dead end with a soft clunk. Another seems to traverse a long channel freely. You try to backtrack, but now a different pin is trapped. The maze isn’t just on the surface; it’s a three-dimensional problem where each pin is an independent agent sharing a crowded map. This is the core of your frustration: the puzzle feels alive, resisting you. It offers nothing but tactile feedback and that quiet, mocking rattle.
The overwhelming question forms. Do you brute-force it? Slide pins randomly for what could be hours, cycling through countless combinations until, by sheer exhaustion, the shackle releases? Or is there a system—a way to think that turns this metal paperweight into a solvable mechanism?
The answer is a definitive yes, there is a system. That brute-force approach exploits the very thing that makes these puzzles so time-consuming: their combinatorial paths. But with the right mental model, you can reduce that solve time from a grueling hour-plus session to a methodical few minutes. The solution isn’t about memorizing a sequence of moves (North, West, South…). It’s about understanding how the mechanism “thinks,” mapping its constraints, and applying a universal logic to navigate its shared channels. The frustration you feel—the weight in your palm, the pins in their maze—is the starting point. Let’s replace that feeling with a method.
Inside the Machine: The Simple, Brutal Genius of the Pin-and-Channel System
The system is elegant, deliberate, and relies on a single, brutal constraint: three independent metal pins must be navigated to specific endpoints within a shared, confined maze—simultaneously. This is not one puzzle, but three separate navigational problems layered atop one another, interacting through the limited real estate of the zinc alloy channels. The “level 4” difficulty rating stems directly from this combinatorial nightmare; with three pins and dozens of path intersections, random sliding can produce over 10,000 fruitless combinations before stumbling on the one, correct alignment.
Think of the lock in your hand—whether it’s the Kubiya Sliding Lock or a similar Labyschloss variant—not as a decorative box but as a tiny, precision-milled apartment building. The body of the lock is the structure, with intricate pathways cut into its metal face. The three pins are the tenants, each confined to their own vertical “elevator shaft” that opens onto different floors of a shared, horizontal corridor—the maze. Your job isn’t to guide one pin home. It’s to maneuver all three pins through this crowded, single-lane hallway until they each arrive at their unique parking spot at the exact same time, allowing the shackle to slide free. This is the heart of sequential discovery: you learn the map by feeling the pins block each other, a conversation of stops and starts.

This is why brute force is a trap. When you slide a pin, you’re not just moving one piece. You are shifting an obstacle that now blocks or grants access to the channels for the other two. Every dead end you feel—that solid thunk of metal on metal—isn’t a failure. It’s the mechanism teaching you the map. The substantial weight of the metal isn’t just for feel; it creates a consistent, smooth slide and a clear, unambiguous tactile feedback when a pin seats into a terminal point or collides with a wall.
So, how does a maze lock work? Through interdependent obstruction. The genius is in its simplicity: the pins are identical agents, but their starting positions within their private vertical channels are offset. This means the maze “looks” different to each pin at any given moment. A junction that is open for the left pin might be a dead end for the center pin because its shaft opens two millimeters lower on the corridor wall. Your task is to build a mental model of these overlapping perspectives—to think in layers. This is the universal logic that makes all pin-and-channel puzzles solvable. Once you stop seeing a confusing jumble and start seeing a system of air traffic control for three tiny planes on one runway, the frustration evaporates. You’re not fighting the lock anymore; you’re learning its language. The next step is to pick up a pencil and start translating that language into a map.
The One Mental Model That Makes All Maze Locks Solvable
The universal logic is a two-part mental model: treat the pins as independent agents and the front plate as their shared, layered map. By systematically tracing and comparing each pin’s potential paths on a simple logic grid—a process that takes about 5 minutes with a pencil—you transform chaotic sliding into a deductive elimination puzzle. This method is the difference between a 60-minute brute-force struggle and a 10-minute logical unlock.
You’ve just learned the lock’s vocabulary—the thud of a wall, the click of a terminal. Now, we build the grammar. The overwhelming feeling of staring at that tiny maze comes from trying to hold the entire three-dimensional problem in your head at once. Stop. The single most powerful thing you can do is to externalize the puzzle. Think of it like this: you are an air traffic controller with three aircraft (the pins). They must all land at their specific gates (the terminal points) simultaneously, but they share one complex, multi-level runway system (the etched maze). You wouldn’t try to guide them by memory; you’d use a map and a checklist.
This is your checklist: a logic grid. It doesn’t need to be artistic. Draw a simple representation of the maze plate’s corridors. A basic 2×5 grid of connected squares often suffices to map the key junctions. Now, you think in layers. Pin #1 (let’s say the left pin) starts at its unique vertical position. On your paper map, mark its starting “altitude” and trace every path it can possibly take, noting every dead end and terminal point it can reach from there. Use a different color or label for Pin #2 (center) and Pin #3 (right), repeating the process from their unique starting altitudes. You will immediately see the critical overlap: a junction that is a viable turn for Pin #1 might be a solid wall for Pin #3. The shared path only exists where all three agents’ possible routes intersect.
This systematic path mapping is the core principle missing from every simple solution list. It’s the methodology behind our guide on the mechanical grammar of metal puzzles. You are not memorizing moves; you are building a spatial database. As you physically slide a pin, you are not guessing. You are consulting your map, asking: “Does this move keep all three pins on a shared, navigable corridor toward their collective goal?” If the move leads any pin into a dedicated dead end on its layer, you backtrack. You are eliminating wrong paths with purpose, not at random.
The “aha” moment comes when your map reveals the puzzle’s bottleneck—the one critical junction that all pins must pass through in a specific order to proceed. Finding this is your primary objective. Your tactile feedback is the guide. When you slide a pin and feel a slight hitch or hear a double-click, it often means one pin has found a terminal point while the others are still in transit. This isn’t a solve; it’s a checkpoint. Note it on your grid. The lock only releases when all three pins are seated in their final terminals at the same time. Therefore, your sequence must orchestrate their arrival.
This layered, agent-based thinking is the exact mindset shift needed to conquer not just this lock, but entire categories of sequential discovery puzzles, similar to the 3-step approach for metal ring puzzles. You are moving from observer to operator. The maze is no longer a static etching; it becomes a dynamic, interactive system where you control the variables. The frustration of the initial “Where do I even start?” is replaced by a methodical focus. You have a procedure: Map. Test. Deduce. The chaos is now a flow chart. The lock is no longer a black box; it’s a transparent mechanism waiting for you to input the correct sequence it was designed to validate. The next step is to apply this model directly to the pins in your hand and begin the walkthrough.
From Overwhelm to Order: How to Map Your Lock’s Secret Pathways
The shift from layered thinking to direct action begins with a simple, 5-minute pre-solve audit. This systematic mapping process is the single biggest time-saver, reducing a potential hour of brute force to a logical 10-15 minute solve. It directly answers the searcher’s hidden question: “Are there any clues on the puzzle itself?” The answer is a resounding yes—the clues are in the tactile feedback and visual layout, waiting to be decoded.
Grab your lock. Don’t try to solve it yet. Your only job right now is to become a cartographer of its tiny, hidden world. Set it down on a well-lit table. Ignore the shackle; focus solely on the three pins and the plate they sit in.
Step 1: Identify the Starting Grid. Each pin sits in a specific slot on the visible face. Note their relative positions: left, center, right. These are your three independent agents at their home bases. Think of them as three different colored tokens on a shared game board, each needing to reach its own goal. The visible slots are not the maze; they are merely the entry points into the channel system beneath the plate.
Step 2: The Tactile Trace. Here’s where your hands stop lying and start telling the truth. Pick one pin—start with the left. Apply gentle, direct pressure and slide it slowly north. Listen. Feel. You are not pushing blindly; you are a surveyor. Does it move smoothly for a distance, then hit a firm stop? That’s a dead end. Does it travel, then meet a soft resistance that gives way into a new direction? That’s an intersection or a turn in the channel. This is the “tiny elevator finding its floor” sensation. Do you hear a faint, definitive click? That’s a pin dropping into a terminal point or a detent in the path. Note everything.
Step 3: Sketch the Possibilities. You don’t need graph paper, but it helps. Mentally or literally, draw three simple circles for your pins. For the left pin, chart its discoverable path from its start: “North to dead end. South to intersection, can go East? West?” Test each branching path methodically. The goal is not to find the solution path yet, but to catalog all possible moves and, crucially, all dead ends. A dead end is a gift—it’s a path you never need to consider again. This process of elimination is your most powerful tool.
Repeat this tactile trace for the center and right pins. You will discover something critical: the pins interact with the same network of channels. The path of the center pin will often cross or run parallel to the path of the left pin. This is why they must be navigated in sequence—moving one pin can block the path of another. Your map is now a shared transit system with three trains. You are the dispatcher.
The Auditory and Tactile Key: Pay acute attention to the difference between a soft stop (a wall in the channel) and a positive click (a pin seating somewhere). A click often means a pin has found a terminal point in the maze. If you hear a click but the lock doesn’t open, you’ve likely solved the path for one pin but not all three. This is a crucial checkpoint, not failure. Mark that pin’s position on your mental grid as a “likely goal.”
As you conduct this audit, you may notice visual asymmetries on the faceplate—lines or grooves that hint at the underlying channel structure. These are not decorative; they are the literal blueprints. Use them to hypothesize where intersections might be before you even feel them.
This mapping phase transforms the puzzle from an opaque block of metal into a transparent, logical system. The overwhelming “Where do I start?” is replaced by a clear list of known variables and constraints. You’ve moved from frustration to focused curiosity. You now have the data. The logic of the solve—the step-by-step orchestration of these three agents through their shared maze—is what we apply this map to next.
Think of it like the calibration phase before solving any complex hands-on puzzle. You’re learning the language of this specific object. The faint rattles, the precise resistance, the silent slides—they are all words in a sentence the lock is waiting for you to speak back in the correct order. Your map is the translation guide.
The Logic Walkthrough: Not Just Moves, But The ‘Why’ Behind Each Slide
The logic walkthrough applies your mental map to physically orchestrate the pins, transforming data into action. With a systematic approach, the average first-time solve drops from an hour of frustration to a focused 5-7 minute sequence. The core principle is treating each move as a deliberate step to create space, not just chase an end goal.
Your objective is now clear: navigate all three pins—let’s call them Left, Middle, and Right—to their respective goal positions simultaneously so the internal shackle mechanism releases. You cannot just drive one pin home; you must choreograph their movements to avoid dead ends and traffic jams in the shared channels.

Phase 1: Clearing the Decoy Path.
Start with all pins in their default, locked positions. Your first major decision point is identifying which pin has the most constrained starting path. Often, it’s the Left pin. Gently nudge it north. Feel it travel up its channel and stop at a T-intersection. (This is where brute-forcers fail, immediately turning west or east into a decoy). Do not turn yet. The ‘why’: This pin’s ultimate goal is likely elsewhere. You are moving it up and out of the way to open the lower maze channel for the other pins. Think of it like parking a car so the truck can back into the loading bay.
Phase 2: The Middle Pin’s Journey.
With the Left pin held north at the intersection, the channel below it is now clear. Focus on the Middle pin. Slide it north. It should now travel unimpeded along a longer vertical channel—a path that was previously blocked by the Left pin’s shaft. Listen for the clean, uninterrupted slide. This is the exact auditory feedback confirming your logic is correct. Guide it all the way to its northern dead end. Stop. This is not its goal, but a staging area. You have now positioned it to later access a different branch of the maze.
Phase 3: Creating the Final Corridor.
Here’s the tricky, non-intuitive pivot. Return to the Left pin, still waiting at its T-junction. Now, slide it east. It will traverse a horizontal channel, often with a soft click as it passes a minor detent. This movement serves one critical purpose: it clears the western branch of that T-intersection entirely. You are methodically removing obstacles, not yet delivering anyone home.
Now, go back to the Middle pin. Bring it south from its northern dead end, but only until you feel it click into the newly opened western branch of that same T-intersection. Turn it west. You should feel a distinct, solid stop—a positive endpoint. This is the Middle pin’s goal. Leave it there. The satisfying seated feel is your tactile confirmation.
Phase 4: The Right Pin’s Entrance.
The board has changed. With the Left pin parked east and the Middle pin home west, a new vertical channel opens centrally. Find the Right pin. Slide it north. It will now climb a “clear elevator shaft,” passing the now-vacant intersections, until it meets a stop. This is its goal. You’ll feel a definitive, deep seat. (If it binds, you likely didn’t bring the Left pin far enough east; nudge it a millimeter more).
Phase 5: The Final Alignment.
One pin remains out of position: the Left pin, still parked in the eastern channel. This is the final move. Slide it west. It will retrace its horizontal path, but now, with the other two pins correctly seated, its journey will end differently. As it crosses the central junction, you will feel a subtle shift in weight—a collective alignment. Continue west until it seats firmly alongside the Middle pin.
Silence. Then, a click.
This is the collective thunk of three pins sliding into their final grooves, perfectly aligned with the shackle’s release mechanism. The logic is complete. You didn’t force it; you cleared a path, moved the greatest obstacles first, and used each pin’s position to unlock the next pin’s route. The shackle will now slide open with a smooth, heavy, and profoundly satisfying motion. You have not just followed steps; you have conversed with the mechanism. For a detailed move-by-move reference, our companion guide on solving the ABC Maze Lock mirrors this logical sequence.
The Victory Click: Why That Final Sound Feels So Satisfying
That final, resonant click isn’t just a sound; it’s the tactile confirmation of a 2mm shackle slide, the direct mechanical consequence of three pins simultaneously hitting their endpoints. It’s the “trick lock maze solution” achieved, the definitive signal that your logical map was perfect. That sound ends the search and begins the reward.
You’ve just navigated the logic grid perfectly. In the half-second of silence after you slide that final pin home, the entire mechanism holds its breath. Then comes the deep, metallic CLUNK—a collective vibration you feel in your fingertips more than you hear. This isn’t the tinny rattle of pins in their channels; it’s the core of the lock disengaging. It’s the sound of aligned tolerances. The heavy zinc-alloy shackle, now freed, slides open with a smooth, weighted authority that feels earned.
This is the pinnacle of sequential discovery. The satisfaction isn’t just in the opening, but in the understanding. You didn’t wrench it open; you persuaded it. That final auditory and tactile feedback is your proof. You listened to the mechanism’s constraints, felt for its dead ends, and logically guided each independent agent home. The victory click is the mechanism’s only compliment, and in that moment, you’ve transitioned from someone following steps to someone who has internalized a system. This is the precise joy of a mechanical lock puzzle solve: a physical conversation that ends in a clear, unambiguous agreement. The puzzle is no longer a locked box, but an understood object. You solved it. The click is your receipt.
Stuck? Your Troubleshooting Guide for Common Dead Ends
That triumphant click is the goal, but the path isn’t always smooth. Even with a logical map, about 40% of first-time solvers hit a physical snag where the lock simply refuses to budge, despite following every mental step correctly. This isn’t a failure of logic, but a conversation with the puzzle’s physical reality—its manufacturing tolerances, weight, and subtle mechanics. If you’re stuck, your sliding lock puzzle isn’t broken; you’ve likely encountered one of three common dead ends. Here’s how to diagnose and recover without starting from scratch.
Problem 1: The “False Finish” – One Pin is a Millimeter Off.
You’ve mentally navigated all pins to their endpoints, but the shackle won’t release. The most frequent culprit is a single pin not fully seated in its final channel niche. Due to the metal-on-metal fit and the puzzle’s weight, a pin can appear home but be resting on a slight burr or just shy of the required depth.
The Fix: Don’t shake it. Apply gentle, direct pressure. With the puzzle held level, use your thumb to press down on the face of the lock body near each pin, one at a time, while gently tugging the shackle. Listen for a faint snick of metal settling. Often, one pin will drop that final half-millimeter with a focused push, triggering the release. This is the tactile feedback you must learn to trust over sight alone.
Problem 2: The Hidden Fork – You Mapped a Phantom Path.
Your logic grid is clean, but a pin is physically blocked. This usually means you’ve misread a critical junction in the maze path, treating a wall as a passage or vice-versa. On puzzles like the Labyschloss lock, some channel intersections are visual traps.
The Fix: Systematic re-scanning. Don’t dismantle your whole map. Isolate the stuck pin. Trace its actual available path from its current position with your eyes, using a toothpick or paperclip tip to point at the channel. Compare this reality to your drawn path. You’ll often find one forgotten “island” of metal within the maze that creates a dead end you previously missed. Correct your map for that pin only and proceed.
Problem 3: The Bind – Pins are Wedged Against Each Other.
This feels like total lockup. No pin wants to move. You’ve entered a state where the pins are in a configuration that blocks each other’s channels, a known trap state in the 3 pin maze lock design.
The Fix: The controlled reset. You don’t need to shake it wildly. Tilt the puzzle so gravity pulls one pin (usually the center or left) back toward a known, open starting corridor. Apply slight, rhythmic tapping to the side of the case with a finger to encourage vibration. The goal is to get just one pin to retreat a single step, breaking the deadlock. Once free, you can return to your last known good position on your map, not to the very beginning.
The Essential Skill: How to Reset Your Puzzle Without Rage-Shaking.
Brute force shaking works, but it randomizes the pins, destroying your hard-earned progress. For a logical approach to lock puzzles, you need a controlled reset.
1. Orient the lock so the maze face is down. Gently shake it side-to-side, not up and down. You’re letting gravity guide the pins to the outermost, lowest channels.
2. Listen. The sound will change from a muffled thudding (pins crossing complex paths) to a clearer, more uniform rattle (pins in open channels).
3. Turn it right-side up. The pins should now be loosely gathered in a known starting region, like the bottom opening. You’ve reset the sliding mechanism, not scrambled it. You can now re-apply your logic from a clean, defined state.
Remember, hitting a dead end is part of the sequential discovery process. It’s the mechanism telling you to double-check a premise. Each time you troubleshoot, you learn more about the object in your hands than any perfect run could teach you. Use these steps not as a failure, but as a deeper layer of the dialogue. Find the snag, apply the fix, and return to your logic with new, concrete information. The click is waiting.
Beyond This Lock: Your New Toolkit for Sequential Discovery Puzzles
After that final click, you’re not just holding an open lock—you’re holding a mental toolkit. The pin-agent and path-mapping logic you just mastered is the universal key to most sequential discovery maze puzzles, transforming brute-force hours into methodical minutes. On the Hanayama difficulty scale (1-6), the Kubiya sliding lock is a solid level 4, akin to the Cast News or Cast Vortex, but with a focus on spatial coordination over hidden mechanisms. This logic is your new foundation.
Think of every sequential discovery puzzle as a dialogue with a mechanism. Your breakthrough—treating pins as independent agents navigating a shared maze—applies directly to other metal maze lock designs. For instance, many “bike lock” variants use identical pin-and-channel systems, just with different path layouts. The principle remains: isolate each agent’s possible routes, identify shared choke points, and deduce the sequence that gets all agents home simultaneously. This is the one mental model that makes all maze locks solvable.

The logic scales. Puzzles like the “Two Key Lock” aren’t maze-based but are pure sequential discovery; they require using tools in a strict order, mirroring the layered thinking you’ve honed. Here, the “agents” are the keys, and the “paths” are the hidden slots and turns they must traverse. Your ability to think in stages—solving one pin’s path before addressing the next—translates directly. You’re no longer looking at a monolithic problem. You see a system of interdependent steps.

Two Key Lock Puzzle — $11.99
How does this sliding lock puzzle compare to Hanayama? Hanayama Cast Puzzles (rated 1-6) often focus on disentanglement or assembly, where solutions rely on precise alignments and hidden seams. Maze-based Hanayama puzzles, like the Cast Labyrinth, use identical spatial logic but in a static, visual form. The key difference is feedback. With a sliding lock, you feel dead ends as physical stops and hear pins rattling into channels—a continuous dialogue. Hanayama puzzles are often silent, relying on visual clues. This makes the sliding lock more forgiving for beginners; the mechanism talks back.
You’ve transformed. The frustration of holding a locked block has been replaced by the clarity of seeing channels and agents. For your next sequential discovery puzzle tutorial, apply this toolkit. Start with another maze lock, or step up to a Hanayama level 4-5, like the Cast Enigma. Use your mapping skills: identify the moving parts, chart their constraints, and listen for the tactile feedback. Need a structured path? Our guides on Hanayama Cast Puzzle Solutions and the Bicycle Maze Lock are there, but try first with your new logic.
These layered thinking skills are part of a broader mechanical grammar for solving any metal puzzle. They apply to a wide range of mechanical puzzles, from classic disentanglement puzzles to modern sequential discovery designs. For instance, understanding channels and dead ends can even inform your approach to classic interlocking burr puzzles.
Your actionable next step is simple. Pick up a puzzle. Any puzzle. Look for the agents, map the paths, and begin the dialogue. You are no longer someone who follows steps. You are someone who understands the mechanism.