The Beautiful Lie in Your Palm: Introducing the Illusion of Solid Metal
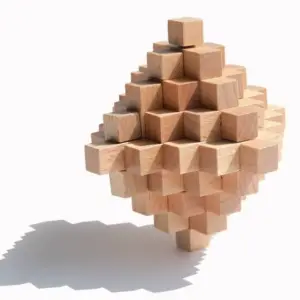
That first moment is universal. You pick it up, and it feels impossibly dense—a cool, heavy knot of zinc alloy weighing between 40 and 120 grams, designed for a satisfying heft. You turn it over, hearing a faint, solid rattle from within a seemingly seamless form. Your fingers probe for a gap, a catch, a starting point. There is none. It presents itself as a single, immutable object. If you’re holding one right now, wondering how on earth these solid pieces come apart, you’re not missing a secret button. The secret isn’t in the metal you see. It’s in the empty space you don’t.
This is the beautiful lie of the cast metal puzzle. Its core paradox is an illusion of solidity. Your eyes tell you it’s one piece. The weight in your hand confirms it. Yet logic insists it must be multiple interlocking pieces, designed to disassemble and reassemble. The cognitive dissonance is the hook. The resolution isn’t force, but a shift in perception. You must stop seeing the metal and start seeing the void. This is the shared moment of tactile curiosity every solver knows.
Think of it not as a solid block, but as a meticulously choreographed labyrinth contained within a compact shell. The pieces are not welded or glued; they are trapped by geometry alone. The precision that makes them feel seamless—the machined precision where parts meet with almost no visible gap—is the same precision that allows for movement. The tactile feedback, that subtle schwoop of a smooth slide or the definitive tock of a lock engaging, is your direct communication line with that internal architecture.
The most common mistake here is applying linear force—pulling or twisting as if trying to break a wishbone. (This is where most people force it—don’t.) A cast puzzle isn’t a test of strength; it’s a spatial conversation. The answer to “How do you even start?” is to listen with your hands. Shake it gently to map the internal play. Feel for which parts have independent movement, however microscopic. That initial, frustrating immobility is a designed starting state, a stable equilibrium the puzzle rests in. Your job is to find the first sequence of movements that nudges it out of that stable rest and into its hidden sequential movements.
This initial relief—the understanding that you’re not confronting magic, but a cleverly hidden mechanical puzzle system—is the first step out of frustration. The metal isn’t lying to you. It’s just speaking a language of rotational axes, clearance, and concealed pathways. Let’s learn to hear it.
Clearance is Everything: Tolerances, Negative Space, and Machined Precision
That initial spatial conversation is governed by one unbreakable rule: clearance is everything. In engineering terms, tolerance is the permissible limit of variation in a physical dimension—the precise gap that allows a key to turn in a lock. In a cast metal puzzle, that gap can be as little as 0.1 to 0.2 millimeters. This microscopic negative space, designed into the zinc alloy casting, is the hidden geometry that makes movement possible. Without it, you’d hold a solid, useless paperweight.
Think of a perfectly machined lock and key. The key slides in because it is slightly smaller than the keyway. Apply that to every interacting surface inside your puzzle. The pieces aren’t fused; they’re in a state of precise, intentional adjacency. When a puzzle feels “stuck,” it’s not broken. You’ve likely either encountered a sequential discovery step you haven’t found yet, or you’ve misaligned those critical clearances by a fraction of a degree. (Forcing it here is how you risk a permanent, galling bind—the metal plating can actually shear off.)

This is where manufacturing becomes part of the puzzle mechanism design. Pieces are die-cast from molten metal into hardened steel molds. This process is accurate, but the raw castings have minor imperfections—tiny flashing or rough surfaces. That’s why they’re tumbled in abrasive media for hours. This finishing step doesn’t just make them shiny; it’s a critical calibration. It removes material, widening those vital clearances by microns and creating the smooth tactile feedback you feel as a schwoop.
The final plating—whether nickel, brass, or gold—adds another layer, literally. Electroplating deposits a coating mere thousandths of a millimeter (0.002-0.005 mm) thick. On a macro scale, it’s negligible. On the scale of puzzle tolerances, it’s decisive. A perfectly solvable raw casting can become “stuck” if the plating is applied too thickly, filling in the designed negative space. This is why two copies of the same Hanayama puzzle can have subtly different “handshakes.” The most extreme examples, like the Zirel puzzle, operate on microscopic gaps and precision casting as tight as 0.002mm, where the thermal expansion from holding it in your hand can be enough to change the solve.
So, can you permanently break it? Yes, but not how you think. Corrosion or grit can lock pieces. The real danger is torsional force—applying leverage when a piece is bound. This can gall the soft zinc alloy, effectively welding surfaces together by displacing metal. The solution is never force; it’s realignment, a return to the starting equilibrium, and a search for the correct rotational axis you’ve missed. The precision that binds is the precision that frees.
The Three Foundational Tricks: A Taxonomy of Cast Puzzle Mechanisms
Every cast metal puzzle operates on one—or a hybrid—of three core mechanical principles, which directly map to the escalating complexity of Hanayama’s 1-6 difficulty levels. Understanding this taxonomy is how you move from random fumbling to strategic exploration; it’s the difference between seeing a tangled knot and recognizing the specific type of weave used to tie it.
1. Disentanglement: Pathfinding Through 3D Labyrinths
This is the most intuitive and ancient of the three principles, shared with classic wire disentanglement puzzles. The goal isn’t to pull pieces apart, but to navigate them through a convoluted, shared path of negative space until they are free. Think of it as guiding a key through a three-dimensional maze where the walls are made of the other piece. The trick is that the correct path is rarely a straight pull; it involves a precise series of rotations and slides where pieces must be in exact, transient alignments to pass through internal windows or gates. The classic Hanayama Cast Vortex (a difficulty 4) is a masterclass in this. Its two spirals seem hopelessly intertwined, but they separate with a satisfying schwoop-clunk after you discover the specific rotational axis and tilt that allows one spiral’s channel to exit the other’s head. The entire solve is about mapping that invisible corridor.
2. Sequential Movement: The Domino Effect of Alignments
This is where most modern cast puzzles shine and where the “solid metal” illusion is most profound. The pieces are interlocked in a state of perfect, mutual constraint. No single piece can move first. The solution is a Rube Goldberg machine of micro-movements: shifting Piece A just enough to create 0.5mm of tolerance for Piece B to rotate a few degrees, which then unlocks a slide in Piece C, and so on. The movement is cumulative and often non-reversible without restarting. The genius is in the design of the interlocking pieces; every surface is a cam, a lever, or a gate. This principle is the heart of sequential discovery, a pinnacle of mechanical puzzle design. When a puzzle feels “stuck” even when you’re following the puzzle solution mentally, you’ve likely missed a sub-millimeter alignment in the early sequence. The famous Cast Labyrinth (difficulty 3) is a perfect introductory example. Its plates shift with a series of soft tocks, each small movement enabling the next, until the system unlocks.
3. Finding the Key Piece: The One That Unlocks the Gridlock
In some puzzles, all pieces appear equally stuck in a gridlock. The trick is identifying the one piece that isn’t a prisoner—it’s the warden. This key piece is often designed to look identical to the others or is camouflaged within the symmetry of the form. Its movement is usually counter-intuitive: it might be the piece that seems most central and trapped that actually rotates or slides first, breaking the symmetry and dissolving the mutual constraints on all others. Solving these is less about dexterity and more about a perceptual shift—re-evaluating what you assume is static. This principle frequently combines with Sequential Movement; the key piece initiates the sequence.

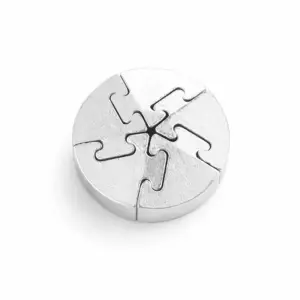
Two Key Lock Puzzle — $11.99
A quintessential “key piece” puzzle, like the Two Key Lock Puzzle above, embodies this principle. Two identical-looking keys are interlocked. The solution hinges on discovering that one key has a subtly different orientation or freedom, making it the true key to the lock. To explore more brilliant examples, see our analysis of the core mechanical principles of disentanglement, judged by a machinist’s eye for such details.
In practice, most sophisticated puzzles are hybrids. A level 6 Hanayama puzzle, like the infamous Cast Enigma, might require you to first find the key piece (Trick 3), then execute a long, non-linear sequence of movements (Trick 2), which involves navigating tight disentanglement paths (Trick 1) mid-sequence. The difference between cast and wire puzzles becomes stark here: wire puzzles are almost purely Trick 1, while cast metal puzzles use the material’s rigidity to explore the intricate, multi-step world of Tricks 2 and 3. Now that you speak the language of the mechanisms, you’re ready to learn how to listen to the puzzle itself through your fingertips.
How to Listen with Your Fingers: Decoding Tactile and Auditory Feedback
You now understand the language of the mechanisms—disentanglement paths, sequential moves, key pieces. But a cast metal puzzle speaks that language through pressure, sound, and weight. Your hands are not lying to you; they’re translating. The feedback from a well-machined zinc alloy puzzle is a direct data stream into its internal logic. A definitive ‘click’ indicates a piece has found a positive stop or engaged a lock, while a gritty ‘grind’ signals a catastrophic bind, often due to plating buildup of a few thousandths of an inch. Learning this vocabulary transforms random manipulation into informed exploration. It’s about learning to translate sensory input into mechanical intelligence.
Think of it as diagnostic sonar. Close your eyes. Now, gently torque the pieces. Do you hear a solid clunk with no movement? That’s a hard stop—a piece is against an immovable internal wall. Do you feel a slight schwoop of smooth sliding followed by a soft tock? That’s a piece finding a channel and then seating into a detent. That sequence is the puzzle whispering, “You’re on a path.” Conversely, a rasping, resistant grind is the puzzle shouting, “Stop. You are forcing two surfaces that were never meant to meet under pressure.” (This is where most people, in frustration, apply too much force and risk a permanent bind.)
The most critical piece of data is slop—the deliberate, minute play between pieces. In a precision mechanical puzzle, slop is not a manufacturing defect; it’s your primary clue. It defines the potential vector of movement. If you can wiggle Piece A up and down 2 millimeters relative to Piece B, but not side-to-side, you’ve just mapped your first axis of potential freedom. A complete lack of slop, a sudden “bind,” often means you’ve aligned features in a way that locks the entire assembly solid. This is frequently where puzzle solving techniques fail—the solver mistakes a bind for the “hard part” and pushes through, rather than backing up to find the slop that indicates the true route.
Weight distribution is another silent informant. As you tilt the assembled puzzle, listen and feel. A subtle shift in balance or a new, faint rattle means an internal component has moved relative to the others. In labyrinth puzzles, like the Cast Vortex or the Maze Lock below, this is the core of the solve: you’re not just moving pieces with your fingers, you’re guiding a loose component through a hidden maze by tilting the entire assembly, using gravity as your tool.

This leads to the Universal First-5-Minutes Protocol. Before you try to solve, you must interrogate.
- LOOK: Under bright light, from every angle. Your goal isn’t to see the solution, but to identify every visual feature: holes, slots, notches, and unique shapes on each piece.
- LISTEN: Shake it gently. A single, solid rattle suggests one piece is loosely captive. Multiple, light ticks suggest several independent components. No sound at all means everything is snugly interlocked—a key data point.
- SHAKE & TILT: Deliberately shift the weight. Listen for changes in the rattle. Feel for a shift in the center of mass. This often betrays the “loose” piece that is your entry point.
- MAP THE SLOP: Apply gentle, controlled pressure in every direction to every piece pair. Don’t try to move them apart; just catalog what kind of tiny movement is allowed. Rotational wiggle? Linear slide? This is you building a mental CAD model of the negative space.
- GENTLE STRESS: Apply light tension—a slight pull or twist—to a pair of pieces while performing a third action, like rotating a different piece. Often, the solution requires you to hold a piece just so under slight stress to create the necessary clearance elsewhere. This is the heart of sequential discovery.
This protocol systematically converts the overwhelming “Where do I even start?” into a structured data-gathering mission. The sounds and feels are no longer mysteries but diagnostic tools. A click is a waypoint. Slop is a map. A bind is a “Wrong Way” sign. Your fingers are no longer fumbling in the dark; they’re listening in the light. Now, with your senses tuned and a protocol in hand, you’re ready to adopt the universal solver’s mindset.
The Universal Solver’s Mindset: A Step-by-Step Strategy for Any Puzzle
The ultimate secret is that there is no secret. Every cast metal puzzle is a designed, deterministic system. The goal isn’t to guess but to discover. This is where your sensory diagnostics—the clicks, the binds, the slop—evolve into a conscious, repeatable methodology. It’s the difference between poking at the puzzle and conducting an investigation. With this five-step mindset, you can approach any new puzzle, from a Hanayama Level 1 to a diabolical Level 6, not with dread, but with the systematic curiosity of an engineer. At least 95% of solves are achieved by reversing the precise sequence of the assembly. This is the transferable problem-solving methodology you need.
Your diagnostic phase just gave you raw data. Now, we build the case.
1. Assume Solvability (The Prime Directive)
This is non-negotiable. You are not fighting the puzzle; you are collaborating with its designer. The pieces will separate along a path allowed by their geometry and the tiny, machined tolerances between them. Forcing is not a strategy; it is the declaration of a mechanic’s surrender. When you hit a solid bind, your internal dialogue should shift from “It won’t move” to “The current state of the other pieces is preventing this move.” This mental reframe is everything.
2. Mental Disassembly: Ghosting the Pieces
With the puzzle at rest in your hand, close your eyes. Your goal is not to solve it physically, but to solve it in your mind. Visualize the pieces as translucent, ghostly forms. Now, ignore the laws of solid matter. In your mind’s eye, can you imagine one piece sliding through another? Where would it need to go? This isn’t about finding the real path yet; it’s about identifying the conceptual path—the necessary translation or rotation that would result in separation. Often, the actual solution is a clever, real-world approximation of this “ghost” move, using rotations and clearances to simulate one piece passing through the solid mass of another. This is the essence of out-of-the-box thinking.
3. Axis Hunting: Cataloging All Possible Rotations
Every movement in a cast metal puzzle is either linear or rotational. Linear slides are rare; rotation is king. Your job is to find every potential rotational axis for every piece, both obvious and hidden. Take two interlocked pieces. Can they rotate relative to each other? Around what point? Is it a clean pivot or a wobbly, eccentric rotation? (That wobble, or slop, is your clue to a more complex, multi-stage path). Systematically test each pair. A piece might have a primary, obvious axis and a secondary, tighter axis that only appears when the puzzle is in a specific, stressed state. Map them all.
4. Constraint Mapping: The “Why Not” Analysis
For every potential movement you identified in steps 2 and 3, you must now identify the constraint that blocks it. This is reverse-engineering the trap. If Piece A could, in theory, rotate schwoop out of Piece B, what is physically stopping it? Is it the flank of Piece C? Is it a lip or protrusion on Piece B itself? Touch that precise spot. This is constraint mapping. By cataloging every “why not,” you start to see the dependencies. The solution almost always involves manipulating other pieces to temporarily remove the primary constraint for a single, crucial move. You are solving a spatial logic problem where the pieces are both the lock and the key.
5. Reverse-Engineering the Assembly Sequence
Here’s the master key: Disassembly is assembly in reverse. The final step in your mental solve is to hypothesize the last step of the assembly. If the puzzle is together, how was the final piece put in? It had to have a path. By working backward—”What was the last move that locked this all together?”—you often find the first move of the disassembly. This directly answers the common user question: putting it back together is different, but only in direction. It requires you to remember or rediscover that precise sequence, often requiring more dexterity as you must actively create and maintain the aligned clearances, rather than exploit them. It’s the difference between dismantling a watch and building one.
This mindset transforms the puzzle from an object of frustration into a structured project. You are no longer a player hoping for a breakthrough. You are a detective gathering evidence, an engineer analyzing a mechanism. You move from “I wonder if this works” to “According to my constraint map, clearing this lip requires this piece to be rotated 30 degrees counter-clockwise, which is currently blocked by… ah, I see.” The satisfying tock of the final piece releasing isn’t luck. It’s the sound of your methodology being proven correct. Now, with confidence in your approach, you can appreciate the final piece of the puzzle: how it was made.
From Molten Metal to Fidget-Weight Enigma: How Cast Puzzles Are Made
You now have a mental map for solving them, but that dense, satisfying object in your hand—that 40 to 120 grams of heft—started as a puddle. Understanding this journey from molten metal to finished enigma reveals why some moves feel buttery smooth and others create a frustrating, solution-breaking bind. It’s a story of manufacturing and its direct impact on the solve.
The process is die-casting: molten zinc alloy is injected under pressure into a hardened steel mold, forming the raw pieces with tolerances often within a fraction of a millimeter. After cooling, the pieces are “de-gated,” where the sprues and channels of excess metal are snapped off. They’re then tumbled in a barrel with abrasive media for hours. This isn’t just for shine; it’s critical deburring. Every microscopic flash of leftover metal from the mold seam must be worn away, or it will act like a tiny lock, preventing the precise sliding and rotation your strategy depends on. This is where the foundational “clearance” is physically created.
Here’s where manufacturing directly talks to your fingertips: plating. Pieces are often electroplated with nickel, brass, gold, or silver for color and corrosion resistance. This adds thousandths of an inch to every surface. On a well-designed puzzle, this is accounted for in the mold. On an extremely tight-tolerance design, or a cheaper imitation, it can eliminate the functional clearance entirely. That infuriating “stick” you feel, even when you’re sure you’ve found the right alignment? It might not be you. It’s a half-thou of brass plating where it wasn’t planned for. (This is why forcing is a terrible idea—you’re not fighting the puzzle’s logic, you’re fighting its physics, and the softer plating will gall and bind long before the zinc alloy core gives way.)

This explains the typical $12 to $25 price point for brands like Hanayama. You’re paying for that precision tooling, controlled plating, and rigorous tumbling that ensures the designed clearances are real. The zinc alloy core provides the fidget-weight density, while the plating defines the hand-feel—a nickel-plated puzzle has a cooler, slightly harder schwoop than a warmer, sometimes slightly grippier brass-finished piece.
This manufacturing dance is why puzzles generally don’t “wear out” or get looser with normal use. The zinc alloy is harder than your skin, and the plating is tough. Barring corrosion or forced damage, a puzzle solved a thousand times should move with the same precise tock as the first. The Hanayama Cast Puzzle series, starting in 1983, mastered this balance, turning independent puzzle designers’ concepts into consistently manufacturable disentanglement puzzles. The final product is a testament to material science: an object that feels impossibly solid, yet whose secret life exists entirely in the emptiness between its interlocking pieces.
Cracking the Codex: What Hanayama’s 1-6 Difficulty Rating Really Means
Hanayama’s official 1-6 difficulty scale, assigned directly by the puzzle’s designer, isn’t a vague measure of “hardness.” It’s a precise map of escalating mechanical and cognitive challenges, where each integer corresponds to a specific category of trick being deployed against you. Understanding this codex—from Level 1’s obvious single-axis rotation to Level 6’s diabolical, multi-layered sequential discovery—transforms the rating from a warning into a strategic preview. This is the key to decoding the difficulty scale.
Level 1 (Beginner): The Obvious Mechanism. Think of this as the tutorial level. The goal is to teach your hands the fundamental vocabulary. The rotational axis or linear path is clear, often involving a single, unambiguous turn or slide. There’s little to no sequential discovery; the move presents itself. A classic like Cast Ring or Cast Heart falls here. The challenge isn’t in finding how to move, but in trusting that the solid metal will allow the movement. This is the best first cast metal puzzle to build confidence.
Level 2 (Easy): The Simple Discovery. The core mechanism is still relatively straightforward—often a single disentanglement or a two-step process—but now it requires you to find the starting position. The pieces may need to be aligned in a non-obvious way before the primary move reveals itself. There’s a slight “aha” moment, but the path, once found, is short and logical. It reinforces the principle that the solution lives in negative space.
Level 3 (Intermediate): The Hidden Axis. This is the first major cognitive jump. The defining trait of a Level 3 puzzle is a rotational axis or pivot point that is deliberately concealed by the shape of the pieces. Your eyes tell you the pieces are locked flat against each other; the solution requires you to discover a tilt, a twist, or a rotational plane that isn’t apparent from the resting state. The famous Cast Vortex is a masterclass in this. You must override visual data and rely on tactile feedback to map the hidden geometry.
Level 4 (Hard): Misdirection & Counter-Intuition. Here, the puzzle begins to fight your instincts. The correct sequence often involves moving a piece into a perceived tight spot, applying gentle pressure in a way that feels wrong, or temporarily making the entanglement worse to make it better later. The mechanics themselves might not be more complex than a Level 3, but the path is littered with psychological blocks. You’ll encounter sequential movements where step two is impossible unless step one is fully and precisely committed—a common point where solvers hesitate and think they’re stuck.
Level 5 (Very Hard): Precision Sequencing & Memory. At this level, the strategic moves compound. You’re navigating a labyrinth of clearances where the order of operations is strict and non-obvious. The puzzle may have multiple, interdependent pieces that must be manipulated through a series of precise intermediate states. Reassembly is often the true test, as you must mentally reverse-engineer and recall a chain of 5-10 specific manipulations. The challenge is cognitive load and spatial memory as much as mechanical insight.
Level 6 (Expert): Multi-Layered Sequential Discovery. This is the pinnacle. A Level 6 rating means the puzzle is a Russian doll of secrets. Solving it requires discovering a mechanism (the first “layer”), which only grants access to or reveals the true primary mechanism (the second “layer”). This often involves a key piece that doesn’t initially appear to be a key, or a component that must be manipulated to alter the puzzle’s internal geometry before the main disentanglement can even begin. The path is long, unforgiving, and designed with elegant misdirection. It’s not just about finding a sequence, but about uncovering the very rules of the puzzle itself.
So, how can a puzzle be a “6”? It’s not about strength or dexterity. It’s the puzzle designers deploying every trick: hidden axes, precise tolerances that allow only one exact path, psychological misdirection, and compounded sequences that must be discovered and remembered. The Hanayama puzzles at this level, like Cast Delta or Cast Enigma, are less toys and more mechanical theorems to be proven with your hands.
Use this codex to choose your challenge. If you’re new, start at 1 or 2 to learn the language. If you understand clearance and hidden axes, tackle a 3. Only move to a 5 or 6 when you’re comfortable with long, blind exploration and meticulous mental mapping. Remember, the rating isn’t a gatekeeper of intelligence; it’s a label on the toolbox of tricks you’ll need to open.
Choosing Your Next Artifact: Matching Mechanism to Your Curiosity
Choosing your next cast metal puzzle is about aligning mechanism with mindset, not just chasing a higher number. While the puzzle rating system tells you the scale of the challenge, the core mechanism type defines its character—and your sustained enjoyment hinges on picking one that matches your curiosity. They rarely “wear out” from solving, but a drop of light machine oil (never WD-40) on a cotton swab can restore the original tactile feedback if a puzzle feels grimy or develops a slight bind from handling. Avoid home remedies like puzzle heating, which can warp the alloy.
Now that you understand the codex of difficulty, think back to the three main ‘tricks’: Disentanglement, Sequential Movement, and Finding the Key Piece. Do you love the slow, meditative exploration of a labyrinth? A sequential labyrinth puzzle like Cast Labyrinth is your match. Prefer the sudden, geometric aha! of aligned axes? Seek a disentanglement style. This is how you graduate from solving puzzles to collecting experiences. It’s about matching mechanism to your curiosity.
Consider the “fidget factor” versus the “one-and-done” solve. Some interlocking pieces mechanisms, once mastered, become satisfying kinetic sculptures you can solve and resolve almost mindlessly—a perfect desk companion. Others are cerebral expeditions you’ll likely solve once, marvel at the ingenuity, and display. Your best first cast metal puzzle isn’t necessarily the easiest rated one; it’s the one whose mechanical premise whispers to you.

As for cost: Are expensive ones better? Often, you’re paying for designer pedigree or exotic materials, not superior mechanics. The standard zinc alloy Cast Puzzle series pieces are engineered to a price point that makes obsession accessible. A higher price tag doesn’t guarantee a more clever mechanism—some of the most devious puzzles sit squarely in the $15-$20 range. Care is simple: keep them dry, handle with mostly-clean hands, and if they must be cleaned, use a soft cloth and a tiny amount of isopropyl alcohol, not water. (The plating can tarnish if submersed.)
So, your actionable next step: Look at the puzzle you just solved. Identify its core mechanism. Now, seek its opposite. If you just untangled a knot, try navigating a sequential lock. This is how you build your own internal library of problem-solving strategies, moving from a solver of objects to a student of the hidden space within them. The artifact is waiting. You now possess not just an answer to “how do they work?”, but the strategic moves and mechanical grammar to explore the entire genre, from classic disentanglement puzzles to modern sequential discovery marvels. The cold, dense metal in your hand is no longer an enigma. It’s an invitation to a conversation.
For formal classifications and history, mechanical puzzles and disentanglement puzzles are well-documented categories on Wikipedia and its dedicated disentanglement page.