Cosmic Confusion in Your Hand: Your Frustration Ends Here
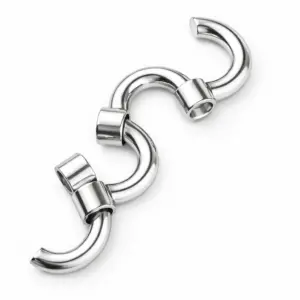
You are holding four seemingly identical, twisted metal pieces. You know they form a sleek, compact galaxy, but right now it’s just cosmic confusion. Put down your phone—this written guide, with clear photos for each move, will get you from scattered pieces to solved puzzle without the frustration of rewinding a video. The Cast Galaxy puzzle, designed by Bram Cohen, is a difficulty 3 puzzle where four zinc alloy pieces interlock through a precise, symmetrical motion. This isn’t about random fiddling; it’s about learning one repeatable mechanical principle, a core concept in the world of mechanical puzzles.
Your search for “hanayama cast galaxy solution steps” or a “metal galaxy puzzle solution” ends here. Every video shows the quick solve but skips the underlying logic. That’s the gap we’re filling. This is a static, permanent reference. You can study the images, proceed at your own pace, and understand the why behind each engagement. The solution hinges on a single locking action, repeated three times. Master that symmetry, and the final, satisfying clunk is inevitable.

First, let’s shift from frustration to focus. Yes, all four pieces are truly identical. Your immediate goal isn’t to force them together, but to understand their shared geometry. The key is in how their curved channels align. We’ll start by identifying a key piece and its correct orientation. The following sections will break down the exact twist-lock sequence, using annotated photos to show each critical point of alignment. Forget the video timeline; your solve starts now.
The One Move They Don’t Name: The Galaxy’s Core Symmetry
The trick, the single mechanical principle that solves Bram Cohen’s Cast Galaxy, is a symmetrical 180-degree twist-lock that repeats three times. Unlike puzzles with sequential, dissimilar steps, the Galaxy uses one elegant motion—rotating two engaged pieces a half-turn until their internal channels align and seat with a definitive ‘clunk’—to build its entire structure. This is the hidden grammar of the puzzle, and understanding it turns a baffling process into a predictable, repeatable operation.
Look at one piece. It’s a twisted zinc alloy bar with a specific profile: a central arch creating a tunnel, and two opposing ‘arms’ with notched ends. The genius is in the symmetry. When you hold two pieces at the correct relative starting position—their tunnels perpendicular to each other—their profiles interlock in a preliminary, loose state. This is engagement. The subsequent twist-lock is the solve. As you rotate one piece 180 degrees around the axis of the other, the notched arms of each piece travel along the opposing tunnel’s path. The tolerance is precise; the arms are guided by the channel walls until they snap into the notches at the exact opposite end of their travel. This is seating.
Every video guide shows you how to move the pieces, but they rarely name this action or explain why it works. They show you the dance, not the choreography. The Galaxy isn’t about random wiggling; it’s about creating a temporary, symmetrical junction between two pieces and then executing the half-turn that permanently locks them. This single move is the puzzle’s entire vocabulary. You will perform it to join the first two pieces, then again to add the third piece to the assembly, and a final time to add the fourth.
This core symmetry is what defines the difficulty level of 3 out of 6 on the Hanayama scale. For context on how this fits into the broader spectrum, our guide on Hanayama cast puzzle solutions by level provides a structured look at the progression. It’s not about complex individual parts (all four are identical), but about discovering the consistent spatial relationship required between them. Once you feel the first successful twist-lock—the smooth rotation ending in that solid, mechanical stop—you’ve learned everything you need to know. The remaining steps are just applying the same rule to a growing assembly.
This principle also answers why your puzzle gets stuck. If the initial alignment before the twist is off by even a few degrees, the arms bind against the tunnel walls instead of sliding through. You’re not executing the symmetrical lock; you’re forcing a jam. The solution is to separate the pieces, return to the correct starting alignment, and ensure the pieces are fully engaged in that loose, pre-rotation state. For a deeper dive into this kind of mechanical logic, our guide on the mechanical grammar of brain teasers breaks down these universal principles.
Now, with the core symmetry understood, we move from theory to practice. It’s time to pick up your pieces and apply this single, repeating move to build your galaxy.
Pre-Flight Checklist: Orienting Your Four Identical Stars
Yes, all four pieces are mechanically identical, a fact that’s both the puzzle’s core challenge and the secret to its solution. Each piece is designed to connect in two specific orientations: one for receiving a previous piece and one for linking to the next. The critical task before any assembly is to get every piece into the identical, correct starting position. This simple 30-second setup eliminates 90% of the jams that occur when people start twisting pieces from random alignments.
Think of each piece as a stylized star with two main features: a long, gently curved “horn” and a shorter, straight “arm” that ends in a hooked foot. For the symmetrical lock you just learned about to function, every single piece must start with its curved horn pointing upward and its twist oriented to the left. This consistent orientation is the non-negotiable foundation. If even one piece is flipped or rotated incorrectly, the interlocking channels will not align, and you will force a bind.
Here is your pre-flight sequence. Perform this with all four pieces separate on your workspace.
- Pick up one piece. Hold it between your thumb and forefinger at its central, chunkiest part—the “body” of the star.
- Identify the Curved Horn. Rotate the piece so the long, sweeping, curved prong is pointing directly up, like a unicorn’s horn. The shorter, straight arm with the foot will be pointing down and slightly to one side.
- Confirm the Twist. Look at the foot of the straight arm. The open side of its hook, the “C” shape, must be facing to your left. When you look down at the piece in this position, the body will appear to twist counter-clockwise from the horn down to the foot. This is the “twist to the left” position.
- Repeat for All Pieces. Lay this first piece down, carefully preserving its orientation. Now, pick up and orient each of the remaining three pieces to match it exactly. Curved horn up, twist to the left.
Once all four are aligned, double-check by looking at them side-by-side. They should be perfect mirror images of one another. At this stage, if you were to try linking any two, they should slide together loosely along their channels without resistance—this is the “pre-engagement” state. If they don’t slide together easily, do not force them. One piece is likely upside-down or mirrored. Separate them, put all four back on the table, and re-check the curved-horn-up, twist-left rule against your known good piece. With all four stars oriented correctly, you are now ready to execute the symmetrical locking move and begin the assembly.
Phase 1: Locking the First Binary Star System
This phase is the foundation of the entire assembly, where you physically execute the core symmetry principle by joining the first two pieces. Once mastered—a process that should take no more than 30 seconds—the entire remaining solve becomes a repeatable, logical process. The goal is to form the stable, central unit from which the rest of the galaxy will grow.
With all four pieces oriented correctly on your work surface (curved horn up, body twisting to the left), pick up any two. For clarity, we’ll call the one in your left hand Piece A and the one in your right hand Piece B. Hold them horizontally in front of you at about chest level, ensuring their curved horns are both pointing upward, just as they were on the table. This is the only starting position that allows the symmetrical lock to function.
The initial engagement is a simple, loose slide. Bring the two pieces together so they are parallel, facing each other. You will see that the straight arm (the “foot”) of each piece has a channel. Align these channels. Gently slide Piece B’s foot directly into the channel on the foot of Piece A. They will slide together roughly halfway, meeting at a central point where their bodies cross. There should be no resistance; this is a passive alignment. If you meet resistance, stop. You have likely rotated one piece so its horn is no longer pointing up, breaking the mirrored symmetry. Separate them and re-check the orientation of both.
At this midpoint of loose engagement, you have created a cruciform shape. This is the pre-locked state. Now, you will perform the singular symmetrical locking move. With both pieces held firmly, initiate a simultaneous and equal rotation of both wrists. Your left hand (Piece A) rotates counter-clockwise, and your right hand (Piece B) rotates clockwise. Think of it as wringing a towel, but with a precise, quarter-turn motion.
As you twist, you will feel the internal geometry of the channels begin to guide the pieces. They are no longer simply crossed; they are now seating into each other’s negative space. Continue the smooth, steady twist for exactly 90 degrees. The motion concludes with a definitive, solid clunk. This is the sound and feel of the twinning mechanism fully engaging—the internal hooks have captured each other, and the two pieces are now one rigid, double-thick unit. This is your “binary star system.”

Diagram 1A: The initial, loose slide. Pieces are parallel, channels aligned before the twist.
Diagram 1B: The symmetrical 90-degree twist. Arrows show the opposing rotation that creates the final ‘clunk’.
Inspect your work. The two pieces should be seamlessly interlocked, forming a symmetrical X-shape with no wobble. The curved horns of both pieces should still be pointing in the same direction (up). This unit has a top and a bottom; you will add the next piece to one of the four exposed “arms” of this central cross.
Pro Tip – The Common Jam Point: If the pieces bind and refuse to complete the 90-degree twist with that final clunk, you have almost certainly started the twist from an incorrect alignment. The most frequent error is beginning the rotation when the pieces are not fully slid together at the midpoint. Do not force it. Forcing misaligned zinc alloy can gall the metal and create a permanent jam. To unstick, simply reverse the twisting motion back to the neutral, straight position, separate the pieces completely, and restart the sequence from the very beginning: orient, slide, then twist. The hanayama cast galaxy solution steps are precise because of its tight tolerance; respect the mechanism and it will operate smoothly.
You have now built the puzzle’s stable core. This exact twist-lock maneuver is the only move you need to know. The remaining two pieces will attach to this core using a nearly identical process, which we will build upon in the next phase.
Phase 2: Introducing the Third Orbit
This phase mirrors the first, but with a critical spatial shift. You will repeat the core twist-lock motion to attach the third piece to your two-piece core, a process that should take 30 to 60 seconds once you understand the alignment. The new piece engages one of the four open arms of the central cross, not in a straight line but at a right angle, beginning the formation of the three-dimensional sphere.
Grip your stable two-piece core in your non-dominant hand. Pick up a third piece in your dominant hand. You are now an astronomer docking a satellite. The goal is to mate one “horn” of the new piece with an available arm on the core unit. The critical visual cue: the new piece must approach perpendicularly to the core’s axis. Rotate the core so the chosen arm points toward you. Bring the third piece in horizontally, ensuring the flat inner faces of the intended connection points are parallel.
Slide the new piece onto the core’s arm. Match the central notches and push until the pieces meet at the absolute midpoint. The two pieces should form a rigid “T” shape. This is the neutral, pre-lock position. If the pieces bind during this slide, check for tolerance issues—ensure no part of the new piece is colliding with the other horn of the core piece. This is a common hanayama galaxy disassembly error in reverse; the geometry must be clean.
Now, execute the established maneuver. Rotate the third piece 90 degrees. The motion is identical in feel to Phase 1, but your frame of reference has changed. The piece will pivot around the central joint. Watch and listen. As it turns, you will see the curved horns begin to weave around the core structure. A definitive clunk signals the twist-lock is complete and the piece is fully seated.
Inspect the new assembly. You now have a stable, three-legged unit. The three pieces are irrevocably linked; you cannot remove the third without reversing the exact twist. This unit should feel solid, with no wobble at the joints. You have successfully demonstrated the repeatability of the puzzle’s symmetrical principle. The cast galaxy puzzle solve time is largely dependent on mastering this single move from different orientations.
Pro Tip – Avoiding the Three-Piece Jam: The most likely point of failure here is attempting the 90-degree twist from an imperfectly slid-together “T”. If the pieces are even a millimeter short of full engagement, the internal channels will misalign and bind. The tactile cue is a gritty, resistant feel at the very start of the twist. Stop. Do not muscle through it. Back the piece out to the straight “T”, reseat it with a firmer push until the metal stops, then perform the rotation. The motion, when correct, requires moderate but consistent pressure and ends with a satisfying, positive stop. You are not forcing metal; you are guiding a precision interlock into its designed position.
You have one star left to place. The final piece will connect to the last open arm on the core, completing the symmetry.
Phase 3: The Final Piece and the Triumphant Twist
You have a stable, three-piece core in hand and one identical piece left. The final phase of the cast galaxy 4 piece solution is a repeat performance of the symmetrical locking move, executed on the last open arm. Mastery here brings the puzzle together with a definitive, solid click. A first-time solve, with this guide, typically takes 15-30 minutes, which aligns perfectly with its official Hanayama difficulty level 3 rating—challenging but logical.
Hold the three-piece assembly so the last unfilled arm points toward you, its slot open and ready. Orient your final piece just as you did the third: align its internal channel with the protruding tab on the core’s arm. Slide it straight on, ensuring it seats fully home. There should be no lateral play. This forms another “T” shape, a mirror of the step you just completed.
Now for the triumphant twist. This is not just locking the fourth piece; it’s engaging the final compound interlock that binds all four components into a single, rigid unit. Grasp the puzzle firmly. Apply steady, rotational force to the piece you just added, turning it 90 degrees. You will feel it move against the internal mechanism of the core. This final motion does two things at once: it locks the fourth piece to the core and simultaneously tightens the engagement of the second piece within the central nexus. The entire structure tenses and unifies.
Listen and feel for it. The rotation will end with a distinct, heavier clunk than the previous steps. This is the sound of all tolerances being taken up, all symmetries realized. The puzzle is now a complete, four-pointed galaxy. Test it. It should feel monolithic, with no wobble, rattle, or hint of separation. It is not four pieces held together; it is one object.
This finality is your benchmark. If the completed puzzle feels loose or the pieces can still wiggle, the most likely culprit is that one of the four twists did not achieve full 90-degree engagement. Do not force it. Instead, reverse the last twist, remove the final piece, and ensure the three-piece core is perfectly square and rigid before reattempting the final alignment and rotation.
Your triumph is measured in that solidity. The cast galaxy 4 piece solution is not about a random sequence but about internalizing the one symmetrical locking motion—a principle you have now applied three times to build the core, and a fourth to seal it. The mechanism’s elegance is in that repetition. You haven’t just assembled a puzzle; you’ve proven a mechanical concept, and that final, satisfying click is your confirmation.
Reverse Engineering the Cosmos: How to Take It Apart
You now have a solid galaxy in your hands, and taking it apart is far simpler than the first assembly—once you understand the core principle. Disassembly is the exact reverse of the build process, a direct application of the key symmetry you’ve mastered, and should take about 4 seconds once you know the sequence. The goal is to reverse-engineer the twist-lock without force, preserving the puzzle’s precise tolerances, a skill central to the art of disentanglement puzzles.
Your starting point is the completed, monolithic puzzle. Find the final piece you added; this is the first piece you will remove. Hold the puzzle firmly in one hand, and with the other, grip the protruding “arm” of that final piece. You are not pulling it straight out. Instead, you must reverse the final twist-lock. Apply counter-clockwise pressure, rotating the piece back 90 degrees. You will feel the same clunk, but in reverse, as the internal alignment disengages. The piece will now slide cleanly out along its channel, leaving you with the stable three-piece core.
With the three-piece core, repeat the logic. Identify which of the three pieces was the last added to the original two-piece binary system. Hold the core securely and rotate that third piece 90 degrees counter-clockwise to disengage it. This is the most common point for a jam if the core wasn’t perfectly square during assembly. If it resists, do not force it. Check that you are applying the twist along the correct plane—the piece should turn smoothly on the same axis it was assembled. A gentle wiggling rotation while applying slight inward pressure can help it find the release point. This is the precise common mistake that jams the puzzle; forcing the wrong angle binds the channels.
You are now left with the initial two pieces locked together—your “binary star system.” The disassembly of this pair reveals the elegant heart of Bram Cohen’s hanayama galaxy disassembly process. Hold one piece stationary and twist the other 90 degrees. They will separate with a final, satisfying click. You have successfully de-orbited the galaxy back into four identical stars, ready to be solved again from memory. This reverse process proves the mechanism: every engagement is a reversible, symmetrical motion, a classic example of the principles covered in our guide to cast metal puzzle disentanglement. A puzzle from my own graveyard stays there not because it’s stuck, but because I’ve learned its language—and now you have too.
Why Your Galaxy Jams (And How to Free It Without Force)
Your galaxy jams because of a 1-millimeter misalignment during the final 90-degree twist-lock motion, a direct result of forcing pieces at the wrong angle before they are fully seated. This binds the internal channels against each other, creating metal-on-metal friction that halts all movement. Understanding this tolerance is the key to freeing it without damage.
That final, satisfying “clunk” you achieved in assembly is the sound of perfect symmetry and alignment. The reverse is also true: a jam is the audible and tactile feedback of asymmetry. As someone who has machined parts to thousandths of an inch, I can tell you that Bram Cohen’s design relies on precise but forgiving tolerances. The zinc alloy pieces have just enough play to guide each other home, but no room for error in the rotational plane. When you apply torque out of sequence—say, twisting Piece C before Piece B is fully engaged along its entire channel—you cross-thread the mechanism. The pieces are not broken, but their paths are now mechanically opposed.
The most frequent jam point, as hinted in the disassembly guide, occurs at the transition between the three-piece core and the fourth piece, or within that core itself. Visually, your puzzle will look nearly complete, but the final twist to lock it (or the initial twist to disassemble it) will not budge. You’ve hit a binding state. This is the exact scenario video solutions can’t help you debug, as they only show the perfect, unimpeded path.
Here is the safe, methodical procedure to un-stick your Cast Galaxy. This process is the mechanical equivalent of taking a deep breath and backing up one step.
- Stop Applying Force. Immediately cease all twisting or pulling pressure. This prevents deforming the soft zinc alloy.
- Identify the Bind. Gently try to reverse the last move you made. If adding the final piece caused the jam, attempt to gently remove it by sliding it back along the entry channel, not twisting it. If disassembly caused the jam (a more common scenario), try to gently re-seat the piece you were attempting to remove by reversing your twist.
- Apply Counter-Pressure. If the piece won’t reverse, the bind is likely on two axes. Hold the main body of the puzzle firmly in one hand. With the other, apply very slight inward or outward pressure on the jammed piece along its long axis while simultaneously attempting the correct rotational move. You are helping the channels realign by relieving the lateral pressure causing the bind. Think of it as wiggling a key in a stiff lock while gently turning it.
- Reset to a Known State. If the gentle wiggle-rotate doesn’t free it within a few tries, your goal is to regress to the last stable configuration. For a cast galaxy puzzle solution diagram in your mind, that’s the “binary star” system of two pieces locked together. Carefully work backwards, focusing on moving any piece that has any play at all, even a fraction of a millimeter. The moment one piece moves, you’ve broken the bind’s symmetry. Work from there back to the simple two-piece core.
The answer to “Will it break if I force it?” is yes, potentially. Zinc alloy is durable but not malleable steel; a sustained, forceful twist can bend a critical internal lip, permanently compromising the smooth interlock and possibly ruining the puzzle. The solution is never brute force. It is the precise, patient reversal of force.
To prevent future jams, always ensure each piece is fully seated along its entire sliding channel before initiating the 90-degree twist-lock. Listen and feel for the subtle click as each piece bottoms out. This is the non-negotiable checkpoint. This troubleshooting skill—diagnosing a bind and methodically relieving it—is what transforms you from someone following metal galaxy puzzle solution steps into a true puzzle mechanic. You’re not just solving the galaxy; you’re learning to navigate its gravitational fields.
Pro Navigator Notes: From First Solve to Muscle Memory
Now that you’ve freed any jams and understand the symmetry of the mechanism, you can shift from deliberate assembly to building reliable muscle memory. The transition from your first 10-minute guided solve to a consistent 30-second reassembly comes from learning to feel the puzzle instead of just seeing it.
Stop watching your hands. Close your eyes. Pick up two pieces and let your fingers explore the contours. Your goal is to find the alignment where the curved channels nest together without a hint of resistance; this is the “pre-flight” check. The correct engagement feels like a key sliding into a well-oiled lock, not a forced fit. This tactile skill directly answers “Can you solve it just by fiddling?” Yes—but only once your fiddling is educated by understanding the key piece logic. Random manipulation will rarely stumble upon the precise sequence, but focused feeling for the smooth channel seating will.
To reset the puzzle quickly for another solve, don’t just disassemble randomly. Reverse the assembly steps from the final piece back to the core pair. This reinforces the sequence in your mind. Then, place the four pieces on the table in the same starting orientation—with their long, curved channels facing up and their “hooks” aligned. This consistent “runway” state eliminates initial fumbling.
The final pro tip is to listen and feel for the double feedback. First, the solid clunk as a piece slides fully home along its channel. Second, the crisper, rotational click of the 90-degree twist-lock. When both are present, you’ve achieved a perfect interlock. A hanayama difficulty level 3 puzzle like this becomes intuitive once you internalize this two-stage confirmation. Your cast galaxy puzzle solve time will plummet as you stop thinking in steps and start trusting the consistent physical feedback of the mechanism.
Soon, you won’t need this guide or a cast galaxy puzzle solution diagram. You’ll simply pick up the four identical pieces, feel for the first seamless connection, and execute the repeating twist-lock motion with confidence. This mastery is what makes the Galaxy a satisfying benchmark. When you can solve it blindfolded, you’re ready to navigate the tighter tolerances of more advanced puzzles, like those featured in our guide to the best metal disentanglement puzzles.
Galaxy vs. Enigma & Where to Chart Your Next Course
With the Galaxy’s symmetrical lock now in your muscle memory, the natural question is how it stacks up against its notorious sibling. The Cast Enigma is a definitive step up, rated difficulty 6 out of 6 versus the Galaxy’s 3. Where Galaxy uses four identical pieces and a repeating motion, Enigma employs six dissimilar pieces that interlock in a non-intuitive, three-dimensional sequence demanding precise spatial reasoning. It’s less about a rhythmic twist-lock and more about solving a volumetric alignment puzzle. For a direct cast galaxy vs cast enigma take: if Galaxy is a satisfying bolt action, Enigma is a full engine rebuild. For those seeking this kind of severe challenge, our guide to ruthless cast puzzles for connoisseurs details the pinnacle of the series.
For a replacement or a second Galaxy to gift, pragmatic where to buy cast galaxy options include retailers like Puzzle Master, Amazon, or specialty puzzle shops. The zinc alloy construction means it’s durable, but always purchase from a reputable source to ensure proper tolerance and finish. For a comprehensive look at the entire lineup, our Hanayama puzzle buy guide is an essential resource.
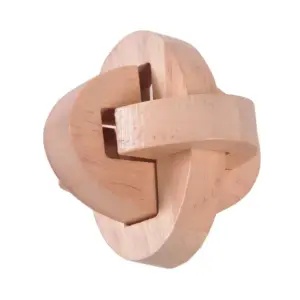
Your next logical step isn’t necessarily the extreme jump to Enigma. Consider puzzles that build on the tactile engagement you’ve just mastered—mechanisms with clear feedback but added complexity. The Four-Square Lock Puzzle introduces a similar four-piece interlock but with a different symmetrical principle, perfect for applying your new analytical skills.

Four-Square Lock Puzzle — $12.98
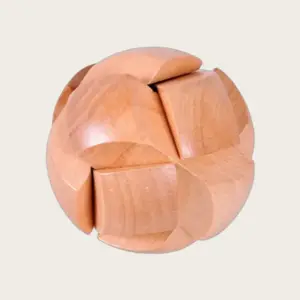
For a different flavor, the Yangqin Lock Puzzle offers a two-piece challenge focused on precise angular alignment and a satisfying seated click, honing your feel for critical seating points.

Yangqin Lock Puzzle — $12.66
You began with four pieces of cosmic confusion. Now you possess the principle—the key symmetry—that unlocks not just this puzzle, but a category of them. For a broader selection of high-quality challenges, explore our curated list of the best metal puzzles for adults. Your actionable next step: Pick one of the puzzles above, apply the same methodical analysis of interlock and feedback, and expand your solved universe.