I’ve been reviewing puzzles from Puzzlemaster and Brilliant Puzzles for years, and the Double Cross Cage consistently earns a spot on my “most impressive” list. Not because it’s impossible—it’s not. But because it demands something most puzzles don’t: spatial reasoning, patience, and a willingness to completely rethink how interlocking structures work.
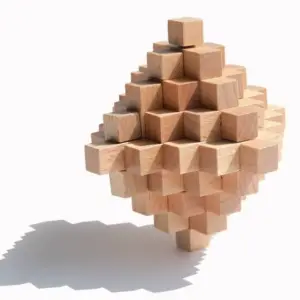
The Double Cross Cage is a 24-piece wooden puzzle where every single component is identical. Twenty-four cross-shaped wooden bars, all cut to the exact same dimensions, somehow lock together into a complex, symmetrical cage that looks like it belongs in an engineering textbook. The first time I solved it, I spent 40 minutes staring at the pieces, convinced I was missing something. I wasn’t. The trick is understanding that symmetry doesn’t mean simplicity.
If you’ve seen the YouTube solution video or the TikTok breakdown (https://www.tiktok.com/@teasipcom/video/7559572076651089160), you know how satisfying it is when that final piece clicks into place. Let’s walk through exactly how this puzzle works, why its design is brilliant, and how you can master it without throwing pieces across the room.

Anatomy of the Double Cross Cage: Understanding the 24 Identical Pieces
Before you can solve any interlocking puzzle, you need to understand what you’re working with. The Double Cross Cage uses 24 identical wooden bars, each one a masterpiece of precision engineering.
The Cross-Shaped Bar: A Deep Dive
Each bar is what I call a “four-directional cross” or “plus-sign connector.” Here’s the breakdown:
The Main Beam
This is the longest part of the piece—a rectangular bar that serves as the backbone. Think of it as the “shaft” running through the center.
Four Perpendicular Arms
Extending from the center of the main beam are four square blocks, positioned at 90-degree angles to each other. Two blocks extend left and right (forming a horizontal T), and two extend up and down (forming a vertical line). When you look at the piece from the front, it resembles a plus sign (+) or the Chinese character for “ten” (十).
The Central Through-Hole
Here’s where the magic happens. At the exact center of the piece—where all four arms meet—there’s a square hole that runs completely through the bar. This hole is precisely sized to allow another bar’s main beam to pass through it. This is the key to the entire interlocking mechanism.
Symmetry and Precision
Every single one of the 24 pieces is cut to identical tolerances. There are no “special” pieces, no corner pieces, no unique connectors. The entire puzzle relies on how you orient and interlock these identical components. That’s what makes it so devilishly clever.
If you’re familiar with puzzles from Puzzlemaster or Brilliant Puzzles, you’ve probably seen similar interlocking designs, but the Double Cross Cage takes it to another level with its sheer scale and symmetry.
How to Disassemble the Double Cross Cage (Without Breaking It)
Disassembly is the easy part—assuming you know where to start. Here’s the method that works every time.
Step 1: Observe the Structure
Hold the assembled Double Cross Cage and rotate it slowly. Look for a set of bars that are all oriented in the same direction. In a well-built puzzle, you’ll notice certain bars run parallel to each other, creating what looks like a “layer” or “frame” within the larger structure.
Step 2: Apply Gentle Pressure
Using your thumbs and forefingers, grip the two outermost bars of this parallel set. Now here’s the critical part: don’t yank. Apply steady, outward pressure while gently twisting. The goal is to coax the interlocking tabs free, not to force them.
The video instructor emphasizes “use skill, not force,” and they’re absolutely right. If you’re fighting the puzzle, you’re doing it wrong.
Step 3: Separate the First Section
Once you feel the resistance give, pull the bars outward. The first section should slide free, revealing the complex internal structure. You’ll see how multiple bars thread through each other’s central holes—it’s like looking inside a 3D lattice.
Step 4: Disassemble Completely
Continue removing bars until you have all 24 pieces separated. Lay them out on a table. You’ll be amazed at how something so intricate breaks down into identical components.
Pro tip: Take a photo of the assembled puzzle from multiple angles before disassembling. Trust me, you’ll thank yourself later.
How to Assemble the Double Cross Cage: The Complete Method
Reassembly is where most people get stuck. The Double Cross Cage isn’t solved in one go—it’s built in stages. Here’s the exact process.
Phase One: Build the First Framework (12 Bars)
Step 1: Create the Base Layer
Take two bars and lay them parallel to each other with their openings (the through-holes) facing left. These form your foundation.
Step 2: Add the Cross Layer
Place two more bars on top, perpendicular to the first pair, with their openings facing upward. Thread these bars through the central holes of the base layer. You’ve just created a basic “井” (well) shape—two bars crossing another two.
Step 3: Duplicate the Structure
Build a second identical 井-shaped unit using four more bars. Now you have two matching components.
Step 4: Stack and Expand
Stand both units upright and layer them together to form a 3D frame. Gently pull the structure apart slightly to create working space.
Step 5: Add the Outer Shell
Take four more bars and insert them horizontally into the frame—one on each side (front, back, left, right). Make sure all four bars are oriented the same way. They should thread through the existing structure’s holes, creating an outer “cage” around the core.
You’ve now completed the first framework: 12 bars forming a stable, symmetrical structure. Set it aside.
Phase Two: Build the Second Framework (8 Bars)
Step 1: Create an Opposing Base
Take two bars and lay them parallel, but this time with their openings facing opposite directions (one left, one right). This is the key difference from the first framework.
Step 2: Add the Cross Layer
Place two bars on top, perpendicular, with openings facing upward. This creates another 井-shape, but with a different internal alignment.
Step 3: Add Vertical Supports
Insert four bars vertically—one on each side of the 井-structure. Pay close attention to their orientation. These bars should stand upright and thread through the existing holes, creating a more open, skeletal framework compared to the first one.
You’ve now completed the second framework: 8 bars forming a complementary structure.
Phase Three: Combine and Seal (4 Bars)
Step 1: Nest the Frameworks
Take the first (larger) framework and carefully slide it over the second (smaller) framework. The two structures should interlock at multiple points, with bars from each framework threading through the other’s holes. This is where the puzzle starts to look like its final form.
Step 2: Insert Side Bars
Take two bars and insert them from the left and right sides into the gaps between the two frameworks. These bars should face opposite directions. They act as “pins” that lock the two frameworks together.
Step 3: Seal the Top and Bottom
Insert the final two bars from the top and bottom, threading them through the remaining holes. Push gently until all bars are flush and fully seated.
Step 4: Final Adjustment
Carefully push and wiggle all the bars until they’re completely locked in place. The structure should feel solid, with no loose pieces. If something feels off, backtrack and check your orientations.
Congratulations—you’ve just assembled the Double Cross Cage.
For a visual walkthrough, check out the YouTube tutorial (https://youtube.com/shorts/ere6wGhuCco?si=0p46sDEKBD9vY4wr) or the TikTok demo (https://www.tiktok.com/@teasipcom/video/7559572076651089160). Seeing the motion in real-time makes a huge difference.
Why the Double Cross Cage Stands Out Among Wooden Puzzles
I’ve tested dozens of interlocking puzzles from Puzzlemaster, Brilliant Puzzles, and independent craftsmen. The Double Cross Cage earns its place among the elite for a few key reasons.
Perfect Symmetry
Every piece is identical. There’s no “cheating” with unique corner pieces or special connectors. This forces you to think purely in terms of orientation and layering.
Scalable Complexity
The puzzle is built in stages, which means you can stop and appreciate each phase. Unlike puzzles where you’re either fully assembled or completely lost, the Double Cross Cage gives you incremental victories.
Tactile Satisfaction
There’s something deeply satisfying about sliding wooden bars through precisely cut holes. The tolerances are tight enough that pieces don’t rattle, but loose enough that assembly doesn’t require force. It’s craftsmanship you can feel.
Educational Value
This puzzle is a crash course in 3D spatial reasoning. Engineers, architects, and anyone who works with structural design will appreciate how the Double Cross Cage demonstrates load distribution and interlocking stability.
Common Mistakes (And How to Avoid Them)
After watching friends and family attempt this puzzle, I’ve noticed a few recurring errors:
Mixing Up the Frameworks
The first framework uses 12 bars; the second uses 8. If you start building the second framework first, you’ll run out of pieces at the wrong time. Follow the sequence.
Ignoring Orientation
“Openings facing left” vs. “openings facing opposite directions” isn’t just flavor text—it’s critical. One wrong orientation in the base layer cascades into complete failure 10 steps later.
Forcing Pieces
If a bar won’t slide smoothly, you’re either using the wrong orientation or trying to insert it at the wrong stage. Stop, backtrack, and check your work.
Skipping the Photo
Seriously, take pictures before disassembly. Your future self will thank you.
Who Should Buy the Double Cross Cage?
This puzzle isn’t for everyone. It’s intermediate-to-advanced difficulty, and it requires patience. But if you fall into any of these categories, it’s a must-have:
- Puzzle collectors who want a showpiece that’s as beautiful as it is challenging
- Engineers and architects who appreciate structural elegance
- Gift-givers looking for something unique that isn’t another Amazon gadget
- Teachers who want a hands-on tool for teaching geometry and spatial reasoning
- Anyone who loved the Circular Lock and wants to level up to a bigger challenge
The Double Cross Cage is available from specialty retailers like Puzzlemaster and Brilliant Puzzles, as well as select independent sites. Expect to pay a premium for quality craftsmanship—this isn’t a mass-market toy.
Final Thoughts: Is the Double Cross Cage Worth Your Time?
Absolutely. The Double Cross Cage is one of those puzzles that earns its spot on your shelf. It’s visually stunning, mechanically brilliant, and challenging enough to keep you engaged without being frustrating.
The first time you solve it, you’ll feel like a genius. The second time, you’ll appreciate the design. By the third time, you’ll be showing it off to friends and watching them struggle. That’s the mark of a great puzzle.
If you’ve watched the solution videos and you’re still curious, take the plunge. Just clear your schedule—you’ll need at least an hour for your first attempt.
And when you finally lock that last piece into place? You’ll understand why the Double Cross Cage has earned its reputation as one of the most satisfying wooden puzzles ever designed.