Your Scattered Bands, Decoded: The Moment Before the ‘Aha!’
So, you’re here. The pieces are laid out—four, six, maybe eight shiny, defiant bands that once looked like a ring. Now they look like a mistake. That’s fine. Breathe. The first person to solve one of these felt exactly this way. (The second and third probably did, too.) You haven’t broken it; you’ve just entered the puzzle.
What you’re holding is a classic disentanglement puzzle cast in precious metal, a specific and fascinating category of mechanical puzzle. Often called a puzzle ring, its history is shrouded in romantic tales—Turkish sultans, fidelity tests, clever smiths. But strip away the lore, and what remains is pure, elegant mechanics. This isn’t about a trick or a ‘magic’ sequence. It’s about understanding a simple, interlocking system. Once you see it, you can solve any variation in front of you, from a simple 3-band to an elaborate 8-band puzzle ring.
That feeling you’re chasing—the satisfying click of everything sliding home—comes from aligning gates with keys.
Think of each band as having two roles. The shank is its long, curving body that will form part of the ring’s circumference. But along that shank are critical features: notches (gaps) and protrusions (keys). The gate is the specific opening created by a notch when the band is in the correct position. The key is the part of another band designed to pass through that gate. Your entire task is to maneuver these bands so every key finds its corresponding gate, like aligning tumblers in a lock.
This is The One Diagram That Explains All Puzzle Rings: Demystifying the ‘Gate and Key’ System. Imagine a simple turnstile. You can’t push through the solid bar; you must wait for the opening to align with your path. Your puzzle ring works the same way. The frustration you feel? That’s just your keys knocking against solid metal, searching for the opening. We’re going to find those openings together. If you’re already feeling the strain, our guide on how to solve a puzzle ring without losing your mind might offer some initial comfort.
For now, look at your scattered bands. You’re not looking at chaos. You’re looking at a perfectly logical, solvable system. The journey from this mild panic to the pride of wearing a solved ring is a short one, paved with a few clear principles. Let’s move from frustration to curiosity. Let’s learn to read the metal.
Anatomy of a Puzzle: How to ‘Read’ Your Rings Before You Start
Now that you see the logic—gates and keys—it’s time to apply it to the specific pieces in your hands. This is where most guides rush ahead, but we’ll slow down. Think of this as meeting your team before a big game; you need to know who each player is and what role they’ll perform. Your immediate question, “My ring looks different from the pictures, will these steps still work?” starts to be answered right here.
Look closely at each band, or shank. You’ll notice four universal parts, though their shape and number may vary.
- The Shank: The long, curved body of the band. On a simple band, this is all you’d see. On your puzzle ring, it’s the stage where everything happens.
- The Notch (or Indent): This is the carved-out gap in the shank. It’s not just a decoration; it’s the potential for a gate. A single band may have one or more notches.
- The Key (often called the ‘Arrowhead’ or ‘Blob’): This is the raised, usually wider, protrusion on a shank. Its job is to eventually pass through another band’s gate. Its shape—whether a rounded nub, a flat tab, or a literal arrowhead—is the lock-pick of this operation.
- The Gate: This is the functional opening created when a notch is positioned correctly relative to another band. A notch alone is just a dent; a gate is an active passageway.
Here’s a practical exercise. If your ring is disassembled, you’re already set. If you’ve been given an assembled ring and want to understand it (or confirm you’ve identified the parts correctly), learning how to take apart a puzzle ring is a brilliant diagnostic step. Find the seam where the bands intersect and gently twist and pull one shank in the opposite direction of its curve. It should come apart with steady, mild pressure—not a yank. (If it’s stubborn, we’ll cover that in troubleshooting.) Taking it apart once, on purpose, removes the mystery and lets you see the mechanism in its resting state.
Now, lay all the bands flat. Not all bands are created equal. In a classic 4-band puzzle ring, you’ll typically have two nearly identical bands and two that are distinct. The identical ones often form the foundational figure-8. The distinct ones have more pronounced keys or notches that act as the final locking pieces. With 6-band puzzle rings or higher, this role differentiation becomes even more critical. One band might be the “kingpin” that threads through several others. The metal matters, too—traditional silver or gold is malleable and can bend with force, while modern stainless steel or titanium is tougher but less forgiving. Knowing this changes your touch from forceful to precise.
This act of reading your rings—counting the shanks, mapping the notches, identifying the most prominent keys—transforms the puzzle from an abstract frustration into a tangible, solvable disentanglement puzzle. You’re no longer following blind steps; you’re recognizing components. With that knowledge, you’re ready to begin the physical assembly, starting with the universal first move that almost every puzzle ring solution requires.
The One Diagram That Explains All Puzzle Rings: Demystifying the ‘Gate and Key’ System
So, you’ve “read” your rings. You’ve identified the shanks and spotted the notches. This is where the real understanding begins. Forget memorizing a sequence of twists for a moment. Every single puzzle ring, from a classic 4-band to an elaborate 12-band, operates on the same mechanical principle. If you grasp this, you can solve any of them—even a homemade one from a bin of scrap silver. Think of it as a tiny, elegant lock.
Imagine a simple door latch. You have a bolt (a solid piece of metal) and a strike plate with a notch. To lock the door, you push the bolt into the notch. A puzzle ring works the same way, but in three dimensions and with everything rotating. The prominent bumps or “arrowhead” shapes on your bands are the keys. The specific gaps or openings on other bands are the gates. Assembly is the process of guiding each key through its corresponding gate, and then using rotation to slide it into a locked position where it can’t escape.
Here’s the visual: take two bands and interlock them in a loose figure-8. Look closely where they cross. One band has a key near the crossing point. The other band has a gate—a space between its two parallel wires—right at that same crossing. The initial step isn’t about forcing things together; it’s about aligning that key with that gate so it can pass through. Once it’s through, you rotate the entire assembly. That rotation moves the key away from the open gate and seats it into a “locked” channel on the band, held in place by tension and geometry. This is the fundamental interlock. All the following steps are just repetitions of this core action: align key to gate, pass through, rotate to secure.
This principle scales. In a 4-band puzzle ring, you’re typically building two of these locked pairs and then joining them with a final, master key. In 6-band puzzle rings or 8-band puzzle rings, you might be creating multiple interlocking layers, but each connection point is just another instance of a key finding its gate. If your puzzle ring won’t go back together, it’s almost always because a key is misaligned with a gate, or you’re trying to rotate the assembly in the wrong direction (usually, it’s anti-clockwise). Never force the metal; you’re not pushing through a solid wall, you’re guiding a component along a path. If it resists, jiggle, don’t shove.

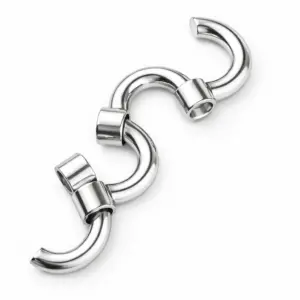
This gate-and-key system is what classifies puzzle rings as a type of disentanglement puzzle, much like the classic cast metal brain teasers. The goal is never brute strength, but spatial reasoning, a concept explored in depth in our guide to metal puzzles that don’t break. (If you enjoy this kind of mechanical intrigue, you’d appreciate the similar step-by-step logic used to solve the Cast Hook metal brain teaser).
Armed with this principle, the specific steps for your ring’s band count transform from a mysterious ritual into a logical, predictable process. You’re not just copying motions; you’re recognizing each “click” as another key seating home. This is the “why” that most puzzle ring solutions omit. Now, let’s apply it to the nearly universal starting point: forming that foundational figure-8.
The Infinity Loop is a Lie: Setting the Universal ‘Figure-8’ Foundation
That understanding of gates and keys transforms the most famous step in any puzzle ring solution—the figure-of-eight—from a magical incantation into a logical, mechanical necessity. Every video tutorial and set of puzzle ring instructions for a multi-band puzzle ring starts here for a reason. But most present it as the trick, when it’s really just the temporary scaffold. Think of it not as the solution, but as the essential skeleton upon which you will hang the remaining pieces.
Here’s the core truth: for rings with four or more bands, you will always begin by linking two specific shanks into a symmetric, double-looped shape. This creates the foundational framework of gates that the other bands will lock into. The process is universal, but precision is key.
First, identify your two starting bands. On a classic 4-band puzzle ring, these are typically the two bands whose notches (or “keys”) are on the inside curve of the shank. They are often, but not always, identical. Lay them side-by-side on your work surface. Now, pick one up. You’re going to form two interlocked loops, like a loose, asymmetrical infinity symbol.
Hold the band vertically. Create the first loop by bringing the top end down and around, but don’t close it. Now, take the other key band and slide it through that first loop you just made. Then, form the second loop with the first band by bringing its other end around and through the second band. This is the fiddly part. The goal is to end up with both bands interwoven so that, when viewed from the side, they form two distinct, connected circles that share a center point. They should be mirror images.
A critical note on orientation: The notches or keys on these two bands should be facing the same direction—imagine they are both pointing toward what will become the top of the ring. This alignment is crucial for the next steps. (A common mistake is twisting one band 180 degrees, which will make subsequent bands impossible to seat.)
Now, hold this assembly gently between your thumb and forefinger. It will feel flimsy and want to collapse. That’s normal. You are not building a stable structure yet; you are establishing a relationship. This figure of eight creates a specific set of openings, or gates. The central crossing point is where the mechanical magic will happen, as the remaining bands will use their own keys to lock this wobbly scaffold into a rigid whole. Understanding this foundation is key to solving more intricate puzzles, much like approaching the challenge of the Metal Starfish Puzzle Ring.
If you feel stuck here, rotate the entire assembly. Sometimes viewing it from a different angle makes the symmetric shape click into focus. And remember the golden rule: never force the metal. If the bands are kinking or catching, you’ve likely crossed them incorrectly. Unwind and start the loop-over-loop process again, more slowly. This foundational step, while universal, requires a patient touch to set the stage for solving your disentanglement puzzle. With this delicate skeleton formed, you’re ready to introduce the third element and start locking everything into place.
The 4-Band Walkthrough: Your Step-by-Step Baseline to Mastery
So you have that delicate figure-of-eight scaffold in your fingers. It feels wobbly, like a house of cards. Good. That means you’ve built the correct foundational relationship, and you’re ready to lock it down. This is where the gate and key system you learned earlier becomes your active, hands-on guide. We’ll use the most common 4-band puzzle ring as your baseline for mastery—once you understand this sequence, the logic scales to rings with more bands. For an even more detailed, photo-driven walkthrough, you can reference our dedicated step-by-step guide for the 4 band puzzle ring.
Step 3: Introducing the Third Band – The First Lock.
Pick up a third band. Look at its ends: one will have a key (the protruding arrowhead blob), the other a gate (the U-shaped notch). Your goal is to use this band to bind the two loops of your figure-8 together.
1. Hold the rings of your figure-8 assembly vertically. One loop will be on top, the other on the bottom.
2. Slide the key end of the third band down through the top loop of the figure-8. Let it hang through.
3. Now, here’s the precise move: rotate this third band anti-clockwise (a quarter-turn) so it lies horizontally across the bottom loop of your figure-8.
4. The key on this third band must now slot into place within the gate on one of the original two bands in the bottom loop. You may need to jiggle the assembly slightly to find the alignment. You’ll feel it engage.
(If this feels impossible, you likely have the figure-8’s loops crossed the wrong way. The third band’s key should move naturally into a waiting gate. If it’s fighting you, disassemble back to two bands and re-form your infinity symbol, flipping which band is on top.)
Step 4: The Fourth Band – Completing the Interlock.
You now have three bands intertwined. The structure will feel more substantial but not yet rigid. The final band closes the system. Its path is essentially the mirror image of the third band’s.
1. Take the fourth band. Slide its key end up through the bottom loop of your assembly (which now has the third band lying across it).
2. Rotate this band clockwise (the opposite direction!) so it lies horizontally across the top loop.
3. Carefully maneuver its key into the remaining open gate. This is the trickiest alignment, as all four bands now demand precise positioning.

The Final Maneuver and ‘The Click’.
With all four keys tentatively seated in their gates, don’t expect a ring yet. It will look like a loose, symmetrical knot. This is normal. Apply gentle, equal pressure from all sides, coaxing the bands into a circular arrangement. Use your fingertips to roll the shanks into alignment around an imaginary central circle.
The moment of victory is a subtle but distinct click or snap. All tension will equalize, the structure will become perfectly rigid, and you’ll have a solid, wearable ring on your finger. This click is the sound of all four gates fully and simultaneously engaging with their corresponding keys, transforming your disentanglement puzzle back into a piece of jewelry.
If the click doesn’t happen, stop. Do not force the metal. Likely, one key is sitting beside its gate, not inside it. Gently loosen the assembly and nudge the bands, checking each key-gate pair. The final convergence requires all four relationships to be true simultaneously. This is the core challenge of how to solve a puzzle ring, and understanding the ‘why’—that you’re aligning mechanical interlocks—is what gets you there. Master this, and the logic for 6, 8, or even 12-band rings will feel familiar, just with more gates to align.
Beyond Four: Adapting the Principle for 3, 6, and 8+ Band Rings
Mastering the 4-band puzzle ring is your key to the kingdom. Once you understand that to assemble a puzzle ring is a process of aligning mechanical gates and keys, you can deconstruct the logic of any multi-band variation. The principle scales; only the number of relationships changes. (And yes, this is the answer to the common question: “Are there different instructions for 6-band vs. 4-band?” The core moves are the same, just repeated.)
Let’s start with the outlier: the 3-band puzzle ring. An odd number of shanks might seem perplexing, but it often represents a simplified, more elegant version of the four-band logic. Typically, one band acts as a central “hub” or complete loop, while the other two interlock through it using a modified gate and key system. Your assembly will likely begin with a simpler twist or loop, not the full figure-8. The goal remains identical: trace the path of each band, find where its key must slot into another’s gate, and gently encourage them into a stable, triangular-turned-circular formation. They are fantastic puzzles for beginners precisely because they have one less critical alignment to manage.
Now, for the majestic 6, 8, or 12-band behemoths. Take a deep breath. You are not looking at one impossibly complex puzzle, but at two or more 4-band “cores” that have been ingeniously linked. A 6-band puzzle ring is almost always two interconnected 4-band units sharing two common bands. An 8-band ring is often two complete 4-band units linked, or a more complex double helix.
Your strategy? Solve one core at a time.
- Identify the Cores. Lay all the bands out. Look for the familiar gate and key anatomy. You will likely see subsets of bands that can form their own independent figure-8 foundations. Start with one of these subsets.
- Build the First Core. Using your 4-band mastery, take what looks like four bands and assemble them 90% of the way. Get them into that tense, pre-click knot we discussed in the last section. Don’t force the final click yet.
- Integrate the Next Band(s). Here’s where patience is paramount. The additional bands are not mere decoration; they are functional shanks with their own keys and gates that must weave through the structure of the first core. Study the remaining bands. One will have a key that needs to pass through a gate on your already-assembled core. Slowly, with plenty of jiggling (never forcing), thread it through. You are essentially adding a new band to an existing, semi-stable puzzle.
- Repeat and Converge. Continue integrating bands, treating the growing assembly as your new foundation. For a 6-band, after integrating the fifth and sixth shanks, you will have not one, but several final key-gate alignments to satisfy simultaneously. This is why high-band-count rings are so satisfying—the final click is the culmination of multiple precise alignments snapping home at once.
The universal truth? Never force the metal. If a band won’t thread, you’ve likely misidentified the sequence. Back up a step. The complexity of a multi-band puzzle ring is logistical, not magical. You’re a conductor ensuring all instrumental sections (the 4-band cores) come in at the right time. This scalable challenge is a big part of why the metal puzzle ring remains the ultimate test of spatial reasoning.
Troubleshooting Tip: If your 6 or 8-band ring feels impossibly stuck mid-assembly, gently loosen the whole structure and look for the paired units. You may have accidentally woven bands from two different cores together prematurely. Part them, secure the first core more completely, then try the integration again. And remember, the best puzzle ring solutions come from understanding the blueprint, not memorizing a sequence for one specific ring. This principle-first approach is what lets you solve a vintage forged puzzle ring from a flea market bin as readily as a modern one from a major supplier like Stuller.
The Final Maneuver & ‘The Click’: When Triumph Snaps Into Place
You’ve threaded the last band. Your puzzle ring now looks like a coherent, yet impossibly loose, knot of metal that spins freely around a hollow center. This is the moment. The transition from a loose weave to a solid ring is the most demanding and satisfying part of assembling a puzzle ring. It requires finesse, not force.
Hold the assembly gently in one hand, pinching the central crossing point. With your other hand, begin to gently squeeze the shanks toward each other, applying even pressure from all sides. You are not crushing it. You are increasing the tension within the woven structure, guiding each arrowhead blob (the key) toward its corresponding slit (the gate). You’ll feel resistance. This is good.
Here is the exact maneuver: As you apply this gentle, omnidirectional pressure, use your thumbs to start rotating the bands in opposite directions. For a standard 4-band puzzle ring, this usually means rotating the two dominant outer bands counter-clockwise relative to the inner weave. Think of it as wringing out a very tiny, very stiff towel. This rotational pressure, combined with the squeeze, is what coaxes the final alignment.
You may feel the ring pop in and out of a semi-stable, yet still loose, state. (This is the point where most instructional videos cut away, and it’s infuriating.) The trick is persistence. Maintain that gentle, rotational pressure. Your goal is to walk every single key to the very lip of its notch. The entire system is now under tension, like a drawn bow.
Then, the click. It’s not always audible, but it is always tactile—a definitive, crisp snap as every key fully seats into its gate. The metal, which felt spongy and mobile a second ago, suddenly becomes a single, rigid, wearable jewelry band. The hollow center vanishes, replaced by solid metal.
If it doesn’t click, stop. Do not force the metal. Release pressure completely. The most common issue is one band being just a millimeter out of sequence, blocking the final seating. Jiggle each band individually, then re-apply the squeezing rotation. Often, using the pad of your pinky finger to apply focused pressure right at a stubborn crossing point can persuade the last key home.
This final click is the solution crystallized. It’s the mechanical proof that you understood the gates, followed the sequence, and mastered the tension. For a multi-band puzzle ring with 6 or 8 bands, this moment is even more profound—a cascade of tiny internal clicks as multiple independent alignments lock in sequence, culminating in that one, solid snap. That’s the sound of triumph.
When to Force It (Never) and When to Jiggle It (Always): A Troubleshooter’s Guide
That triumphant click isn’t always immediate. If you’re here, you’ve likely hit a snag—a band that won’t seat, a gap that won’t close, or the sinking feeling that you’ve bent something. Let’s troubleshoot. This is where knowing the why behind the figure-8 and gates pays dividends, transforming frustration into a diagnostic process. Remember, a puzzle ring is a precision disentanglement puzzle; it’s designed to be solved with finesse, not force.
First, the golden rule: Never force the metal. If you meet solid resistance, you are misaligned, not stubborn. Forcing is the fastest way to bend the metal, permanently deforming a shank and ruining the interlock. The correct approach is always strategic jiggling—tiny, exploratory motions that help the keys find their notches. This approach is a cornerstone for solving many best metal puzzles for adults.
When your puzzle ring won’t go back together, follow this diagnostic checklist.
1. Inspect for Damage. Lay each band flat on a table. Look down its length like sighting a rifle. Any curve or twist? A bent shank will prevent proper alignment. If you see a warp, you can often gently reverse it by rolling the band between your fingers or pressing it against a hard, flat surface. Go slowly. For severe bends, a jeweler can repair it, but for a mild one, patience is your tool.
2. Verify Your Foundation. Ninety percent of assembly issues stem from an incorrect starting figure-8. Return to your first two bands. The crossing must be precise, with the keys (those arrowhead blobs) pointing away from each other in the loops. If one is flipped, the entire multi-band puzzle ring sequence fails. Don’t assume; double-check.
3. Check Gate Alignment at Each Step. As you add the third and fourth bands, each new key must pass through an open gate. If it catches, don’t push. Rotate the entire assembly slightly, or jiggle the new band up and down while applying light inward pressure. You’re feeling for the moment the key slips into the channel. This is the core of how to solve a puzzle ring—listening with your fingers.
4. The Final Hurdle. If everything seems right but the final click eludes you, the issue is almost always one band sitting a hair too high or low, blocking the last engagement. Release all pressure. With one hand, squeeze the assembled ring lightly to maintain tension. With the other, use a fingernail or a soft tool (like a toothpick) to gently tap or nudge each crossing point. Then, re-apply the squeezing rotation. That last millimeter often requires persuasion, not power.
How do you keep it from falling apart again? Once solved, a properly assembled ring is remarkably stable. If it comes apart too easily in daily wear, the primary culprit is ring fit. A puzzle ring should fit snugly. If it’s too loose, it can jostle and self-disentangle. Consider resizing or adding a silicone sizer. Secondly, mind your handling. Putting on a jacket or handling keys can catch a band. Be conscious when sliding your hand into tight spaces.

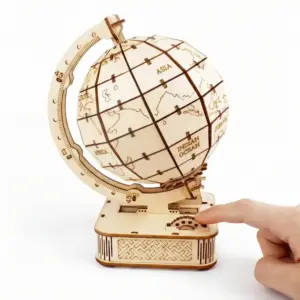
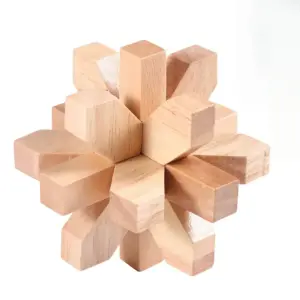
If you’ve mastered the 4-band puzzle ring and enjoy this type of spatial reasoning, you might graduate to more complex mechanical puzzles like the one above. The principles of patience, alignment, and controlled movement translate directly.
The Permanent Solution? Some people, after solving a ring once, solder it shut. I don’t recommend this for a quality forged puzzle ring. It destroys the puzzle’s essence and can damage the metal. If you never want to solve it again, you’re better off buying a solid band. The joy is in the reassembly, the quiet focus it demands. For more on the mindset needed for these puzzles, see our guide on why your hands are lying to you when solving metal puzzles.
In the end, troubleshooting a puzzle ring is about respectful observation. You are not fighting the ring; you are collaborating with its geometry. When in doubt, put it down, take a breath, and retrace the gates from the beginning. The solution is always in the alignment.
The Permanent Solution: Why Some People Solder Their Rings (And Should You?)
After a particularly frustrating cycle of solving, wearing, and watching your puzzle ring tumble apart again in your pocket, a thought will cross your mind. “What if I just… made it permanent?” Soldering the shanks together is the nuclear option, a final surrender to the puzzle. As a former jeweler, I understand the impulse, but let’s talk about what it really means before you reach for the torch.
The primary reason people consider this is for security and peace of mind. A soldered ring becomes a single, solid piece of jewelry, immune to accidental drops and daily jostles. For a forged puzzle ring made of precious metal that you wear constantly, the fear of losing a band is eliminated. It’s a common ‘trick’ among owners who love the ring’s look but have lost patience with its function.
However, the cons are significant and, in my view, almost always outweigh the pros. First, you destroy the very essence of the object. A disentanglement puzzle that cannot be taken apart is a contradiction, its core ingenuity rendered null. Second, from a practical standpoint, soldering can devalue the ring, especially if it’s antique or a collectible mechanical puzzle. A poor soldering job can also damage the metal’s finish, create weak points, or even melt delicate notches if not done by a professional.
So, should you? Here is my bench jeweler’s advice: treat it as an absolute last resort. Before you do, revisit the troubleshooting guide. Is the ring falling apart because a key is bent? A jeweler can often repair that. Is it a cheap, modern ring with loose tolerances? Perhaps its value as a solvable object is low to begin with.
If you genuinely never want to solve it again, ask yourself if you’d be better off buying a traditional, solid band. The quiet triumph of the annual reassembly, the focused ritual of it—that’s the soul of a puzzle ring. Soldering it shut is like gluing the moving parts of a clock because you can’t tell time. The permanent solution, in truth, is not in the solder, but in the patience and understanding you’ve built by learning its gates. (If you must proceed, take it to a professional jeweler who understands fine wire work and the correct solder gauge—never attempt it yourself.)
From Puzzle to Jewelry: Care, Handling, and the One Time You Shouldn’t Take It Apart
So, you’ve resisted the siren call of the solder, and your puzzle ring sits solved and complete in your palm. That satisfying, final click marks a transition—from a scattering of bands to a piece of jewelry. But a multi-band puzzle ring isn’t a solid band; owning one requires a shift in mindset. Let’s talk about how to wear, care for, and, most importantly, keep your hard-won victory.
First, the fit. A fully assembled puzzle ring will feel looser on your finger than a solid ring of the same nominal size. This is normal. The interconnected shanks create a structure with inherent, necessary play. If it feels dangerously loose, consider going down a half-size if you purchase another. The goal is a secure fit that doesn’t restrict the gentle flexing of the puzzle’s components.
For cleaning, simplicity is key. For silver or gold, a soft-bristled toothbrush (designated for this purpose) and warm, soapy water works wonders. Gently brush the intricate weave to dislodge skin oils and dust, then rinse and pat completely dry with a soft cloth. Pay special attention to the notches and internal channels where grime can hide. For stainless steel or titanium, the same method applies. Avoid harsh chemical dips or ultrasonic cleaners, as they can be overly aggressive on the fine wire and delicate friction fits that hold your disentanglement puzzle together.
Now, for the single most important piece of ownership advice: There is one time you should never, ever take your puzzle ring apart. Do not disassemble it when you are away from a controlled, secure environment—think on an airplane, at the beach, on a hike, or in a moving vehicle. The moment you pop those bands free, you are holding several small, nearly identical pieces of metal primed to vanish into cracks, sand, or grass. The risk of catastrophic loss is high. The satisfaction of solving it is not worth the heartbreak of losing a piece forever. Let your travels be for wearing your clever mechanical puzzle, not for testing its solvability on a tray table at 30,000 feet.
Wear it with the pride of understanding. That loose, fluid feel on your finger is a constant, quiet reminder of the gates and keys you mastered. Each time you glance at it, you won’t just see a ring; you’ll see the solved state, the elegant geometry you now comprehend. You’ve moved from frustrated confusion to spatial mastery.
Your final, actionable step? Give the assembled ring one more gentle twist and press, ensuring every band is seated in its proper alignment. Then put it on. Your tutorial is complete; the rest is just living with a little, wearable secret.