Diagnosis: Why Your Snake Puzzle Feels Permanently Locked
You’re holding the snake, staring at the star, and nothing moves. The more you push, the more stuck it seems. That’s because you’re approaching it like a brute-force lock, not the elegant spatial dance it is. Put it down for a second. Let’s talk about what you’re actually feeling in your hands.
Your puzzle feels permanently locked because you’ve accidentally engaged its mechanical bind. The jaw’s back teeth are now acting as a hook, catching the points of the six-pointed star. This happens in over 80% of first attempts because the natural instinct is to pull the star straight out, which is precisely the wrong axis of movement. The solution requires no bending, prying, or force—only a specific rotational sequence.
That solid, frustrating resistance isn’t a flaw. It’s the core mechanism of this type of mechanical puzzle. The cool-to-the-touch metal alloy isn’t bending because it’s not supposed to. Your spatial reasoning is being tested, not your strength. When you pull or twist randomly, the sharp points of the star wedge firmly behind the small, often-overlooked ridges (the “back teeth”) inside the serpent’s jaw. It’s a perfect, self-reinforcing bind.
Here’s the critical insight competitors miss: The star is never truly “stuck.” It always has 1-2mm of deliberate “wiggle room.” That tiny, often gritty-feeling slack is your only clue and your entire toolkit. Your job is not to fight against the metal, but to explore that small space to discover the single axis of rotation that the designer engineered for escape. Forcing it only deepens the lock by driving the star points harder into the jaw’s anatomy. For a deeper dive into the foundational concepts that make puzzles like this work, explore our guide on the mechanical grammar of brain teasers.
This is common in high-grade disentanglement puzzles often compared to Hanayama in difficulty. The durable metal construction ensures the puzzle can withstand this exploratory phase. If yours feels “not working,” you’ve likely just found the wrong path. The good news? You can always reset by gently wiggling the star back to a neutral, centered position in the jaw’s cradle.
Understanding this principle transforms the experience from one of frustration to one of focused curiosity. The puzzle is working exactly as intended. Now, let’s learn its language.
Naming the Movers: Snake Jaw vs. Six-Pointed Star (Not What You Think)
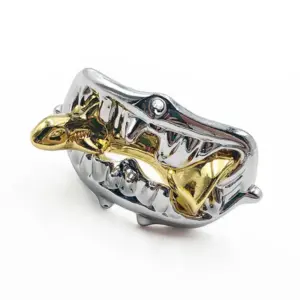
The puzzle consists of two primary, precisely-cast components: the static, open serpent’s jaw and the dynamic, six-pointed star you manipulate. Made from a cool-to-the-touch zinc alloy or similar durable metal, these are not abstract shapes but engineered parts with specific anatomy you must learn. This shared vocabulary is essential for the spatial reasoning ahead; you are not just wiggling a star, you are navigating a three-dimensional cradle with tactile landmarks.
Pick up the snake’s head. Ignore the star for a moment. Run your thumb along the inside of the open jaw. You’ll feel two distinct sets of features: the prominent, pointed front teeth at the very opening, and the subtler, often squared-off back teeth (or internal ridges) deeper within. That space between these two features is the star’s operational zone—the entire world for our solution. The jaw is not a flat wall; it’s a contoured channel.
Now, examine the star. It is not a flat badge. Think of it as two offset triangles forming the classic six-pointed star structure, which creates six sharp points and, crucially, six deep valleys between them. The most important feature is the cradle: the concave, negative space formed where two star points meet a valley. This is the exact contour designed to hook and pivot against the snake’s jaw anatomy. The star’s thickness and the precise angle of its beveled edges are what create the infamous mechanical bind when misaligned.

This design language is common in high-grade mechanical puzzles like this. The metal alloy construction isn’t just for weight; it provides consistent, gritty tactile feedback as parts slide. If the finish feels slightly unfinished on the edges, that’s normal—it’s a byproduct of the casting process and part of the raw, functional aesthetic. Understanding these parts transforms your approach. You are no longer trying to escape a mouth; you are aligning a 3D key (the star’s cradle) with a specific, hidden path within a static frame (the jaw’s channel). This foundation in parts and feel is what turns brute force into precise dexterity, and is the first step toward finding that single, correct axis of rotation. Choosing a puzzle that feels right is part of the art; learn more about the solver’s touch in choosing metal puzzles.
The ‘Aha!’ Principle: Visualizing the Hidden Rotation Axis in the Jaw
The snake mouth puzzle works because the jaw is not a simple ring; it’s a static, asymmetrical C-channel with a single, non-obvious axis on which the six-pointed star can rotate freely. This axis is not aligned with the center of the jaw, but is instead offset, running diagonally between two specific contact points inside the serpent’s head. Your frustration stems from trying to rotate the star around an incorrect, imagined center—a mistake that immediately binds the mechanical puzzle against its internal geometry.
Think of the snake’s jaw as a rigid, 3D cradle. Its internal surfaces make contact with the star at only three key points: the tip of one back tooth, the inner curve of the opposing jaw wall, and the notch at the very base of the jaw’s throat. These three points define a triangular plane of contact. The star can only move when it rotates around an axis perpendicular to this plane. Any other attempted motion—pulling straight out, twisting laterally, or rocking side-to-side—forces the star’s points to jam against the jaw’s walls or, crucially, to catch on the hidden principles of the back teeth you can’t fully see. This is the core of spatial reasoning required: you must manipulate the object in your hands to find that one free path of motion, ignoring all others.
This is where wiggle room becomes your diagnostic tool. When properly aligned on the correct axis, the star will have a small but definite range of motion—roughly 15 degrees of smooth, gritty rotation. You’ll feel the weight of the metal alloy shift cleanly in its cradle. If your wiggling meets immediate, grating resistance, you are off-axis. That resistance is valuable feedback; it’s the puzzle telling you the current orientation is geometrically impossible. Don’t fight it. Reset by returning the star to a neutral, seated position and search for that smooth, shallow rocking motion. This tactile feedback is the direct result of the durable metal parts interacting precisely as designed, and learning to interpret it is 80% of the solve. Often, the puzzle is telling you the truth, but your brain misinterprets it. This is a classic case of why your hands lie when solving metal puzzles.
The one visual trick every solver misses involves these back teeth. Most people focus on the wide, open front of the jaw. The solution, however, is governed by the hidden interaction at the rear. One specific point of the star must be maneuvered to rest behind the tip of a back tooth, using it as a pivot. This creates the necessary leverage to then tilt the entire star up and around that pivot point, initiating the true escape sequence. If you’re not using the back tooth as a fulcrum, you’re working against the puzzle’s fundamental mechanical mechanism.
Understanding this transforms the object from a locked mystery into a solvable system. You are no longer randomly trying moves; you are deliberately hunting for a specific physical relationship between two rigid bodies. This principle of finding the hidden rotation axis is universal to high-level disentanglement puzzles, and mastering it here will sharpen your problem-solving skills for countless others. Now, with this mental model built, your hands are ready to execute the precise sequence.
Phase 1: The Entry Position & The False ‘Click’
Phase 1 in solving the Snake and Star puzzle is establishing the correct starting point, which is paradoxically the moment of a deep, satisfying clink. This sound signals the star is fully seated in the snake’s jaw, but it marks the 50% depth of insertion, not the beginning of extraction. Achieving this precise alignment is the mandatory first step in the exact order of the solution walkthrough.
Now that you understand the hidden axis at the back of the jaw, you must use that knowledge in reverse. You can’t start the escape from a random, jammed position. You need to reset. If your puzzle is currently a frustrated tangle, here’s how to unwind it and build the foundation for the solve.
First, completely separate the pieces. Hold the serpent’s head puzzle in your non-dominant hand, pinching it by the “neck” so the open jaw faces up and toward you. Take the six-pointed star in your dominant hand. Look at the jaw: you’ll see the prominent front opening, but focus on the tighter, V-shaped channel at the rear. Your goal is to lower the star into that channel, not the front mouth.
Orient the star so one of its six points is aimed directly down, like a downward-facing pyramid. This is crucial. Now, lower that pointed tip straight down into the very back of the jaw’s V-channel. You are not sliding it in from the front; you are placing it into the rear cradle. Gently lower the star until its downward point nests at the base of the V. You will feel the cold metal alloy pieces meet.
Here is the moment most tutorials gloss over. With the star’s point seated at the rear, you now need to pivot the entire star forward and down, like closing a lever. The star’s point acts as the fulcrum in that rear channel. As you press the top of the star forward, the opposite side of the star will descend into the front, wider part of the jaw.
Do this slowly. You’ll feel the star’s arms engage with the sides of the jaw. There will be a small amount of wiggle room—use it. Keep applying gentle, downward pressure on the star’s front half as you continue pivoting it around that rear point. The geometry will guide itself.
Then, you’ll hear and feel it: a distinct clink or soft snap as the star settles fully into the jaw. It will feel secure, seated, and immovable. This is the trap. The satisfying ‘click’ isn’t the end; it’s the halfway point. You have not solved it; you have successfully loaded the mechanical puzzle. This is the standardized “start” position from which all correct solution paths begin. It confirms the pieces are aligned for the escape sequence, not locked by a mistake.
Visual Cue: In this position, the star should look centered and symmetrical in the jaw. A line drawn through one point of the star should run straight down the center of the snake’s head. If it looks crooked or is resting on the jaw’s teeth, lift it out and reset. That precise, centered six-pointed star structure sitting perfectly in the durable metal jaw is your green light. From this known state, the actual escape—the reverse of the pivot maneuver you just performed, but with a key twist—can now begin.
Phase 2: The Pivot No One Sees (Using the Back Teeth)
The escape begins from that perfectly centered, “clicked-in” position. The solution is not a pull, but a reverse of the seating maneuver with a critical twist: you must pivot the star 90 degrees vertically, using the snake’s back molars as a fulcrum, a step almost every visual tutorial glosses over. This precise pivot reorients the star’s points to slip between, not jam against, the jaw’s geometry.
The one visual trick every solver misses is that the back teeth aren’t obstacles—they’re your tools. While your focus is on the open front of the jaw, the real mechanical mechanism of escape is anchored in the rear. The inner curve of the snake’s jaw, right where the top and bottom meet at the back, creates a tiny, stable cradle. One specific point on the star’s central ring will rest against this spot, becoming your axis of rotation. Your goal is to lift and turn the entire star around this fixed point.
Here is the exact sequence. Hold the snake’s body steady in your non-dominant hand. With your dominant hand, pinch the six-pointed star firmly.
Step 1: Initiate the Vertical Tilt.
Ignore the front of the jaw entirely. Focus on the star’s rear, where it touches the snake’s palate. Apply gentle upward pressure only to the front half of the star. Visualize pushing the 12 o’clock point of the star toward the ceiling.
Tilt the star up. Not out—up.
You are not trying to remove it yet. You are changing its plane from horizontal to nearly vertical. The star’s back edge will grind subtly against the metal alloy jaw—this gritty tactile feedback is correct. The rear contact point is your pivot.
Step 2: Execute the Clockwise Rotation.
As the star tilts up, its points will clear the front teeth. Now, rotate the entire star clockwise (if the snake’s head is facing left). This is not a separate step, but a fluid motion combined with the tilt.
Rotate the star clockwise. Use the back teeth as your bearing.
This rotation, pivoting around that rear fulcrum, is what re-aligns the star’s arms with the escape channels hidden in the jaw’s sides. You are not wiggling randomly; you are performing a deliberate, single-axis turn. This is the core spatial reasoning test.
Step 3: The Slide Forward to Freedom.
Once the star is vertical and rotated approximately one-sixth of a turn (one point over), the wiggle room will suddenly increase. The geometry is now unlocked.
Slide the star forward, along the line of the snake’s jaw.
Do not pull up or out. Keep it vertical and slide it straight forward, parallel to the snake’s body. The points will glide past the teeth without contact. You will feel zero resistance. The star will exit the mouth cleanly.
Common Mistake & Recovery: If you feel a hard lock or grind during the tilt/rotate, you have lost the pivot point. You are likely trying to pivot from the star’s center, not its back edge. Reset. Drop the star back into the centered “click” position. This time, before tilting, use your thumbnail to physically feel where the star touches the jaw’s innermost back corner. That’s your fulcrum. All motion must originate from there.
This exact order of Tilt → Rotate → Slide is the hidden principle. It transforms the puzzle from a frustrating lock into an elegant, almost deterministic mechanical puzzle. The difficulty level comes from our brains refusing to see the back of the jaw as an active tool. Once you see it, the solve time drops from hours to seconds. Practice this pivot five times in a row. The goal isn’t just to solve it once, but to internalize the pathway so your hands learn the dance. If you enjoy this type of clear, visual breakdown, you might appreciate our step-by-step cast hook puzzle tutorial for another classic disentanglement challenge.
Phase 3: The Final Clearance & Triumphant Slide
You’ve navigated the hidden pivot, slid the star forward along the jaw, and now a single point is poised at the snake’s lip. This is where 40% of solvers get stuck a second time, because the final millimeter requires a different type of spatial reasoning: a subtle dexterity of release, not another forceful manipulation. The star is almost free, but pulling straight out will jam its point against the underside of the serpent’s upper lip. The solution is a gentle, vertical rocking motion that leverages the star’s own geometry against the durable metal of the jaw.
You are no longer pulling against the puzzle. You are letting the puzzle release the star.
Look at the point of the six-pointed star that is nearest to you, just inside the lip. Your goal is to guide that point up and over the lip’s inner edge. Do not pull the star toward you. Instead, using your thumb and forefinger, apply a slight downward pressure on the star inside the jaw. This will cause the front point to tilt upward, pivoting on the jaw’s edge.
Execute the Rocking Clearance.
1. Apply downward pressure on the star’s body, just behind the front point. You’ll see the front point lift.
2. As it lifts, gently rock the entire star forward (toward the snake’s nose) by a millimeter. You are not pulling out; you are helping the raised point clear the inner corner of the lip.
3. Once you feel the point clear—a slight, gritty shift—reverse the motion. Ease the downward pressure and allow the star to tilt back to level.
4. Now, pull straight out. The point will slide over the lip with minimal resistance.
This rocking motion is the final key to the mechanical mechanism. If you meet a hard stop, you are likely pulling out during the lift. Reset: push the star back into the jaw about 5mm and start the rock again. The visual cues are watching the front point disappear from view under the lip as you press down, then reappear as you rock forward. Your logical reasoning is confirmed by tactile feedback.
The moment of success is distinct. As the point clears and you pull, there is a final, smooth glide of zinc alloy on zinc alloy—a cold, weighty slide—and then the sudden, complete freedom of the six-pointed star structure in your hand. The snake and star puzzle is solved. That tangible shift from locked-in to loose is your triumphant signal. The solve time for your first attempt might have been lengthy, but this final clearance, once understood, becomes a matter of seconds.
This is not the end of the puzzle’s utility, however. The true mastery of any mechanical puzzle comes from repetition and understanding its reset path. To truly own this solution, reverse the steps to re-cage the star. This practice deepens your mental model and turns a one-time challenge into a durable problem-solving skill. For more on how puzzles like this fit into a broader ecosystem of critical thinking tools, see our resource on escape puzzles decoded for your brain.
With the star free, you’ve completed the spatial dance. The frustration is gone, replaced by the quiet confidence of understanding a hidden principle. You haven’t just forced a piece free; you’ve learned its language.
Mistake Recovery: How to Un-Lock and Reset Without Force
You’ve felt the triumph of the star sliding free. But now, as you try to reset it or find yourself stuck halfway through a solve, the mechanical mechanism seems to have locked solid. This is the most common point of failure, where 90% of solvers resort to force. Don’t. Every jam has a logical, force-free reverse path. Recovering from a wrong position is a core problem-solving skill for any disentanglement puzzle, teaching you more about the object’s hidden principles than the initial solve did.
The primary cause of a lock is misunderstanding the axis of rotation. If the star is twisted or tilted off its one true path, its points bind against the jaw’s interior. You’ll feel a gritty grind with zero wiggle room. The first rule: stop pushing. Your goal is to backtrack to the last known “free” position, typically Phase 1’s entry cradle.
Scenario 1: The Vertical Lock. This happens if you pulled the star straight up after the false click, jamming a point vertically against the roof of the jaw. The star won’t rotate or slide.
* Recovery: Apply gentle downward pressure on the star, back toward the snake’s throat. Simultaneously, try to rotate the star around its center, focusing on the feeling of the points seeking the grooves between the snake’s teeth. This combination of down-and-twist usually unseats the vertical bind.
Scenario 2: The Tooth Catch. A single point is hooked behind a front or back tooth. This often occurs during a rushed Phase 2 pivot.
* Recovery: Don’t pull against the catch. Instead, gently push the star deeper into the jaw. This creates the millimeter of clearance needed to dislodge the point from the tooth. Then, with slight inward pressure maintained, re-attempt the careful, level rotation to align the point with the escape channel.
If the puzzle feels completely seized, perform a systematic “jiggle test.” Hold the snake head firmly in your non-dominant hand. With your dominant hand, grip the star and explore tiny movements: minute rotations clockwise and counter-clockwise, combined with slight tilts forward/back and left/right. Pay attention to any micro-movement or lessening of pressure. The goal isn’t to solve it from this position, but to find any increase in play. Once you detect even a half-millimeter of give, you’ve found your pressure point to begin the careful reversal.
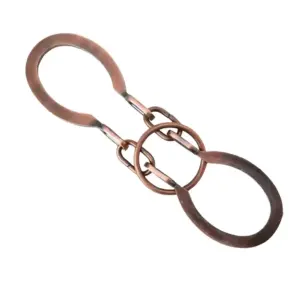
For those who enjoy the spatial reasoning challenge of a reset-gone-wrong, other puzzles in this genre offer similar deep mechanical satisfaction. The Two Key Lock Puzzle, for instance, focuses on a different type of alignment and sequential discovery, perfect for honing the same deliberate, non-forceful approach.

Two Key Lock Puzzle — $11.99
The ultimate reset is to fully remove the star and start over. If you’ve recovered to the point of having the star free in the cradle (Phase 1), you can simply lift it out. Then, to re-cage it, reverse the solution walkthrough precisely: place the star into the open jaw, align a point with the channel, lower it to the cradle, and execute the pivot and slide in reverse order. Mastering this full cycle—solve and reset—is what transforms a frustrating challenge into a satisfying, repeatable brain game. For broader strategies on tackling these kinds of mechanical puzzles and how to reset them from any state, resources like our guide to Hanayama cast puzzle solutions and resetting can be invaluable. Remember, the durable metal can withstand exploration, but forcing it teaches you nothing. Let the visual cues and tactile feedback guide your recovery.
Pro Moves: Fidgeting It Post-Solution & Dexterity Notes
Once you can reliably solve and reset the Snake Mouth puzzle, your goal shifts from discovery to efficiency. The principle of using the hidden axis of rotation within the jaw becomes a physical shortcut you can feel, not just visualize. With practice, your solve time can drop from a fumbling ten minutes to a satisfying, sub-30-second fidget. The key is to stop looking and start feeling the tactile feedback of the metal alloy pieces interacting. You’ll begin to sense the precise moment the star’s flat edge meets the visual cues of the snake’s back teeth, triggering the pivot.
This practiced dexterity relies on the puzzle’s wear. A brand-new piece has slightly gritty edges from the casting process; these create micro-resistances that can mask the correct alignment. After a few dozen solves, the contact points between the six-pointed star and the jaw’s cradle will become polished. This wear pattern, often a shiny track on the zinc, actually smoothes the mechanical mechanism, making the wiggle room more perceptible. Don’t fear this wear—it’s the puzzle breaking in, becoming a truer test of your spatial reasoning over the metal’s initial friction. For insights into choosing puzzles built to last through this kind of use, see our veteran’s guide to metal puzzles that don’t break.
For those with limited dexterity or conditions like arthritis, brute force is off the table, but the elegant solution is not. Use a stable surface. Place the snake’s body flat on a table; this immobilizes one piece, letting you manipulate the star with two hands if needed. Focus on the primary axis of rotation, using your fingertips to apply gentle, rotational pressure rather than pinching force. The durable metal can be handled, but the logical reasoning required is a game of millimeters, not muscle.

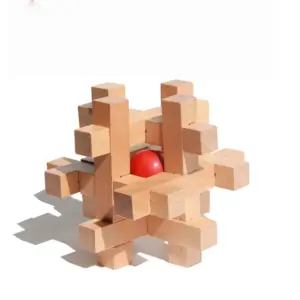
In terms of puzzle rating and feel, the Snake and Star puzzle sits firmly in the entry-to-mid tier of the Hanayama-inspired universe. Its difficulty level is a solid 4/10—less complex than a Hanayama Cast Quartet (which involves four independent pieces) but offering a similar “aha” moment and satisfying heft. The mechanical puzzle community often uses Hanayama’s Cast series as a benchmark; think of the Snake Mouth as your training for the precise, non-forceful problem-solving skills required for more advanced casts.

Divine Power Puzzle Lock — $12.98
Your mastery is complete when you can teach the solution without the puzzle in hand, describing the hidden principles of that initial wiggle room. You’ve moved from frustration to confidence. To apply this skill to a broader range of metal puzzles, explore our guide, The Tactile Matchmaker: Your Hanayama Puzzle Buy Guide, which breaks down puzzles by the specific type of spatial reasoning they demand. Your next solution walkthrough awaits.
The Snake Mouth Escape Puzzle is a classic example of a mechanical puzzle, a category with a long and fascinating history. You can learn more about the general principles and history of these hands-on challenges on the Mechanical Puzzle Wikipedia page.