The 30-Second Escape (For When You’re Truly Stuck)
You’re holding this cool, heavy ring. The star is tantalizingly loose but won’t come free. You’ve twisted, pulled, and maybe even Googled ‘impossible toy’. Take a breath. The Snake Mouth puzzle’s solution is a precise, four-move sequence that navigates an internal cam path, not a test of strength. You can free the six-pointed star in under 30 seconds by following these exact rotations and alignments. Let’s walk through it.
The 4-Move Key:
1. Hold the outer ring steady. Orient the “snake’s mouth” (the wide, U-shaped gap) to face you.
2. Rotate the star 180 degrees. Turn it so one of its points aims directly into the snake’s mouth. You’ll feel a distinct click as the star’s internal cam engages with the ring’s track.
3. Shift the star sideways. Without turning it, slide the entire star laterally (left or right) within the mouth. It will move about 2-3mm until it hits a stop. This is the crucial alignment most people miss.
4. Lift it straight out. The star is now perfectly aligned with the escape channel. Pull it directly toward you, up and out of the ring’s plane.
Done. If it didn’t work, the star wasn’t fully rotated or shifted. Reset both pieces and try again, focusing on the tactile click and lateral slack. For the why behind each move—the cam path mechanics, troubleshooting, and the ‘horse hoof lock’ history—read on.
Hold, Feel, and Listen: Setting Up for Success
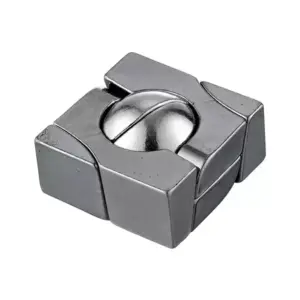
Setting up correctly is not about raw strength, but about using your fingers as sensors. The solution requires one specific grip and orientation to work; get this wrong, and you’re just stressing the zinc alloy, not engaging the mechanism. Hold the puzzle with the outer ring’s flat, smooth side facing up, like a coaster, and position the prominent U-shaped gap—the “snake’s mouth”—to point directly at your chest.
Now, pick up the puzzle. Notice the heft. The material is a zinc alloy, giving it a dense, cool weight of about 45-50 grams—substantial for a 6cm diameter ring. This isn’t a flimsy trinket; that mass is your first clue that solutions relying on force will fail. Your primary job is to feel for two specific physical cues: rotational slack and the tactile click.
Before attempting any moves, take a moment to explore. Grip the outer ring firmly in your non-dominant hand, pinching it between your thumb and middle finger on its smooth sides. With your dominant hand, hold the star by two of its points. Don’t pull. Instead, gently rotate the star back and forth within the ring. You’ll feel a small amount of free movement, maybe 5-10 degrees, before it meets resistance. This is the rotational slack—the play within the track before the cam engages. This sensation is a core principle in solving many cast metal puzzles, a topic explored in depth in the guide on how to unlock any metal puzzle.
Next, identify the mouth. It’s more than just a gap; it’s the exit channel. Visually locate the point on the star that seems to align best with this opening. Now, slowly rotate the star. As you turn it, listen and feel. You are searching for a distinct click or a subtle but firm bump. This isn’t the sound of metal hitting metal; it’s the sensation of the star’s internal cam (a small, off-center peg on its underside) dropping into a specific notch in the ring’s hidden track. When you find it, you’ll know. The star will settle into a position that feels subtly more “locked in” than others. One of its six points will now be aimed precisely into the center of the snake’s mouth. This is your true starting position.
If you don’t feel the click, reset. This is the most common point of failure. Jiggling the star while applying slight inward pressure can help you find the engagement point. Remember, you are not trying to solve it yet. You are calibrating your senses to the mechanism’s feedback. This preparatory ritual—hold, feel for slack, listen for the click—transforms the puzzle from a frustrating object into a readable, mechanical system. It shifts your goal from “escape” to “alignment,” which is the real key. This process of trusting tactile feedback over instinct is a recurring theme in metal puzzle solving, something I delve into in an article about why your hands are lying to you.
The Step-by-Step Unlock: A Visual and Textual Walkthrough
The solution is a deliberate, four-step sequence that uses the cam path’s geometry, not force. From your true starting position—with one star point aimed into the snake’s mouth and the cam engaged in its notch—you will perform two rotations and two controlled slides. The entire process exploits the designed rotational slack in the system, and the final release should feel smooth, not sudden.

Now, let’s walk through each move. (If you prefer a dynamic visual reference, searching for a snake mouth puzzle solution video can be helpful, but this textual guide will explain the why behind every motion you see.)
Step 1: The First Rotation
Hold the ring steady in your non-dominant hand. With your dominant hand, firmly grip the star. Now, rotate the star clockwise (when looking at the snake’s face) by exactly one point. This is a 60-degree turn.
Why this works: You are guiding the internal cam along the first leg of its L-shaped track. This rotation uses the designed clearance to move the cam away from the entry/exit notch, positioning it at the corner of the “L.” You should feel a slight resistance as the cam moves, but it should turn cleanly. (This is where most people try to pull—don’t. You’re merely repositioning within the plane of the ring.)
Step 2: The First Slide
With the star now rotated one point clockwise, you will see that a different point of the star is aligned with the opening of the snake’s mouth. This is your cue for the next move. While maintaining a firm grip, push the star gently but directly away from you, perpendicular to the plane of the ring. Slide it along this new axis.
Why this works: You have reached the corner of the cam path. This slide moves the cam along the short, second leg of the “L” track. It is a linear shift that capitalizes on the rotational slack you just created. The star will move outward by a few millimeters—often just enough to be visible. You are not freeing it yet; you are transitioning it to a new channel within the ring’s body. (If it doesn’t slide, you likely didn’t rotate fully to the next stable position. Nudge the star back and forth slightly less than a full point to find the sweet spot.)
Step 3: The Second Rotation
The star is now partially extended. This is the most delicate and critical phase. From this offset position, rotate the star counter-clockwise by one point (60 degrees). You must keep light outward pressure during this turn to prevent the cam from slipping back into its original track.
Why this works: You are navigating the final corner of the escape route. This rotation guides the cam into the dedicated exit channel—a groove that leads straight out of the ring. The alignment notch you felt at the very beginning is the start of this channel, and you are now circling back to it from the opposite side. The motion should feel tight but smooth, like turning a stubborn bottle cap that’s finally threading correctly.
Step 4: The Final Slide
After the counter-clockwise rotation, look at the snake’s mouth. One of the star’s points will be perfectly centered within the gap, but the star will feel loosely captive. This is the moment. Simply pull the star straight out along the axis of the ring, away from the snake’s head.
Why this works: The cam is now aligned with the open, exit portion of the track. There are no more twists or turns—just a clear path. The release requires no force; a steady, firm pull is all that’s needed. The star should slide free with a satisfying, gritty glide, a signature of the zinc alloy surfaces moving against each other.
This four-move sequence—rotate clockwise, slide out, rotate counter-clockwise, slide free—is the complete key to the snake mouth escape puzzle solution step by step. Its elegance is in its constraint: the puzzle only feels like it has infinite solutions because of the initial rotational slack. The actual solution is a precise navigation of a very specific, hidden cam path.
Troubleshooting the “Stuck” Point:
If the star refuses to come free at Step 4, you have likely missed a full rotation or slid along the wrong axis. Do not force it. Reset by pushing the star fully back into the ring and return to the very beginning: hunt for that initial tactile click. The most common error is in Step 3—failing to apply consistent outward pressure while rotating counter-clockwise, which lets the cam fall back into the maze. Think of it as holding a key turned in a lock while you open the door.
Understanding this internal map transforms the experience. You’re not memorizing a trick; you’re learning the language of a simple machine. For a permanent reference, you might seek a snake mouth escape puzzle instructions pdf, but the true mastery comes from feeling the geometry in your hands.
Inside the Snake’s Jaw: Visualizing the Hidden Cam Track
Understanding the solution is one thing, but feeling the ‘why’ unlocks a deeper satisfaction. The snake mouth puzzle’s solution feels counter-intuitive because it’s governed by a simple cam path—a continuous groove machined into the inside of the ring, which the star’s six points follow. Think of it not as a lock with a keyhole, but as a three-dimensional, closed-loop train track where the star is the locomotive, and its points are the wheels. The star isn’t pulled free; it’s guided out along a predetermined route that uses rotational force to navigate bends and gates.
Now, let’s open the snake’s jaw mentally. If you could see through the zinc alloy, you’d find a track with a very specific geometry. It has three identical lobes, corresponding to the three main channels of the ‘mouth’. Each lobe consists of two key zones: a long, straight alignment notch that runs parallel to the ring’s edge (this is where the star has its initial rotational slack), and a perpendicular, curved cam section that arcs towards the center and back. The star can only exit when one of its points is perfectly aligned with the narrow opening where the straight notch and the curved cam meet—a single, true gate in the entire system. This is the tactile click you hunt for in Step 1.
Let’s map the 4-move sequence onto this hidden track. When you perform the initial clockwise rotation (Step 1), you are not just turning the star; you are driving one of its points along the straight alignment notch, searching for the entrance to the curved cam section. The click is the point dropping into that curved section. (This is where most people, feeling resistance, reverse course—don’t.)
The outward slide (Step 2) is now mechanically compulsory. With the point engaged in the curved cam, the only available degree of freedom is to move the star radially outwards. The cam’s geometry physically pushes the star out of the ring’s central plane as you slide. You are now in a transitional, mid-solve position where the star is askew, partially out.
Step 3, the counter-clockwise rotation, is the most brilliant part. As you turn the star back, you are not reversing your steps. You are navigating the second half of the curved cam section, which now acts as a lever. This rotation, while maintaining outward pressure, uses the cam’s incline to translate rotational force into further linear displacement. It’s the same principle as unscrewing a bolt: the threads (the cam) convert your twist into a pull. This is The ‘Aha’ Physics: the puzzle is solved with torque, not tension.
Finally, the last slide (Step 4) is simply exiting the end of the cam track. The point has been guided to the very edge of the ring’s internal wall, and with the track’s constraints now complete, the star can be lifted free with no resistance. The reason it won’t come out “even when it feels loose” is that, until this final alignment, one of the star’s other points is still bound by a different part of the track, acting as a hidden latch. The loose feeling is just rotational slack within a single lobe, not freedom from the system.
This cam-and-track design explains the puzzle’s robust feel and its repeatability. It’s a kinematic closure—a term from my design days meaning an object is held securely by geometry alone, without springs or latches. The difficulty (I’d rate it a 4/10, akin to a Hanayama ‘Equa’ but less abstract) stems from the track being invisible. Your hands must become your eyes, learning to interpret faint tactile cues. This process of decoding physical feedback is central to the pleasure of many metal puzzle brain teasers.
For a hands-on thinker, this understanding demystifies not just this puzzle, but a whole class of ancient Chinese puzzle mechanisms. It’s why comparing the snake mouth puzzle vs Hanayama is so fun; Hanayama’s Cast Puzzles often use similar interlocking geometric principles, just with more complex, modern machining. The snake mouth is a pure, almost archetypal example of the form. Knowing the snake mouth escape puzzle mechanism means you’ll never be truly stuck again—you’re not performing a magic trick, you’re operating a simple, elegant machine.
Stuck Again? Troubleshooting Common Misalignments
Even with the cam path mapped in your mind, your hands can still get lost. The most common failure point is the “stuck but loose” scenario—the star rotates freely for about 90 degrees but hits a hard stop and won’t exit. This isn’t a defect; it means the star is caught between two cam lobes, and you’re applying force in the wrong phase of the sequence. If this happens, don’t force it. Excessive torque can gall the soft zinc alloy, creating burrs that make the puzzle permanently stiff. Instead, let’s diagnose and reset.
First, return to the absolute start. The puzzle’s resting state is with the star’s point fully seated in the snake’s mouth notch. If you’re disoriented, gently pull the star and ring apart by a millimeter (just enough to relieve pressure) and slowly rotate the star until you feel and hear a distinct click-clunk as one of its six points drops fully into that mouth notch. This is your home position. (You may need to wiggle it slightly to find the true seat). From here, the 4-move sequence is reliable. For more on the durable logic of cast puzzles, I’ve written a guide on metal puzzles that don’t break that applies here.
Specific Problems and Resets:
Partial Escape & Twisting: You’ve pulled the star partially out, but now it’s twisted and jammed. This happens if you skipped the final 90-degree rotation in Step 4. Solution: Don’t pull harder. Reverse the process: push the star back in while gently rotating it counter-clockwise. You’ll feel it re-engage with the cam track. Push until it’s fully seated, re-find the mouth notch, and start over.
The False “Exit Alignment”: You’ve followed the steps, but the star still won’t pull free. Visually, a point seems aligned with the mouth gap. This is a classic misalignment notch issue. Solution: With the star in what you think is the final position, apply very slight rotational pressure left and right. If there’s any “wiggle,” you’re not perfectly indexed. The correct final alignment has zero rotational slack—the star will be geometrically locked in place relative to the ring, only able to move linearly straight out.
Catching on an Inner Ridge: During removal or reassembly, the star catches and grates. This is often a diy snake mouth puzzle solution attempt gone awry—the star is trying to exit at the wrong rotational phase. Solution: For disassembly, stick strictly to the clockwise-quarter-turn sequence. For reassembly, the reverse is critical: insert the star point into the mouth, push fully in, then perform the 4-move sequence in reverse (counter-clockwise quarter turns) until it seats.
If frustration builds, put it down. The snake mouth escape puzzle is a fidget-scale object; muscle memory works better under calm conditions. The metal coating is durable, but solving it hundreds of times will naturally wear a patina on the high-contact edges of the cam track—a badge of honor, not a flaw. Remember, its difficulty isn’t in complexity but in trusting the invisible geometry. Once you’ve successfully reset and solved it three times in a row, the process will feel less like a puzzle and more like operating a satisfying, mechanical switch.
From Horse Hoof to Handheld: The Puzzle’s Pedigree
Now that you understand the cam track and have conquered the 4-move sequence, you’re holding more than a solved metal star ring puzzle; you’re holding a piece of applied ancient mechanics. This object, which you might search for as the alloy horse hoof lock puzzle solution, is a direct, miniaturized descendant of a practical device. Its design isn’t arbitrary artistry but distilled engineering, a fact that becomes clear when you learn its original, utilitarian name.
The snake mouth escape puzzle is most authentically known as the “Alloy Horse Hoof Lock” or “Six-Pointed Star Lock.” These names are your keys to its past. The “Horse Hoof” reference is the Historical Footnote that grounds it: this mechanism is believed to derive from a traditional Chinese locking device used to tether livestock. A larger, sturdier version of this cam-and-groove system would have secured a rope or chain through the central ring, with the star acting as a removable key or plug that, when locked, could not be jostled loose by the animal’s movement—much like the star feels “loose but stuck” in your hand. Its brilliance lies in security through geometry, not strength, a principle that has fascinated lockmakers for centuries.
This lineage places it firmly among other ancient Chinese puzzle locks, which were often beautiful hybrids of art, function, and intellectual play. Unlike modern, precision-machined puzzles like those from Hanayama (such as the Cast Equa), which are designed purely for cerebral challenge, the Horse Hoof Lock’s design feels more organic and direct. Its zinc alloy construction, while perfect for a modern fidget toy, echoes the cast bronze or iron of its ancestors. The slight gritty feedback you feel in the track isn’t a manufacturing flaw but a characteristic of this casting method, connecting you to a much older material tradition. For a broader look at this fascinating category, I recommend this collector’s guide to 12 ancient Chinese puzzle locks.

If you’re intrigued by this context, you’ll find a whole family of similar historical brain-teasers. Pieces like the Fuxi Eight-Corner Puzzle Ball (shown above) or those documented in the guide linked above explore different spatial principles but share the same philosophy of hands-on, non-verbal reasoning.
This brings us to a common user question: how does the Snake Mouth’s difficulty compare to a brand like Hanayama? Think of it this way: a Hanayama puzzle (rated 4-6 out of 6 in difficulty) is often a cryptic, multi-stage discovery. The snake mouth puzzle vs hanayama comparison reveals the Horse Hoof Lock is more straightforward—its challenge is a concise, logical sequence once you discern the single core rule. It’s a 3 out of 6, perfect for a patient 12-year-old or an adult seeking a satisfying, not soul-crushing, fidget toy. For a structured look at that graded challenge, you can explore Hanayama cast puzzle solutions by level.
So, when you ask where to buy snake mouth escape puzzle, you’re seeking this authentic lineage. It’s sold on niche puzzle sites and via select third-party sellers, often listed under its traditional names. Be wary of the cheapest options; a legitimate version will have the heft of zinc alloy, clean casting without sharp burrs in the cam path, and that precise, snicking alignment of the star points within the mouth’s ridges—the hallmark of a well-executed ancient idea. You’re not just buying a trinket; you’re acquiring a working replica of a clever, centuries-old fastening solution, now delightfully repurposed for the pleasure of your own two hands.
Snake Mouth vs. Hanayama: Where It Fits in Your Collection
So, you’ve mastered the cam path—now where does this particular piece of alloy sit among the puzzles you might already own or be considering? For the enthusiast, the Snake Mouth Escape finds its clearest benchmark against the Hanayama Cast Puzzle series, the gold standard for premium metal brainteasers. On a synthesized difficulty scale, the Snake Mouth is a firm 3 out of 6, placing it between Hanayama’s ‘Novice’ and ‘Intermediate’ tiers—more involved than the Cast Equa (rated 2) but far more direct than the devious, multi-layered Cast Enigma (rated 6).
The core difference lies in the nature of the challenge. A typical Hanayama puzzle, like the Cast Vortex or Cast News, often presents an enigmatic object with no obvious moving parts; the solution is a journey of discovery, requiring you to deduce the very mechanism itself through experimentation and sometimes hidden compartment reveals. The snake mouth escape puzzle difficulty is more concentrated. Its mechanism is immediately apparent (a star in a ring), and the goal is singular (separate them). The ‘aha’ moment isn’t about finding a hidden button, but in internalizing the single, elegant rule of the cam path. This makes its satisfaction swift and repeatable, a key trait for a good fidget toy.
Tactile feedback is another point of comparison. Hanayama puzzles are famed for their superb machining, offering silky-smooth movements and precise tolerances that feel like engineering marvels. The Snake Mouth, typically cast in zinc alloy, offers a grittier, more organic feedback. You feel the metal-on-metal scrape within the track, the definitive tactile click of alignment—it’s less about luxury and more about raw mechanical charm, reminiscent of an old tool. (This is where its historical ‘Horse Hoof Lock’ pedigree shines through; it was designed to work, not just to ponder.)
This distinction informs its place in your collection. A Hanayama puzzle is a contemplative object, often solved and displayed as a trophy. The Snake Mouth is an interactive one. Its 4-move solution is quick to re-lock and re-solve, making it ideal for idle hands or to demonstrate the principle of a cam-and-track to a friend. It’s the puzzle you keep on your desk, not solely on a shelf.

If you enjoy this style of “escape” puzzle—where one element must be navigated out of a captive housing—you might also appreciate variants like the Monster Mouth Fish shown above. It applies a similar cam-and-groove principle to a different form factor, offering a new spatial challenge once the Snake Mouth’s logic feels ingrained.
In a final snake mouth escape puzzle review, its value is clear. It won’t consume weeks like a Hanayama level 6, but that’s its strength. It delivers a complete, understandable, and mechanically satisfying puzzle experience in under a minute once solved. It serves as a perfect gateway to more complex metal puzzles, teaching you to think in terms of paths, rotations, and alignment notches rather than force. The Snake Mouth isn’t a competitor to your Hanayama collection—it’s a worthy, tactile complement with a story all its own.
Preserving the Patina: Care, Display, and Replayability
Now that you’ve mastered its internal cam path and appreciated its history, you’re not just an owner—you’re a curator. Proper care for this zinc alloy puzzle is straightforward: handle with clean, dry hands to preserve the patina, and store it in a dry place. The metal coating is durable, but solving it dozens of times per month may gradually wear a subtle, shiny track along the star’s points—a badge of honorable use, not a defect. If it gets grimy, a soft, dry toothbrush clears debris from the grooves.
This puzzle’s true value is in its replayability. Unlike a one-time riddle, the tactile satisfaction of the alignment notch slipping into place grows with repetition. It becomes a fidget toy with a purpose, reinforcing the spatial reasoning of its ancient mechanism each time you traverse the star’s escape route. For display, consider placing the separated ring and star side-by-side on a small stand or in a shallow dish, transforming the solution into a sculptural conversation piece.

If you find yourself searching where to buy snake mouth escape puzzle to gift this experience, prioritize sellers who specify the material and size (approx. 6cm diameter) to ensure you get an authentic, well-cast version. The confidence you’ve gained—from initial frustration to intellectual satisfaction—is the puzzle’s real gift. Your final move? Place the star back into the snake’s mouth, resetting the rotational slack for the next curious mind you choose to hand it to.