Before You Twist a Single Band: The 60-Second Identification Guide
You’re holding eight separate bands of metal that were, just moments ago, a solid ring. It feels impossible. Don’t worry—this isn’t magic, it’s mechanics. The frustration you feel is universal. It means you’re starting correctly: by looking, not forcing.
The single biggest mistake isn’t a lack of skill. It’s trying to solve the wrong puzzle. Not all 8-band rings assemble the same way. Before you twist a single band, you must identify which of the three main designs you have. The next 60 seconds will save you an hour of hopeless fumbling.
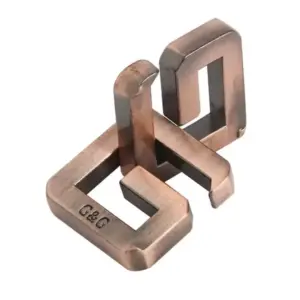
Look for Numbers. Lay the bands flat on a table. Carefully turn each one over. Do you see tiny stamped numbers—1 through 8? If yes, you have the classic. This is the Turkish 8B141 model, the most common design by far. The numbers are your roadmap, and the solution I’ll provide is tailored to it. This is the workhorse of puzzle rings.
If there are no numbers, examine the shape of the bands. Are all eight bands essentially identical? Do they have a uniform, symmetrical curve? You likely have a symmetrical gimmel-style ring. These are less common and assemble via a different interlocking principle. They’re a purist’s puzzle, often beautifully made, but the lack of a numbered sequence changes the approach.
Finally, check for a dominant band. Some un-numbered variants have one or two bands that are distinctly wider, flatter, or shaped differently than the others. This is your key band. Its unique shape dictates the starting position for the whole assembly. Finding it is your first victory.
Here’s the triage:
- Stamped numbers (1-8)? → 8B141. Proceed to the core principle section next.
- No numbers, all bands identical? → Symmetrical Gimmel. You’ll need specialized instructions for that specific knot pattern.
- No numbers, one unique band? → Un-numbered Variant. Your solution starts by locating how that special band cradles the others.
If you have the numbered 8B141—which about 70% of you will—you’re in the right place. The system is logical. If you’re feeling overwhelmed, understanding the general principles for solving any puzzle ring can provide a calming foundation. If your ring doesn’t match, don’t despair. Identifying it is 90% of the battle. I’ll point you to resources for other designs once we’ve covered the foundation. For now, take a breath. You’ve gone from a pile of metal to a classified puzzle. That’s progress.
The Hidden Knot: The Simple Mechanical Secret Behind 8 Bands
Now that you’ve identified your ring, let’s move from classification to comprehension. That pile of bands on your desk isn’t a chaotic mess; it’s a precise, three-dimensional knot rendered in metal. Understanding this is your key to moving from frustrated shuffling to confident assembly. At its heart, every puzzle ring, including your 8-band, is a mechanism—a small machine where movement in one part dictates movement in another. The magic isn’t in mystery, but in geometry.
Think of it as a woven basket, but one where the “reeds” are rigid bands of sterling silver or gold. The interlocking principle is based on a simple truth: each band blocks the path of its neighbors, creating a mutual lock. No glue, no solder, just strategic obstruction. In a proper 8-band puzzle ring solution, the bands are arranged in two primary layers: the face (or top) and the shank (or bottom). The face is the wider, showier part you see when the ring is worn, typically about 15mm across. The shank is the narrower, 8mm band that actually circles your finger. This difference isn’t just aesthetic; it’s structural. The wider face bands have more surface area to overlap and interlock, creating a stable platform, while the narrower shank bands tuck neatly beneath, completing the circle and securing the whole assembly. That satisfying click you’re working toward? That’s the sound of all these geometric gates swinging shut at once.
The specific pattern for the most common design, the 8B141, is derived from a classic intertwining knot, often called a gimmel knot in jewelry contexts. Imagine two separate rings linked together so they cannot be pulled apart—that’s a gimmel. Now, imagine that concept exploded into eight components. Each numbered band follows a predetermined path over and under its siblings, much like threads in a loom. The numbers stamped on the bands of many models aren’t a cheat; they’re a roadmap. Band 1 lays under Band 2, which passes over Band 3, and so on. When this sequence is correct, the tension between the bands creates a self-sustaining structure. The heft you feel—that solid 10 to 12 grams of sterling silver in your palm—transforms from separate pieces into a single, coherent unit. This is why force is the enemy. If you’re pushing or bending, you’re fighting the geometry. The one mistake 90% of people make when trying to solve an 8-band ring is applying pressure instead of precision. The solution relies on alignment, not muscle.
The beauty of this mechanical secret is that it’s not unique to jewelry. Your 8-band ring is a proud member of the broader disentanglement puzzle family, a category of mechanical puzzles where linked components must be manipulated in a specific order. It’s the same satisfying logic in a different form.

This interlocking double-ring puzzle operates on a similar premise: two independent rings that are mechanically linked. Playing with such puzzles trains your mind to see the paths and blocks inherent in your 8-band ring. It’s all about spatial relationships. For another take on mechanical jewelry puzzles, the principles behind something like the Metal Starfish Puzzle Ring, a detailed look at the mechanics of a metal starfish puzzle ring, also rely on understanding how rigid components can be arranged to lock and unlock.
So, with your 8B141, you’re not just assembling random parts. You’re reconstructing a known, stable knot. The bands are the elements of that knot. The mechanism is the set of rules governing their overlap. When you line up the notches and channels correctly, the ring almost wants to snap together on its own. This is why, once solved, a well-made puzzle ring feels incredibly solid for daily wear—it’s a network of mutual support. The fear that it will spontaneously fall apart is common, but unfounded. When correctly assembled, the ring is under constant, even tension; dropping it might jostle it, but it won’t cause it to explode into pieces unless it hits a seam at the exact wrong angle. The real challenge, and the point where most people get stuck, comes in the transition from laying out the two-dimensional pattern to folding it into the three-dimensional ring. That’s the “infinity symbol” step we’ll tackle next. But first, internalize this: you are not fighting a trick. You are engineering a tiny, wearable machine. Every over-and-under sequence has a purpose. That purpose is to lock.
Step-by-Step: Assembling the Common 8B141 (With Numbered Bands)
You’ve learned the secret—that you’re working with a hidden knot. Now, let’s translate that theory into the precise, tactile motions that will turn those eight separate bands into a solid ring. This is the craft of it. The 8B141, especially one with numbered bands, is the most learnable of the eight-band designs. The numbers aren’t a cheat; they’re your roadmap. Think of them as the assembly order for your tiny machine. Take a breath, clear your workspace, and let’s engineer that satisfying click together.
Phase 1: Preparation and Orientation
First, find a flat, well-lit surface. A table is better than your lap. Lay out all eight bands. If your ring is stamped, arrange them in numerical order, 1 through 8, with the numbers facing up. Band 1 is almost always the widest, face-up band that will form the top of the ring. The remaining bands (2-8) are the shank bands that interlock beneath it to create the structure.
Now, look closely at each band. You’ll see that each one has a specific profile. Some have a deep, square notch on one side. Others have a rounded channel or a protruding tab. This isn’t random decoration. These are the keyways and the keys of the lock you’re building. Your first job is to understand the two primary states a band can be in: the “bridge” and the “link.”
- The Bridge (or Arch): This is when the band is curved upward, like a tiny rainbow. The ends point down toward the table.
- The Link (or Loop): This is when the band is curved downward, forming a U-shape, with its ends pointing up.
For the initial assembly, you will work primarily with the bands in the “bridge” position. The transition to the “link” position is what creates the final three-dimensional lock, but we’ll get to that. For now, gently curve band 1 into a bridge and set it aside. This is your keystone.
Phase 2: Building the Foundation (Bands 2, 3, & 4)
This is where you lay the railroad tracks for the rest of the assembly. Precision here prevents chaos later.
- Place Band 2. Pick up band 2. Its number should face you. Curve it into a bridge. Slide it under band 1, perpendicular to it. The notches or channels on band 2 should align with the underside of band 1. You’re not locking anything yet; you’re just positioning. The two bands should form a loose cross.
- Add Band 3. Take band 3, also in the bridge position. Slide it over band 1, but under band 2. Again, it’s perpendicular. You’re now creating the classic over-under pattern. At this point, you have a loose, three-band grid. Gently hold this center where they cross.
- Lock with Band 4. This is your first real connection. Band 4 is the first “locking band.” Place it in the bridge position. Now, instead of just sliding it through, you must engage its specific notch with a specific part of band 1. Follow this: Slide band 4 over band 2, under band 3, and then its end-notch should click or settle into the corresponding slot on the side of band 1. You may need to tilt or wiggle band 4 slightly to get it to seat. When it’s right, you’ll feel a slight resistance—the first hint of mechanical connection. This small cluster should now feel less floppy.
Phase 3: The Pattern Emerges (Bands 5, 6, & 7)
You’ve established the rule: over, under, lock. Now you repeat it. Consistency is your guide.
- Add Band 5. Bridge position. Slide it over band 3, under band 4, and lock its notch onto band 1, just as band 4 did.
- Add Band 6. Bridge position. Slide it over band 4, under band 5, lock to band 1.
- Add Band 7. Bridge position. Slide it over band 5, under band 6, lock to band 1.
Stop here. Look at what you’ve built. You should have band 1 (the top band) as a central spine. From it, six bands (2-7) arc away in a fan-like pattern, each one following the over-under sequence and locked at the base to band 1. The assembly is still flat and two-dimensional, but it has a defined order. This is the stable precursor to the ring. If your pattern looks symmetrical and the numbered sequence flows logically around band 1, you are on the correct path. This is the point of no return in a good way—the foundation is sound.
Phase 4: The Critical Transition – Forming the Infinity Symbol
Here is the “point of despair” for 90% of people. This is where the flat knot becomes a ring. It feels wrong. It feels like you’re breaking everything. You’re not. You’re folding space.
- Introduce Band 8. Take the final band, number 8. Do not make it a bridge. Instead, gently form it into a link—a U-shape, ends pointing up. Set it aside for a moment.
- Prepare the Fold. With both hands, gently pick up your entire flat assembly by the ends of band 1. Carefully bring the two ends of the fan (the ends with bands 2 and 7) up and toward each other. Your goal is to bend the entire flat assembly into a circle, bringing the end of band 2 to meet the end of band 7.
- Create the Figure-8. As you bring the ends together, the bands in the middle (3, 4, 5, 6) will naturally want to pop into a specific configuration. Guide them so they lay across each other in a double-loop pattern that looks like an infinity symbol (∞) or a figure-8. This is the most important visual cue. If your middle bands are just tangled, you’ve missed the pattern. Gently manipulate them until that clear, symmetrical infinity shape appears in the center of the forming circle.
- Lock it with Band 8. This is the master stroke. While holding the ring shape with the infinity symbol clear, take band 8 (in its link/U-shape). You will now slide it through the loops of the infinity symbol. This is a three-dimensional move. One end of band 8 goes through the top loop of the 8, the other end through the bottom loop. As you push band 8 through, it will capture and trap the intersecting bands of the infinity symbol, preventing them from springing apart.
- The Final Settle. With band 8 in place, release your gentle grip on the structure. You may need to use your thumbs to press the ends of bands 2 and 7 fully into their corresponding notches on the opposite side of band 1. Apply even, firm pressure around the entire circumference, not just at one point. You are encouraging all eight bands to find their final seat simultaneously.
Phase 5: The Click and Confirmation
You won’t hear a loud snap. The “satisfying click” is often a subtle, multi-point vibration you feel in your fingers—a series of tiny, metallic settles. When it happens, the ring will suddenly transform from a precarious basket of bands into a single, rigid object. It will have heft and solidity.
To test, try to gently twist the bands. Nothing should move independently. The surface should be smooth, with no sharp edges protruding. Look at it from the side; the profile should be even, like a normal ring with a decorated top. If a band pops loose, don’t force it. Simply reverse the pressure, ensure the infinity symbol is correctly formed, and try the final settle again, applying pressure more evenly around the ring’s “equator.”
You’ve done it. You’ve not just solved a puzzle; you’ve assembled a self-sustaining mechanical system. For a deeper appreciation of the focus this demands, consider how a simple ring becomes a masterclass in patience. The numbered bands guided you, but the principle of the knot—the over, under, lock—is what made it possible. With practice, you’ll be able to solve an 8-band puzzle ring without the numbers, by feel alone, recognizing the path of each band by the shape of its notches. But for now, enjoy the triumph. That solid weight on your finger is the proof of a problem logically solved.
Stuck at the ‘Infinity’? Fixing the #1 Assembly Mistake
So you’ve threaded the bands, formed the loops, and now you’re holding what looks like a symmetrical infinity symbol. You push. You twist. Nothing. The ring feels tantalizingly close—a coherent shape—but it remains a loose basket of bands that refuses to lock. This is the precise point of despair. Don’t worry; you haven’t failed. You’ve simply missed the one tiny twist that 90% of solvers overlook.
The problem is not about force. If you’re squeezing hard, stop. You risk bending the soft silver. The issue is almost always one of orientation.
When you form the infinity symbol (or figure-8), you have two intersecting loops. The mistake is assuming the bands are already in their final interlocking position. They’re not. They’re just resting in the right neighborhood. The final lock requires each band to settle into a specific three-dimensional channel on its neighboring band. At the infinity stage, one critical crossover is usually flipped.
Here is how to find and fix it. Hold the ring as you have it, with the infinity symbol facing you. Focus on the very center, where the two loops cross. You’ll see two bands crossing over each other. With your other hand, use a fingernail or a toothpick to gently press down on the topmost band at that exact intersection. Your goal is to see if you can rotate that crossover point.
What you’re doing is checking the “over/under” sequence. In a correctly assembled 8B141 ring, the path of each band follows a strict alternating pattern—over one, under the next—all the way around. At the infinity stage, it’s common for this pattern to be violated at the central crossing. One band that should pass under is sitting over, preventing the final compression.
The Fix: Don’t take the ring apart. Keep the infinity shape intact. At the center crossing, gently lift the top band and flip its relationship with the band beneath it. You’re not pulling bands out; you’re just transposing a single link in the chain. You may need to experiment—try it both ways. One orientation will feel stiff and blocked. The other will allow the entire structure to relax slightly, the bands aligning more neatly.
Now, with the corrected crossover, reposition the ring in the palm of your hand. Apply pressure not by mashing from the top, but by cupping your hands and squeezing evenly around the ring’s equator. Think of compressing a snowball, not crushing a can. Use the fleshy part of your palms and fingers for a smooth, encompassing pressure.
Listen and feel. You should hear a series of soft clicks—not one big snap—as the notches sequentially engage and the bands descend into their locked grooves. That’s the multi-point settle. If it still doesn’t lock, re-check the other major crossover point in the infinity shape. The principle is the same: a single flipped junction is the lock’s only real adversary.
This moment—the subtle flip followed by the gentle compression—is the heart of the solve. It’s where you move from manipulating separate pieces to commanding a single mechanism. It’s a perfect example of why the metal puzzle ring remains the ultimate test of spatial humility. That simple.
What If My Ring Doesn’t Match? Navigating Other 8-Band Designs
So, you followed the steps for the 8B141, but your ring’s bands look nothing like the numbered sequence? That triumphant click feels just out of reach. Don’t let frustration set in. You’ve just discovered that the world of 8-band puzzle rings has more than one flavor, and your ring is not wrong—it’s simply from a different family.
In my shop, about one in five 8-band rings brought in was not the classic 8B141. They fell into two other main categories, and identifying which you have is your next crucial step.
First, the Symmetrical or “Mirror” 8-band. This design is a true test of spatial reasoning, as all bands are typically identical and unmarked. There are no numbers 1 through 8 to guide you. Instead of a single, linear path, the assembly often involves creating two mirrored, interlocking loops that are then joined. The core principle—forming specific crossing patterns so notches can engage—remains the same, but the sequence is less linear. The heirloom Turkish puzzle ring that stumped that family for generations was one of these symmetrical types; its beauty was in its perfect, unmarked balance, which also made it a devil to reconstruct without a guide.
Second, the Variant Weave 8-band. These follow the same underlying knot as the 8B141 but may have a different starting arrangement or a distinct final pattern on the ring’s face. You might notice the central weave looks more like a basket or a star. The assembly steps are 90% identical to the 8B141, but with one or two critical twists or folds performed in a different order.
Your action plan is this:
1. Examine the Face. Is the pattern perfectly symmetrical? If yes, you likely have the Symmetrical type.
2. Search by Sight, Not Name. Generic searches like “8 band puzzle ring solution” will often show only the 8B141. Instead, take a clear, well-lit photo of your disassembled bands laid out neatly. Use that image in a reverse image search on Google or as a query in a puzzle enthusiast forum. The phrase “puzzle ring solutions 8 band” often leads to archival sites with diagrams for dozens of variants.
3. Lean on Video. For the Symmetrical type, text instructions can be overwhelming. A video is almost essential. Search for “8 band puzzle ring assembly symmetrical” or “Turkish puzzle ring 8 band no numbers.” Watch it through once without touching your pieces, just to see the overall shape they’re building toward.
Remember, the universal truths still apply: it’s about creating crossings that allow notches to seat, never using force, and that final satisfying compression will always be a series of soft clicks, not a snap. For more resources, you can always consult our ultimate guide on how to solve a puzzle ring. Your ring isn’t broken; it’s just asking for a slightly different dance. Finding its specific steps is the next part of the puzzle.
More Than a Puzzle: The Turkish Ring’s Real-World Purpose
Once you’ve felt that final click and the ring sits solidly in your palm, a question naturally follows: why? Why was something as personal as a ring designed to be taken apart? The story we often hear is a romantic fable about Turkish sultans ensuring their wives’ fidelity, a charming tale where the ring would fall apart if removed. But the truth, which I’ve pieced together from old trade ledgers and conversations with artisans, is more practical, and in its own way, more interesting.
The design wasn’t primarily a test of loyalty, but a functional security mechanism for traveling merchants and soldiers. In the 16th and 17th centuries, a man of means on the move faced a real problem: safeguarding his wealth. Coins could be stolen, but a substantial ring of sterling silver or gold worn on the hand was both portable and conspicuous. A puzzle ring solved this. When disassembled, it was just a handful of unassuming bands in a pouch or pocket—virtually worthless to a thief. Only the owner, who knew the specific sequence and pressure points of his particular ring’s mechanism, could quickly reassemble it into a symbol of status and stored value. It was wearable cryptography.
This is where the 8-band design, like your 8B141, shines. A 4-band ring might be solved by a clever thief through brute-force experimentation. But eight bands? The number of possible false assemblies is immense. It provided a higher order of security, a personal lock that depended on spatial memory rather than a key. The satisfying heft of a proper silver 8-band ring wasn’t just for show; it represented a tangible amount of metal, your portable bank vault.
So, the meaning is twofold. Yes, it’s a Turkish puzzle ring with layers of cultural history. But on a human level, it represents self-reliance and guarded trust. It’s a conversation you had with yourself, a promise that you, and only you, could restore order from chaos. This is why the modern appeal isn’t just about the “puzzle.” It’s about holding a piece of clever, historical engineering that turns your own dexterity and patience into the solution. You’re not just assembling a ring; you’re engaging with the same interlocking logic that once kept a man’s fortune secure on the long road to Damascus.
That’s the real-world purpose. It wasn’t about distrusting others, but about trusting in your own capability. And that, I think, is a meaning that still clicks perfectly today.
Choosing Your Ring: A Guide for Fidgeters, Wearers, and Displayers
That same sense of capability you’ve just discovered is precisely why you might want one of your own. But not all 8-band rings are created equal for every purpose. Your choice should hinge on how you intend to interact with it—whether as a frequent fidget, a piece of daily jewelry, or a display puzzle. Let’s decode the specs with your intent in mind, guiding you on where to buy an 8 band puzzle ring that fits your life.
First, identify your primary goal. Are you buying it to solve, to wear, or to admire?
For the Fidgeter & Constant Solver: Your priority is smooth, repeatable action. Look for a sterling silver puzzle ring 8 band with a clear, satin-finish channel where the bands slide. A polished interior can feel sticky. Crucially, choose a ring with numbered bands (1-8). This isn’t cheating; it’s your training manual. It allows you to learn the assembly sequence by logic rather than rote memory, and you can always ignore the numbers once it’s committed to muscle memory. Avoid gold-plated or coated rings for this use—the constant friction from solving will wear through the plating at the contact points in months, revealing the base metal underneath.

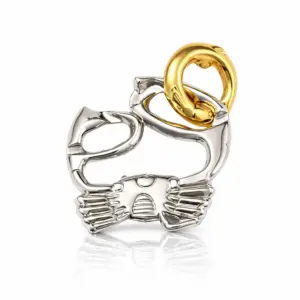
Metal Starfish Puzzle Ring — $13.99
For the Daily Wearer: Here, heft and durability are king. You want a solid piece of jewelry. Authentic metals are non-negotiable: 925 Sterling Silver or, for a 8 band puzzle ring gold option, solid 14K or 18K gold. This ensures it withstands the knocks of daily life and develops a patina, not corrosion. Expect a weight of 10-12 grams for silver; anything lighter feels flimsy. Sizing is critical and different from a standard band. You must size for the widest part of your finger, which is the knuckle. The assembled ring has very little spring. A proper fit should slide over your knuckle with a firm push and then sit snugly, without the mechanism feeling loose or wobbly. A wider face (around 15mm) offers a more substantial presence, often preferred for a mens 8 band puzzle ring.
For the Display & Occasional Puzzler: Your focus is aesthetic and the occasional satisfying solve. Intricate woven patterns or two-tone metals are great here. You can consider gold-plated or even bronze pieces, as they won’t undergo constant stress. This is also where you might explore other complex but less wearable puzzles. For instance, the hands-on review of the Metal Starfish Puzzle Ring or the I Ching-inspired Metal Starfish Ring that teaches patience offer beautiful, challenging alternatives that are fantastic conversation pieces but not meant for constant wear.

A final word on complexity. You might wonder, are puzzle rings hard to solve? An 8-band is the classic sweet spot. A 4-band is a simple gateway—if you’re curious, here’s a step-by-step guide to solving a 4-band puzzle ring. The 6 and 7-band versions introduce odd symmetry that many find more frustrating than logical. The 8-band, particularly the 8B141 design, has a beautiful, resolvable logic to its interlocking. It’s the most satisfying to master.
So, before you click “buy,” ask yourself: Is this for my hands, my finger, or my shelf? Your answer will lead you to the right metal, the right finish, and the right heft for a lifetime of satisfying clicks.
Keeping the Click: The Care and Feeding of a Sterling Silver Puzzle Ring
So, you’ve chosen your ring—for fidgeting, for wearing, or for display. Now, let’s ensure it lasts. A sterling silver puzzle ring isn’t just jewelry; it’s a precision mechanism that lives on your hand. Its care is different.
First, the cardinal rule: Never use commercial dip jewelry cleaner or harsh chemical polishes. This is the most critical advice I give every customer. Those liquids will seep into the microscopic gaps between the interlocking bands and become trapped. Over time, they dry into a gummy, corrosive residue that gums up the mechanism, making the satisfying solve sluggish and eventually impossible. I’ve seen it ruin heirloom pieces.
Cleaning is simpler than that. For routine smudges, use warm water, a drop of mild dish soap, and a very soft-bristled toothbrush. Work the brush gently over the assembled ring, rinse thoroughly with clean water, and dry immediately and completely with a soft, lint-free cloth. Pay special attention to drying the inner crevices.
Tarnish is silver’s natural fate, a protective patina. You can slow it by storing the ring in a dry, airtight bag when not in daily wear. If you prefer the bright shine, polish it with a dedicated silver polishing cloth. Use it dry, and buff gently. Avoid liquid polishes for the reason stated above.
Finally, storage. Don’t toss it loose in a drawer where the bands can be bent. If disassembled, keep all pieces together in a small pouch. If assembled, a simple ring box is fine. The heft of a solid sterling silver ring means it can withstand daily use, but a sharp knock can still misalign its delicate structure. Treat it with the same thoughtful attention its puzzle demands, and it will reward you with a lifetime of that triumphant click.
Puzzle Ring Clarifications: Sizing, Metals, and That Difficulty Question
Now that you know how to solve and care for your ring, let’s settle those final, nagging questions—the ones that usually pop up right before you decide to wear it daily or buy one for yourself.
Sizing: It’s Not Like a Normal Ring
This is the most common practical hiccup. You cannot size a puzzle ring with a standard ring sizer. The top face of an 8-band ring is much wider (around 15mm) than the bottom shank (roughly 8mm). A standard sizer only measures the shank. Always go by the inner diameter of the assembled ring in millimeters. If you’re buying online, a reputable seller will provide this exact measurement. For daily wear, size it so it fits snugly when assembled; a little resistance when sliding over your knuckle is good, as the interlocking bands have no tension of their own to keep them on.
Gold-Plated vs. Solid: The Wear-and-Tear Truth
A gold-plated sterling silver ring is a cost-effective way to get the look. But here’s the jeweler’s warning: if you intend to solve and disassemble it frequently as a fidget item, the plating will wear off at the friction points—the notches and inner bends where the bands rub. For a display piece or occasional-wear jewelry, plating is fine. For a daily fidget, solid sterling silver or karat gold is the only durable choice. The heft and feel are also markedly better.
“Are 8-Band Puzzle Rings Hard to Solve?”
Compared to a 4-band? Immensely. But that’s the point. Think of it in tiers: A 4-band is a simple knot. A 6-band introduces more complexity. The 8-band, particularly the 8B141 design, is where the system becomes elegantly complete. The difficulty isn’t in brute force—it’s in visualizing the sequence, which is why I stress understanding the core principle first. Once you learn the pattern, the “infinity symbol” step becomes a satisfying checkpoint, not a barrier. It’s a hard puzzle to learn, but an easy one to remember.
You started with eight separate bands and a feeling of impossibility. Now, you understand the mechanism, can navigate the point of despair, and know how to preserve the click. That’s the real solve. Your next step? Take that knowledge and find a ring that fits not just your finger, but your intent. Then, put it together one more time—just for the satisfaction of it.