Stop Staring at the Pile: A Bench Jeweler’s First-Second Triage
Your hands are full of shiny, confusing metal bands. There’s a mix of determination and a quiet “what have I done?” in the air. I’ve seen this look on countless faces across my repair bench. The first thing to do is stop. Put down the bands, take a breath. Random trial and error is the fastest path to frustration and, worse, bending a delicate shank. Let’s start with triage, not tricks.
Forget hunting for a one-size-fits-all video. Puzzle rings vary, but their assembly is built on a handful of universal geometric principles. Your job right now isn’t to solve it, but to diagnose it. Think of it like a mechanic identifying an engine before grabbing a wrench. We need two pieces of intel.
Step One: The Head Count.
Lay all the bands out on a flat, well-lit surface. A neutral-colored towel or piece of felt is ideal—it stops them from rolling and makes the metal details pop. Count them. This isn’t just trivia; it defines your strategy. Is it a 4-band, a 6-band, or an 8-band puzzle ring? The vast majority are 4-band rings, which form the core blueprint for all the others. Six and eight-band rings often work with the same logic, just with bands grouped in pairs. Note the number. This is your first anchor point.
Step Two: The “Key Band” Hunt.
This is the linchpin. Almost every puzzle ring has one band that acts as the lock. Your mission: find it. Carefully pick up each band and inspect it, rolling it between your fingers.
You are looking for one of two things:
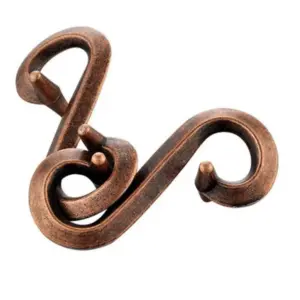
1. A Groove or Notch: This is the most common lock. It will look like a precise, shallow channel cut into the inner surface of the band. It is not a decoration; it’s a functional track that other bands will eventually slot into.
2. A Distinct Bend or Hook: Some rings use a band with a more pronounced, engineered bend—almost like a tiny question mark or hook—instead of a groove.
This is the key band. It’s the shoelace aglet that threads through the entire system. If all bands look identical at first glance, look closer. The difference is subtle but critical. Once identified, set this band slightly apart from the others. You’ve now found the most important part for your puzzle ring tutorial step by step.
You’ve stopped the panic. You have your band count and you’ve likely found your key. This is how you identify puzzle ring parts—not by guessing, but by systematic observation. Now, with the pieces diagnosed, we can move from overwhelm to curiosity and build the foundation. If you’re looking for more on the initial mindset to adopt, our guide on how to solve a puzzle ring offers a solid starting philosophy.
The Three Universal Principles: Infinity Loops, Key Bands, and Nesting
Now that you’ve identified your key band, you have the most important piece. But sliding bands around randomly will lead back to frustration. The secret to a logical puzzle ring solution—whether for 4 band or more—lies in understanding the three mechanical principles underpinning almost every design. Think of this not as a trick, but as the physics of the ring.
1. The Infinity Loop: Your Stable Foundation
The figure-eight, or infinity symbol, is the core stable shape in most puzzle ring assembly. It’s not just a step you mimic; it’s a self-supporting structure. When you cross two bands into a perfect, symmetrical “8,” they create a locked intersection that won’t collapse. This loop becomes the chassis upon which everything else is built.
Why does a ring often fall apart when you think you have the infinity shape? The answer is almost always asymmetry. One band is riding over the other inconsistently, or the crossing point is off-center. A true, stable infinity loop will feel tense and symmetrical, like a balanced knot. This is the universal first move for a reason: it creates order from chaos, giving you a fixed point to work from.

2. The Key Band: The Locking Mechanism
You’ve already found this band. Its groove or unique bend isn’t decorative; it’s a functional track. In the final assembly, all other bands will eventually nest into this channel. The key band is the ruler, and the other bands are the lines you draw along it. It provides the final constraint that removes the last degree of freedom, turning a wobbly arrangement into a rigid ring.
If your key band has a groove, run your fingernail along it. Feel how precise it is. That groove is designed to cradle the rounded edge of another band, holding it in place. If your key band has a hook shape, its job is to capture a specific intersection. This principle scales: in a 6 or 8 band puzzle ring, you may still have one primary key band, or sometimes a pair that work together.
3. The Nesting Pattern: How Bands Interlock
This is the concept that makes the final assembly snugly fit. The bands don’t just lie over each other; they sit within each other’s curvature. Imagine holding two wooden spoons, concave sides facing each other. Sliding them together, they cup each other, resisting lateral movement. That’s nesting.
In a puzzle ring, nesting happens in two ways. First, bands cross and rest in the shallow valleys created by their own curves. Second, and most critically, the key band’s groove is the ultimate nesting site. When all bands are correctly nested, the ring becomes a single, coherent unit with no play. The satisfying “click” you feel isn’t a snap; it’s the moment all bands drop into their nested positions, eliminating all slack.
These three principles—the stable Infinity Loop, the guiding Key Band, and the interlocking Nesting pattern—are the grammar of puzzle ring patterns explained. Whether you’re working with a classic 4-band or a daunting 8-band, you’re just scaling the same concepts. The infinity loop creates stability, the other bands are woven around it following the nest, and the key band’s groove finalizes the lock. Understanding this turns a memorized sequence into a solvable, logical spatial puzzle. For more on the enduring appeal of this challenge, consider the perspective in Why The Metal Puzzle Ring Remains The Ultimate Test Of Spatial Humility. These rings are a fascinating subtype of mechanical puzzles, specifically falling into the disentanglement puzzle category.
With this foundation, you’re no longer following blind instructions. You’re engineering a solution. Now, let’s apply these principles to the universal starting move.
The Foundational First Move: Creating the Stable Infinity Loop
Now that you understand the principles, let’s translate the first one—the Infinity Loop—into a physical action you can perform right now. This is the universal first step for most 4, 6, and 8-band rings. It’s the foundation upon which every other band will be woven, and getting it right eliminates at least half of the ensuing frustration. Think of it as tying your shoelaces before making the bow; without a secure initial knot, everything unravels.
Your goal is to create a flat, interlocked figure-eight using two of your bands. This isn’t just any two bands. Based on your earlier triage, you likely identified a pair of solid, identical bands without notches or pronounced grooves. If you have V-shaped pairs, they are typically the ones you’ll use here. This loop, once formed, should feel stable and lay flat on your palm without springing apart. It becomes the anchor for your assembly.
Here is the precise method, broken down.
Step 1: Select and Position the Two Bands.
Pick up two of the solid, matching bands. Hold one band vertically (like a ‘O’) and the other horizontally (like a ‘—’), so they are centered over each other, forming a plus sign. Your fingers should be pinching the centers where the bands cross.
Step 2: The Quarter-Turn Weave.
This is the crucial motion. Do not try to thread one band through the other like a needle. Instead, think of it as a gentle, rotational nesting.
– Keeping a firm pinch on the crossing point, rotate the top band (let’s say the horizontal one) a quarter-turn, so it begins to tilt. As you do this, the lower band will naturally start to nest into the inner curve of the upper band.
– Continue this rotation, guiding the bands so they settle into each other’s embrace. You are aiming for a symmetrical, flattened “8” shape where the two loops are of equal size and the crossover point is tight.
Step 3: Achieve the Stable ‘Figure Eight’.
A correct infinity loop will look like the mathematical symbol for infinity (∞) or a flattened figure-eight. The bands should be interlocked at a single, central point with no gaps. They will not be perpendicular anymore; they now exist in the same plane. This is your core structure. For a visual analogy of this kind of spatial reasoning, the insights in Why Your Hands Are Lying To You The Real Way To Solve Metal Puzzles are invaluable.
The Best Way to Hold a Puzzle Ring at This Stage.
This is critical. Once formed, transfer the stable infinity loop to your non-dominant hand. Pinch the central crossover point between your thumb and forefinger. Your grip should be firm enough to hold the shape, but not so tight that you distort it. The two free loops of the “8” should dangle comfortably. This grip frees your dominant hand to become your precise assembly tool, ready to pick up and rotate the next band into place.
Why does this step work universally? Because it establishes the primary interlocking geometry that the remaining bands are designed to engage with. The key band you identified earlier will eventually slide along the grooves of this foundational shape, and other bands will nest within its loops. If your infinity symbol is wobbly or misaligned, the entire solve will fail later, leading to the common complaint that the ring “falls apart at the last second.” A stable start is non-negotiable.
Troubleshooting the Loop:
– If it won’t hold shape: You may be trying to use a notched key band in this first step. Set that band aside. Use only two plain, solid bands.
– If the loops are uneven: Focus on the central crossover. Ensure the bands are interlocked at their exact midpoints. Gently adjust their sliding position until the two loops are symmetric.
– If it feels springy and wants to pop apart: You likely haven’t completed the quarter-turn rotation. The bands should rest in each other’s curvature, not be under torsion. Let them settle into a flat plane.
With this stable, flat infinity loop secured in your pinch grip, you have built the chassis. Now you are ready to introduce the guide—the key band with its groove—and begin the logical process of building the rest of the puzzle ring around this unshakable core.
Assembly Blueprint: Solving the Classic 4-Band Puzzle Ring
Now, with your stable infinity loop pinched between thumb and forefinger, you’ve built the chassis. This is where the solve shifts from theory to tactile reality. The 4-band puzzle ring is the foundational design, and mastering its assembly teaches you the logic that applies to all the more complex versions. Here, we integrate that crucial first move and build the complete ring, band by logical band.
First, locate your key band—the one with a distinct groove or notch cut into its inner surface. This is The One ‘Key Band’ Almost Every Puzzle Ring Has. It’s not a decoration; it’s the mechanical lock. If you’re unsure, run your fingernail along the inside of each band. The groove will feel like a tiny, precise channel. Set this band aside for a moment; it’s the final piece.

Step 1: Introduce the Third Band (The “Nesting” Band)
Hold your infinity loop so one of its two loops is on top. Take your third band (a plain one, not the key band). Feed this band through the top loop of the infinity symbol. Your goal is to have this new band nest inside the top loop, lying perpendicular to the two bands forming that loop. Think of it like threading a new shoelace through a loop you’ve already made—it doesn’t interlock yet, it just passes through. This band will eventually form two sides of the final diamond shape.
Step 2: Form the Diamond Frame
This is the pivot point. You now have three bands interacting. Carefully manipulate the new band so it lies parallel to itself on either side of the infinity loop’s central crossover. It should now look like a three-band frame: your original infinity loop forms a wobbly “8,” and the third band cuts across the top loop, creating the beginnings of a diamond or square shape in the center. Keep a gentle pinch on the central crossover to maintain stability.
Step 3: Bring in the Key Band (The Lock)
Pick up your grooved key band. This band will become the clasp assembly. Orient it so its groove faces toward the tangled center of your partial assembly. Now, you must slot into place the two free ends of your third band into this key band’s groove.
Here’s the precise move: Guide one end of the third band into the groove. Then, bending the key band slightly if needed, guide the other end of the third band into the same groove at the opposite side. The groove is designed to cradle both ends of that third band simultaneously. You are not connecting the key band to the infinity loop directly yet; you are using it to capture and secure the third band’s ends.
Step 4: The Final Rotation and Lock
With the third band’s ends seated in the key band’s groove, the entire structure will still be loose. The final action is a gentle rotation. Holding everything, rotate the key band 90 degrees relative to the rest of the assembly. As you do this, the ends of the infinity loop’s bands will naturally slide into the open ends of the key band. You will feel them seek their path.
This is the moment of triumphant relief. If all bands are aligned, you will feel a definitive, satisfying click or a sudden snugness as all four bands interlock simultaneously. The central mess resolves into a clean, woven pattern. The groove has locked everything.
The Snug Fit Check: Why Your Ring Falls Apart at the Last Second
A correctly assembled ring should have no play. Gently try to twist the bands. They should move as a single, solid unit. If the ring feels loose or comes apart with a light shake, the final lock isn’t fully engaged. This is almost always because the third band’s ends are not fully seated in the key band’s groove, or the infinity loop bands haven’t fully entered the key band’s ends.
The Fix: Don’t force it. Reverse the last rotation slightly. Ensure the third band is deeply nested in the groove. Apply even, gentle pressure from all sides as you complete the final 90-degree rotation of the key band. The goal is snugly, not tight. For more detailed guidance, you can always reference our dedicated step-by-step guide for the 4-band puzzle ring.
You’ve now done more than follow steps; you’ve applied the principles. You used a stable foundation (infinity loop), identified the locking mechanism (key band groove), and used nesting to build the structure. This exact logical framework is how you scale up to solve a 6-piece or 8-band puzzle ring, treating complex groups as extensions of this core blueprint.
Scaling the Solution: From 4 to 6 and 8 Bands (It’s All in Pairs)
The satisfying ‘click’ of that 4-band ring locking together is your proof of concept. The principles work. So when you look at the six or eight shimmering bands now, don’t see chaos. See pairs. This is the core insight: higher-band-count rings are built by treating groups of bands as a single unit in our foundational blueprint.
Think of it like upgrading from a simple knot to a double fisherman’s knot. The logic is the same—create loops, interlace, tighten—but you’re now working with doubled strands for greater security. A 6-band ring is often a 4-band core with an extra pair of decorative bands. An 8-band is typically two 4-band structures intertwined. Your job is to identify these paired units and apply the Infinity Loop + Key Band + Nesting sequence to the grouped bands.
First, Diagnose Your Pairs.
Lay all bands flat. Instead of counting individual bands, look for bands that are already physically linked or are perfect mirror images. You’re searching for V-shaped pairs. These are two bands soldered or looped together at one end, forming a V or a U-shape. If you have these, your ring is solved by assembling these V-units, not the individual bands. If all bands are separate, you likely have a design where bands are intended to be manipulated in twos.

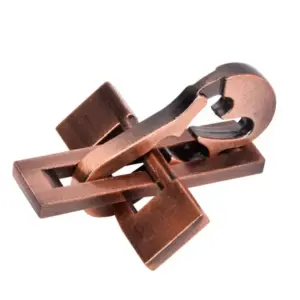
Metal Starfish Puzzle Ring — $13.99
Rings like the one above, or classic Celtic designs, often use this paired-band architecture. Seeing the structure is a form of pattern recognition, a skill that turns a baffling pile into a solvable system.
Reassembling a 6-Band Puzzle Ring (The Paired-Band Method)
Most 6-band rings consist of two V-shaped pairs and two single bands. One of those single bands will be the key band with a groove. The other single band is often a “spacer” or bridge.
1. Identify Your Units. Find the two V-pairs. Set them aside. From the two remaining single bands, find the one with a distinct groove. That’s your key band. The last single band is your third unit.
2. Create the Infinity Loop with V-Pairs. This is the crucial adjustment. Don’t use single bands. Take your two V-shaped pairs. Interlock them in the center to form a stable infinity symbol or figure of eight. This is now your foundational core, just like the two single bands were for the 4-band ring. Ensure the ‘V’s are oriented the same way.
3. Introduce the Third Unit. Take your remaining single band (the non-key band). Nest its ends into the open loops of your infinity core. It will sit perpendicular to the plane of the infinity loop, just as in the 4-band assembly.
4. Lock with the Key Band. Finally, take the grooved key band. Position it so its groove aligns to capture the ends of the third band you just placed. Perform the final 90-degree rotation, threading the ends of your infinity-loop V-pairs through the key band’s ends. The groove should snap over the third band, locking all units together snugly.
Putting Together an 8-Band Puzzle Ring (The Double-Structure Method)
An 8-band ring is typically two separate 4-band structures that are interwoven. They may share a common key band, or have two interlocking keys. Don’t be intimidated.
1. Sort into Two Groups. Divide your eight bands into two sets of four. Look for design cues—bands with matching patterns often belong to the same core structure.
2. Solve the First Core. Using the standard 4-band method, assemble one set of four bands completely. Get it to that locked, stable state. You now have one solid, solved ring subunit.
3. Treat the Core as a Single Band. Here’s the scaling principle in action. That entire first core now functions as one complex “band” in the larger puzzle. Take one of the bands from your second set of four—this will be its key band. Create an infinity loop using two bands from the second set, then nest your already-solved first core into it as the “third band.”
4. Complete the Final Lock. Use the key band from the second set to lock everything. You are essentially building a 4-band ring where one of the components is itself a pre-assembled 4-band ring. This layered approach is how the core principle scales up infinitely.
Answering the Critical Question: “I have two V-shaped rings that aren’t connected, is my ring broken?”
Almost certainly not. Those V-shaped pairs are meant to be separate. Your ring’s design uses them as the primary building blocks, as described above. The connection happens during assembly, when you interlock the V’s to form the infinity loop. If they were permanently attached, the ring couldn’t be solved—or taken apart. Their separateness is a feature, not a bug.
The moment you shift your perspective from “six individual bands” to “three paired units,” the path forward clarifies. The same foundational moves—establish a stable loop, nest a third element, lock with a key—guide your hands. It’s not a new puzzle; it’s the original puzzle, understood more deeply.
The Final ‘Click’: Locking It All In and the Snug Fit Test
Following the layered approach for 6 or 8 bands, or the core sequence for a 4-band ring, you’ve now reached the critical juncture. The bands look assembled, but the puzzle ring won’t stay together. It collapses the moment you relax your grip. This is not failure; it’s the puzzle asking for its final, deliberate lock.
This final move is almost always a controlled rotation or a gentle push. With the stable infinity loop formed and the third element (a single band or a pre-assembled core) nested within it, your key band—the one with the distinct groove—is your final piece. Do not force it. Instead, orient the groove so it aligns with the intersection of the other bands. For most designs, you will gently rotate the key band 90 degrees, feeling for the moment when its groove slots into place over the crossing points of the other shanks. It’s the mechanical equivalent of turning a deadbolt.
You are seeking a subtle but definite physical feedback—a quiet snick or a firm stop. This is the triumphant ‘click’ you’ve been working toward. If you meet solid resistance before that point, backtrack slightly. Ensure the bands are not pinched or twisted out of their natural, flush paths. As noted in our reflection, When A Simple Ring Becomes A Masterclass In Patience, this final step rewards a calm, observant touch over hurried pressure.
The Snug Fit Check: Your Verification Protocol
A truly solved puzzle ring is a self-supporting structure. Do not trust looks alone. Perform this three-point test:
- The Visual Gap Check. Hold the ring up to the light. Look at every point where bands cross or nest. There should be no daylight peeking through gaps. All bands should sit snugly against their neighbors, creating a continuous, woven surface.
- The Tactile Run. Gently run your fingertip around the inside and outside of the assembled ring. You should feel smooth transitions, not sudden bumps or dips where a band is riding too high or low. The surface should feel like a solid, if intricately patterned, tube.
- The Gentle Torque Test. Hold the ring between your thumb and forefinger at opposite sides. Apply a very slight twisting pressure (as if you were very gently wringing out a cloth). A properly locked ring will have no play or wobble; the entire structure will twist as one solid unit.
If it passes all three checks, you have succeeded. The assembly is complete and stable. If it fails—if you see a gap, feel a bump, or detect wobble—the lock is not fully engaged. This is almost always because one band, often the key band, is a half-millimeter out of position. Carefully reverse the final lock, ensure all bands are perfectly nested in their tracks, and try the final rotation again with even more deliberate slowness.
This moment of verification turns relief into confidence. You haven’t just memorized steps; you’ve understood the geometry well enough to know it’s correct.
Bench Jeweler’s Troubleshooting: When the Instructions Aren’t Enough
You’ve followed the principles, performed the snug fit test, and it still didn’t click. Or worse, you’re staring at a pile of bands that refuses to resemble any instruction you’ve seen. This is the moment when frustration whispers that your ring is broken. My job was to listen to that whisper and find the real, fixable cause. Let’s move from general steps to specific diagnostics for the most common real-world hurdles.
Problem 1: “I have two separate V-shaped rings. Are they broken?”
This question is a classic. No, your ring is almost certainly not broken. You likely have a 6 or 8-band puzzle ring where two sets of bands are designed to be separate before final assembly. Think of them not as broken pieces, but as two completed paperclip chains that need to be linked. Your goal is to interlock these V-shaped units. Hold one V in each hand. Orient them so their open ends can hook into each other, much like linking two links of a bicycle chain. Once they are loosely engaged, then look for the key band that will weave through both units to lock the entire structure together.
Problem 2: Bent or Twisted Bands
This is the most common physical flaw I’ve seen in puzzle rings sent for repair. A single bent band can prevent all others from nesting. Stop all assembly. Lay each band on a flat, hard surface like a table or a book. Look down its length. It should be a perfect, consistent arc. Any flat spot, kink, or twist will block the groove or prevent proper seating.
The Fix: For a gentle bend, you can often coax it straight with your fingers. Roll the band against the hard surface, applying even pressure along the curve. For precious metals like sterling silver, be firm but patient—do not pinch or create a new kink. If a band is severely twisted, professional jeweler’s pliers with smooth, nylon jaws may be needed.
Problem 3: The Infinity Loop is Floppy or Unstable
A wobbly figure-eight means your foundation is faulty. The two base bands are not mirroring each other correctly. Dismantle and restart.
1. Ensure the two base bands are identical in their orientation—both arches and valleys must be aligned. It’s like making sure both shoelaces are facing the same way before you start tying.
2. Check that they are nesting, not just crossing. One band should sit snugly in the curve of the other along the entire intersection point.
3. When you introduce the third band (often the first side band), it must pass through both loops of the figure-eight, applying equal tension to each. If it only goes through one, the structure will collapse.
Problem 4: You Can’t Find the Key Band (or You Chose the Wrong One)
Re-examine every band under good light. The locking feature isn’t always a dramatic notch. Sometimes it’s a subtle groove milled into the inside of the band, a slightly different metal color, or one band that is fractionally thicker. Lay all bands parallel. The key band often has a unique profile. If you’ve been trying to force a band that lacks these features into the locking role, the final rotation will never work. Go back to your lineup and re-assign roles.
Problem 5: Everything Seems Right, But It Falls Apart at the Last Second
This is almost always a problem of incomplete nesting or a half-millimeter misalignment. The bands look assembled, but they are resting beside each other’s tracks, not inside them.
The Diagnostic Squeeze: Before attempting the final lock, gently press the assembled-but-unlocked ring from the sides. Do all bands move as one solid unit, or do you feel individual bands shifting? If they shift, carefully collapse the structure and reassemble, paying obsessive attention to how each band sits in the valley of its neighbor. Every band must be fully seated in its track before the key band makes its final rotation. This meticulousness is the difference between a successful assembly and repeated failure.
Remember, these rings are mechanical puzzles designed to be solved through logic and tactile feedback, not force. If you find yourself getting frustrated, set it down. The solution often becomes clear after a break, a principle explored in strategies for ancient puzzles like those discussed in Stop Forcing The Solution What Three Ancient Principles Teach About Puzzle Solving. Your patience is a tool, as important as your fingers. Troubleshooting is not a sign you’re failing; it’s the process of becoming an expert on your specific ring.
Keeping It Together: Care, Handling, and the Safe Take-Apart
You’ve done the hard part. That satisfying snugly fit and the final click means you’ve mastered the logic of your puzzle ring’s assembly. So, can you wear this triumph of jewelry every day? Absolutely—with a few bench jeweler’s precautions.
Treat your assembled ring like the fine mechanical puzzle it is, not a solid band. Avoid excessive force. When putting it on or taking it off, grip the entire cylindrical shape firmly rather than pinching individual bands. This prevents accidentally levering a band out of its groove and triggering a collapse. For cleaning, a soft-bristled toothbrush with mild soap and warm water is ideal; just dry it thoroughly immediately after. Never use ultrasonic cleaners, as the intense vibrations can shake the puzzle apart.
Now, what if you need to take apart your puzzle ring? Perhaps for a deep clean or to prove you can solve it again. The safest method is simply to reverse-engineer your steps. Instead of forcing anything, recall the final locking motion you performed with the key band. Rotate it gently backward. The structure should loosen predictably, allowing you to carefully disengage the infinity symbol and separate the bands. This controlled reversal is far safer than the trial and error that likely led to the initial pile of metal. For more on the durable logic behind such mechanical puzzles, the principles in Metal Puzzles That Dont Break A Veterans Guide To Cast Logic are enlightening.
Your confidence now comes from understanding, not memorization. You know the key band, the nesting principle, and the final lock. That knowledge transforms the ring from a source of frustration into a wearable conversation piece and a private reminder of your patience. So, put it on. Feel the secure, interlocked weight of it. You’ve not just reassembled a ring; you’ve solved the puzzle.