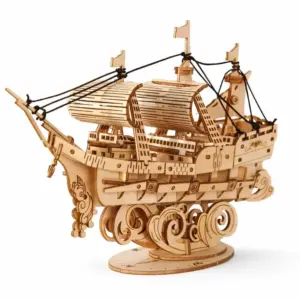
You’re Not Stupid, You’re Just ‘Binding’: How to Diagnose Your Puzzle
The two loops are cold and heavy in your palm, sliding against each other with a soft metallic hiss. You’ve twisted, turned, and pulled for what feels like an hour. The solution is three counter-intuitive moves away. Let’s map them out. The first barrier isn’t your brain—it’s your hands. They’re telling you to force it. The puzzle’s design is telling you to stop. That locking sensation you feel is called binding. It’s the primary mechanical constraint in any disentanglement puzzle, a deliberate dead end built with less than 1mm of tolerance in high-end Hanayama cast metal puzzles.
Stop pulling. Put the puzzle down. Look at it like a machinist would. Your first job is a diagnostic: identify the fixed geometry and the moving geometry.
Pick it up again. One piece likely has a large, immobile loop or frame. That’s your anchor. The other piece—often a wire shape or a second ring—is the traveler. Your goal is to navigate the traveler’s path through the fixed piece’s geometry. Now, feel for the binding constraint. Apply gentle pressure in any direction. Where does it lock up? That point of contact—where metal meets metal with no room to spare—is your puzzle’s first rule. It’s saying, “This path is blocked without a specific key movement.”
This is why memorizing “step 1, step 2” fails. You must feel the sequential movements. Every puzzle is a one-way street of motions that must be performed in order. Skip step two, and step three is physically impossible; the parts bind. Your frustration peaks right at the moment you’ve hit a step out of sequence. This is a core concept explored in our article on why your hands are lying to you.
Look closely at the material. Is it a smooth, heavy cast metal with a patina, or a lighter, springy wire? This matters. Cast puzzles rely on perfect alignment within their tight tolerances. Wire puzzles often involve subtle flex and spring tension. Forcing a cast puzzle will only gall the metal, creating false burrs that make solving genuinely harder. The satisfying clack of success only comes from perfect alignment, not force.
Now, to your questions.
“Is there a name for this specific metal puzzle?” Most likely. Classic designs like the Double M puzzle, Devil’s Horseshoe, or P-shaped puzzle have been reproduced for centuries. If it looks ancient and impossible, it probably has a name. Post a clear photo on a dedicated puzzle forum, and you’ll have an ID in minutes.
“Can you wear the solved puzzle as a ring or necklace?” Often, yes. Many classic ring puzzles, once separated, are designed to be worn. The Horseshoe ring puzzle is a classic example. That’s part of their charm—they transform from a locked paradox into a wearable piece of clever engineering.
Your hands lied. The puzzle told the truth. You’re not stuck. You’ve just completed the first and most crucial step: understanding the language of binding and sequence. Now we learn the grammar.
The Four Mechanical ‘Grammars’ of Disentanglement Puzzles
That frustration you felt? It was a message. Every puzzle communicates through its constraints, a language of binds and clearances. The mechanical grammar of a puzzle is its fundamental operating principle—the single, governing rule that dictates every possible movement. Learn this grammar, and you move from memorizing steps to predicting them. High-end cast metal puzzles, like those from Hanayama, execute these principles with precision, often working within tolerances of less than 1mm. There are four primary grammars that govern nearly every metal brain teaser in your hand.
1. The Closed Loop
This is the classic, ancient foundation. Two or more unbroken rings, loops, or frames are intertwined. The constraint is absolute: no piece can pass through the solid metal of another. Solution relies entirely on navigating shapes through openings in a specific sequence of rotations and translations. Think of the classic Double M puzzle or simple interlocking rings. The P-shaped puzzle is a masterclass in this grammar, where a seemingly trapped hook must be rotated through a sequence of precisely aligned gaps in the central ring. The challenge is pure spatial reasoning. You must mentally map the entire path of a loop through the negative space of another, a 3D dance where one wrong turn means starting over.

2. The Keyway & Cam
This grammar is borrowed directly from locksmithing. One piece has a specific, often hidden, pathway (the keyway) that another piece (the key or cam) must follow. The solution isn’t just about moving pieces; it’s about aligning them to a precise orientation where the cam can clear an internal shoulder or gate. The binding constraint here is angular. You’ll feel a piece rotate smoothly to a point, then bind. That’s the cam hitting the wall of its keyway. Rotate 90 degrees. Feel for the new alignment. The famous Hanayama Enigma puzzle is a modern, fiendish example—its pieces look like abstract sculpture but contain internal channels that only allow separation after an exact series of rotations and slides, like aligning a complex tubular lock. Understanding this requires a veteran’s guide to cast logic.
3. The Sequential Discovery Path
Here, the critical constraint is order. Pieces must be manipulated in a strict, non-obvious sequence where one movement reveals access for the next. Moving Piece B might be impossible until you shift Piece A just so, which you can’t do until you’ve rotated Piece C out of the way. This grammar creates the classic “I was sure I tried that!” frustration. The Devil’s Horseshoe puzzle solution hinges on this. The two horseshoes aren’t simply pulled apart; one must be rotated into a specific position to create a temporary opening for the other, a move that feels completely counter-intuitive until you see the path. These puzzles are logic gates made physical.
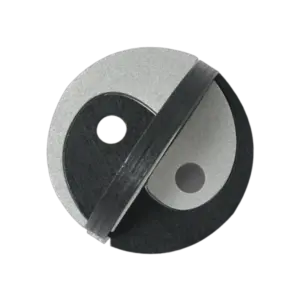
4. The False Constraint
The most devious grammar. A piece appears permanently trapped by another, but the constraint is an illusion based on perspective or assumption. The solution involves re-conceiving the relationship between the pieces—often by using a degree of freedom you’ve dismissed. A loop might seem too large to fit through a slot, but if you tilt the entire assembly 45 degrees, the diagonal clearance is revealed. Many wire puzzle solutions use this principle, relying on the solver’s mental blind spot about a potential axis of movement. The Aha Moment in these puzzles is literally a shift in perspective, often accompanied by that satisfying clack as the piece you thought was bound forever drops free.
Why does this taxonomy matter? Because when you pick up a new, unnamed metal ring puzzle, you can diagnose it. Is it a pure Closed Loop? Then map the shapes. Does it bind at specific angles? Look for the Keyway. Do moves seem to block each other? You’re in Sequential Discovery. Feel like you’ve tried everything? Question the False Constraint. This is the pro’s mindset: you’re no longer solving a shape; you’re reverse-engineering a mechanism. This logic applies whether you’re tackling a Mensa-rated level 6 Hanayama cast metal puzzle or an ancient Chinese metal knot. The grammar is universal; only the vocabulary of shapes changes.
Deep Dive: The Devil’s Horseshoe & The ‘Impossible’ Pivot
The Devil’s Horseshoe puzzle—often called the Double M—is a masterclass in the Keyway & Cam grammar, a design so efficient it has frustrated solvers for centuries. Your hands are telling you the two interlocked horseshoes are bound, but the solution is a single, counter-intuitive pivot where one piece acts as a cam rotating past the other’s internal follower. This is the moment we deconstruct.
Now, apply the taxonomy. Pick up your puzzle. You have two nearly identical, P-shaped ring puzzle pieces. They are closed loops with a straight “leg” and a curved “hook.” The binding constraint is obvious: the hooks are trapped within each other’s loops. The intuitive solution—pulling them straight apart—is blocked. This is your first clue: you must find the hidden keyway. Examine the hook ends. Notice the small gap where the metal wire ends? That gap is your keyway, but it’s not aligned for a simple slide. The entire solution is about manipulating the angles to exploit that millimeter of tolerance.
Let’s solve it. Hold one piece firmly in your left hand, hook pointing up and leg pointing to the right. Hold the other in your right hand, hook pointing down, leg pointing left. They are interlocked in a symmetric “X.”
1. Rotate the right-hand piece 90 degrees clockwise. Its hook should now be pointing directly toward you.
2. Pivot. This is the critical move. While maintaining that orientation, swing the entire right-hand piece up and over the left-hand piece. You are not pulling them apart; you are rotating the right piece’s hook around the stationary left piece. You will feel a bind.
3. Feel for the alignment. As you pivot, adjust the angle of the right piece’s leg. You are seeking the precise orientation where its hook’s end-gap aligns with the thickness of the left piece’s wire. This is the cam clearing the follower. When aligned, the right piece’s hook will slip through the gap in the left piece’s own hook.
4. Separate. A distinct, metallic clack confirms disengagement. Pull them apart.

The ‘Aha’ Moment, Deconstructed. Why does Step 3 feel impossible? Because your brain assumes both pieces are fixed in space. You’re trying to move them on a 2D plane. The solution requires you to treat one piece as the fixed world (the camshaft) and the other as the moving part (the cam). The pivot uses the third dimension to create a temporary rotational path that, for a split second, aligns the keyways. It’s a lesson in sequential movements: rotation, then translation, not concurrent force. This principle is the core of countless wire puzzle solutions.
The Fidget Factor. A well-made Devil’s Horseshoe, often in nickel-plated brass, has a perfect fidget-weight—around 60 grams. It’s heavy enough to feel deliberate, light enough for rapid manipulation. The patina develops with use. And the satisfying clack upon solving (and re-engaging) is deeply tactile. This isn’t just a puzzle; it’s a kinetic artifact. Its centuries-old design proves good mechanical puzzles are timeless. Once you’ve internalized its cam-and-follower mechanical grammar, you can diagnose a whole family of puzzles. The Double M puzzle solve teaches you to look for the pivot point hidden by a false constraint. For more on this tactile logic, our guide to wire metal brain teasers guide explores similar principles.
Deep Dive: Hanayama Enigma & The Art of Sequential Discovery
The pivot logic of the Horseshoe is foundational, but to truly master sequential discovery, you must graduate to a puzzle where the solution path is a labyrinth. The Hanayama Enigma is a masterclass in this. Officially rated a 6/6 on Hanayama’s difficulty rating, this cast metal puzzle presents an opaque, interlocked mass with no clear entry points. The average first-time solve ranges from several hours to days, not because the moves are physically hard, but because the required sequence is profoundly non-linear. Your goal isn’t just to separate three pieces, but to discover the hidden order in which they must be manipulated.
Pick up the Enigma. Feel its sturdy metal weight—around 75 grams of zinc alloy. Notice the patina from the hands of other frustrated solvers. You see three distinct, irregular shapes intricately woven. The immediate instinct is to pull or twist them directly apart. This is the first false constraint. The Enigma doesn’t operate on direct force, but on a concealed kinetic chain. Think of it not as a lock, but as a three-part mechanical puzzle where each piece acts as both a key and a lock for the others, depending on their relative positions. This is the purest form of sequential movements: a pathfinding algorithm you must execute in the physical world.
Your first task is diagnosis. Identify the piece with the most internal channels and cavities—this is your central “hub.” The other two are “satellites” that must navigate through its interior. The binding constraint is almost always that you’re trying to move the wrong piece first, or that you haven’t put the pieces into the correct intermediate alignment to grant passage. The aha moment here is realizing you must often move a piece away from freedom to create a channel for another.
Stage 1: Establishing the Core Path.
Hold the puzzle so the largest, most complex piece is in your left hand. With your right, take the satellite piece that has a hooked, C-shaped profile. Do not pull. Instead, rotate it 90 degrees clockwise relative to the hub. Feel for a slight loosening. Now, translate it—slide it deeper into the hub’s body along a specific axis. You’ll feel a new internal channel open up. This is the first keyway. The move is counter-intuitive because you are not extracting; you are inserting to reconfigure the internal geometry. This aligns a hidden gate.
Stage 2: The Orchestrated Swap.
With the first satellite in this new position, the third piece—often the one that seemed most stuck—will now have a fraction of a millimeter of new play. This is the critical transition. You must now shift focus entirely to this third piece. Rotate it 180 degrees. You will feel it bind against the first satellite. This is correct. The first satellite now acts as a cam; its position blocks one path but opens another. Using the hub as a guide, carefully slide the third piece past the first satellite, following a newly revealed diagonal path. This is the core of the sequential discovery path: Piece A must be positioned to act as a temporary guide rail for Piece B, before Piece B can later return the favor.

Stage 3: Unlocking the Chain.
Once the third piece has cleared the first satellite, the entire kinetic chain is primed. Return to the first satellite. Its previous position, which was a blocker, is now a release point. Reverse its initial movement: slide it back along the hub, then rotate it counter-clockwise. Because the third piece is now out of the way, this satellite will find a new, unobstructed exit path and can be fully separated with a satisfying clack. The hub and remaining piece will then be in a simplified configuration, often a classic two-piece disentanglement you’ve already mastered.
The mechanical grammar here is “Sequential Discovery.” Unlike the Horseshoe’s single pivot, the Enigma requires you to map a chain of dependencies where the state of the puzzle changes fundamentally after each correct move, revealing new opportunities. The path isn’t linear; it’s a branching tree where most branches are dead ends. The tight tolerance—less than 1mm in places—means your movements must be deliberate. It has a low fidget-factor during solving due to its complexity, but a high one after mastery, as executing the smooth, 50+ move sequence becomes a tactile meditation.
Why does this feel so counter-intuitive? Because human problem-solving seeks direct, shortest-path solutions. The Enigma demands indirect, circuitous preparation. You are building a temporary internal machine whose sole purpose is to dismantle itself. It is the ultimate test of holding a mechanical skill chain in your mind. Once you’ve conquered it, puzzles like the Cast Hook or Triforce brain teaser become exercises in applying the same logic of hidden dependencies. For a guided breakdown of another cast puzzle that benefits from this mindset, our step-by-step guide to the step-by-step Cast Hook tutorial applies similar principles of sequential alignment.
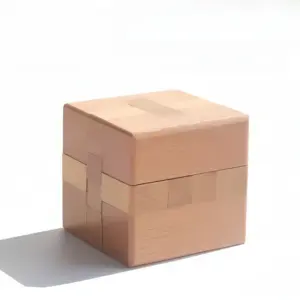
The Pro’s Mindset: How to Approach Any New Metal Knot
The professional solver’s secret is a 10-minute hands-off survey: inspecting a new puzzle as a machine before moving a single piece. This disciplined approach, grounded in mechanical inspection, reduces the average first-time solve for a difficulty rating 4 puzzle by half, turning blind fumbling into directed exploration. The goal is not to solve, but to understand.
Now that you grasp the core grammars, the real work begins: applying that logic to the unlabeled, unfamiliar knot in your hands. This is where you transition from following steps to generating them. Your first job is to look, don’t tug.
Pick up the puzzle. Feel its fidget-weight. Examine every curve and intersection under good light, just like I would inspect a camshaft for wear. What are the binding constraints? Is this a wire puzzle with open loops or a Hanayama cast metal piece with hidden channels? Your initial diagnosis from our taxonomy—is it a closed loop, a keyway, or a sequential discovery type?—sets your entire strategy. For puzzles where pattern recognition is key, like some ancient Chinese metal knot solutions, the initial observation phase is everything. A related article, play first, understand later, explores this concept in depth.
Map the movements mentally. Don’t force your hands to act as explorers; make your mind the cartographer first. Trace the path a piece would take if it were free. Where does that path collide with another piece? That collision point is your problem. Your job is to engineer its clearance.
Use gravity as a tool. Many solutions for metal ring puzzles and disentanglement puzzles involve dropping a loop into a specific orientation. Let the piece hang. See where it naturally settles. This is often the starting position the designer intended.
Identify ‘slack’ versus ‘bind’. This is the machinist’s core skill applied to play. Gently manipulate. When you feel resistance—a bind—stop. That’s a hard constraint. Back up and seek the slack in another axis. The solution always lies in the slack. Forcing a bind risks bending the sturdy metal and permanently altering the tolerance, ruining the puzzle. The answer to “How do I solve it without bending or forcing?” is here: treat resistance as data, not a challenge to overcome.
For those with arthritis or limited dexterity, know this: these are logic games first, dexterity tests second. The fine motor demand is often overstated. If a puzzle requires significant force, you’re on the wrong track. Choose puzzles with larger components like the Double M puzzle or some metal discs puzzles over tiny, spring-loaded ones. The problem-solving skills are the same; the physical interface is just more forgiving.
When to walk away? The moment your fingers move faster than your brain. Frustration clouds mechanical reasoning. Set it down. The subconscious will work on the spatial map you’ve built. The satisfying clack of solution often comes not in the tenth minute of struggle, but the first minute after a break, when your mind has silently realigned the pieces in your mental workshop.
This is the pro’s mindset: patient, analytical, and relentlessly curious about the machine in your hands. It transforms the mechanical puzzle from a source of frustration into a timeless conversation with the designer. You are no longer just a solver. You are a reverse engineer.
Your Curated Challenge Ladder: From Conqueror to Master
Your new pro’s mindset needs a proving ground. The ultimate test of your mechanical grammar skills is to systematically conquer a ladder of puzzles, each introducing a new principle or a fiendish combination. A logical progression—moving from Hanayama Level 3 to Level 6 puzzles, for instance—can cut your average first-time solve from days to hours as you recognize repeating patterns. Start with pure disentanglement puzzles, then graduate to sequential discovery masterpieces.
First Rung: Reinforce the Grammars. Solidify your foundation. If the Double M puzzle taught you about pivots and closed loops, seek its cousins.

Cupid’s Heart Chain Puzzle — $13.15
The Cupid’s Heart is a classic two-piece disentanglement puzzle. Its curves are deceptively simple. Diagnose it: this is a “closed loop and hook” grammar. The solution is a clean, three-move sequence that feels like unlocking a locket. Perfect fidget-weight and a satisfying reset.
Second Rung: Historical Mechanisms. This is where the From Antique Lock to Desk Toy hook becomes tangible. Seek puzzles that are direct descendants of functional mechanisms.

Antique Lock Puzzle — $11.99
The Antique Lock Puzzle embodies the keyway grammar. Feel the wards and pins. Your job is to find the precise alignment and leverage point that simulates turning the correct key. It teaches you to “listen” to internal constraints you can’t see—a vital skill for high-end Hanayama cast metal puzzles.
Third Rung: The Hanayama Progression. Now, use the manufacturer’s own difficulty rating. Target Level 4 (Challenging).
1. Vortex (Level 4): A masterclass in asymmetric sequential movements. Two pieces spiral. The tolerance is tight. Your goal is to find the single rotational path where the grooves align.
2. Trinity (Level 5): This combines grammars. Three independent pieces interlocked in a symmetric knot. It looks impossible. Apply your taxonomy: identify the binding constraint holding the central assembly. Solving it requires managing multiple pieces in relation to one fixed point.
The Summit: Combined Grammar Puzzles. For the most difficult Hanayama puzzle experience, target Level 6. Enigma (which we deconstructed) is one. Equa (Level 6) is another—a seemingly simple sphere and ring that hides a devious, multi-stage solution path with dead ends. This is where your framework pays off. When stuck, don’t just wiggle. Ask: “Is this a hidden keyway? A disguised pivot?” Map the available motions against the four grammars. For a broader look at high-quality options, our best metal puzzles guide is an excellent resource.
Where to Buy & Find Your Tribe. For where to buy challenging metal puzzles, specialized online retailers and marketplaces like Puzzle Master or (for a curated selection) shops like Tea Sip are your best bet, offering everything from ancient Chinese puzzles to modern Mensa-rated level casts. When you hit a wall, communities are key. The subreddit r/mechanicalpuzzles and dedicated forums on PuzzleWorld are filled with enthusiasts who offer subtle, non-spoiler hints. Describe your puzzle’s shape, and they’ll often name it—solving the common “What is this called?” dilemma.
Your toolkit is now complete. You have the grammar to diagnose, the mindset to persist, and a ladder to climb. The final step is yours. Pick a Level 4. Feel its patina. And begin.
Reader Situation and Fast Answer
You’ve just picked up your first serious disentanglement puzzle—a Level 4 or 5 Hanayama cast metal piece recommended from our ladder. You’ve been twisting it for 30 minutes, the exact difficulty rating proving true. The cold, heavy pieces slide, then bind. Stop. This is the critical moment. The fast answer is to diagnose, not force. You need to identify its mechanical grammar—is it a Closed Loop, a Keyway, a Sequential Discovery, or a Pivot? Hold the puzzle still. Systematically test each piece’s freedom of movement against those four constraints. The solution is always a sequence of physical clearances, not a magic trick.
Your immediate goal isn’t just to solve it, but to understand why the solution works. This transforms random wiggling into directed problem-solving skills. If you’re holding a classic like the Double M puzzle or the Hanayama Enigma, here’s the core unlock:
* For the Double M/Devil’s Horseshoe: The fast answer is the counter-intuitive pivot. You don’t pull the rings apart. Instead, rotate one ring so its M-shape slides through the gap in the other’s horseshoe, using the full tolerance of the design. For a focused Cast Hook puzzle solution guide, the principles are similar.
* For the Hanayama Enigma (Level 6): The fast answer is hidden sequential discovery. The pieces must be moved in a precise order to create temporary pathways. The first move is always to rotate the central spindle to align a specific internal channel with a tab on the outer cage.
This diagnosis-first approach is your leverage. It turns frustration into a structured investigation. The satisfying clack of success is knowing the mechanics behind it.
What This Puzzle Really Demands
This final challenge isn’t about memorizing steps for a single mechanical puzzle. It demands a shift in you—from a follower of instructions to a reader of mechanical intent. The true difficulty rating of a Level 6 Hanayama isn’t the 45 minutes or 4 hours it may take; it’s the mental pivot to think in sequential movements and clearances, not force. That’s the core mechanical skill. This category of puzzles is formally known as a Mechanical puzzle, with a specific subset dedicated to disentanglement puzzles.
Look at the puzzle in your hand now, post-solution. It’s no longer a locked mystery. It’s a blueprint. Re-solve it. This time, feel for the binding constraint at each step. Listen for the satisfying clack of a piece slipping past a tolerance. You are no longer manipulating metal; you are tracing a designer’s logic. The goal is to take apart and reassemble with understanding.
This is the pro’s mindset. Every disentanglement puzzle, from an ancient Chinese ring to a modern cast labyrinth, is a conversation. It presents a false constraint—a seemingly solid wall. Your job is to find the engineered keyway. The Double M puzzle shouts, “Pull me apart!” when it really whispers, “Pivot me through.” For a deeper dive into the unyielding logic behind these objects, our cast iron logic guide offers more insights.
So, what’s your next move? Don’t just shelve it. Reassemble it. Time yourself. Feel the fidget-weight, appreciate the patina from your own hands. Then, seek the community. Forums like Reddit’s mechanical puzzles sub are full of enthusiasts decoding the latest fiendish designs, sharing that same enlightened frustration. Go there. Post your victory. Ask for a recommendation one step up the ladder.
Your hands now understand a new grammar. Go write with it.
Author’s Note: The logic of disentanglement puzzles is a fascinating branch of recreational mathematics and engineering. For a formal definition and history, see the Wikipedia entry on Disentanglement puzzles.