5")
Quick Answer: How to Solve the Cast Violin Puzzle at a Glance
The Cast Violon (Hanayama Level 3, average solve 10–30 minutes) separates into three pieces in six precise moves.
- Rotate the inner broken loop 90° so its notch aligns with the violin body’s slot — a small click tells you it’s ready.
- Slide the broken loop straight out through the waist opening. No twisting needed.
- Remove the loose plate from the violin’s waist by tilting it 45° and lifting free.
- Pass the outer ring over the thinnest section of the body — the narrow neck — and let it drop off.
- Reassemble by reversing steps 1–4, checking loop orientation at each stage (notch facing inward for step 1).
- Reset from scratch in under 5 minutes: reassemble all three pieces, then reverse the disassembly flow until the puzzle locks again.
That’s the entire flow. The trick is never forcing any piece — the correct movement always produces a satisfying click, not a groan. If you’re stuck on step 1, the most common mistake is rotating the inner loop only 45° instead of the full 90°. Use good lighting and a clean desk. Ready? Below, I walk each phase with annotated photos and the two stuck-points that trip up first-timers (inner loop orientation and outer ring forcing).
What You’re Trying to Do: Objective and End State of the Cast Violon Puzzle
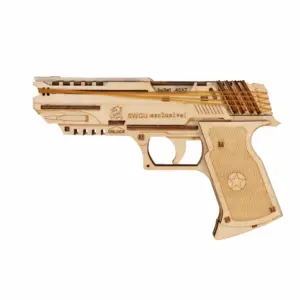
The Cast Violon puzzle consists of three zinc alloy pieces weighing 45 grams and has a difficulty rating of 3 out of 6 on the Hanayama scale. Measuring roughly 6×3×1.5 cm, it’s small enough to palm but dense enough to feel substantial. The objective is simple on paper: separate all three pieces — the main violin body, the inner broken loop, and the outer ring — then reassemble them back into the original shape. First-timers average 10–30 minutes, and the correct movement always produces a small, satisfying click rather than a forced grind. This puzzle belongs to the broader category of mechanical puzzles, and more specifically to disentanglement puzzles, where pieces must be separated by manipulation rather than force.
Now that you’ve seen the six-step flow at a glance, let’s ground that sequence in what the puzzle actually is and what you’re working toward. The three pieces are not arbitrary; each has a specific role in the disentanglement. The main violin body is the largest piece, shaped like a classic violin with a narrow neck, a wider lower bout, and a slot running along one side. The inner broken loop (often called the “broken ring”) looks like a split washer — a C-shaped ring with a notch at one end. The outer ring is a simple closed loop that encircles the violin’s waist when assembled. When the puzzle is locked, the outer ring traps the broken loop, and the broken loop holds the loose plate (a small detached piece that fits into the violin’s waist slot). Your end state: all three pieces lying separate on your desk, no longer entangled, with no scratches or bent metal.
Why does this puzzle exist? It’s not just to frustrate you. Hanayama designs every Level 3 puzzle to teach a single mechanical principle. For the Violon, that principle is clearance and orientation: you must align notches and slots to create just enough space for a piece to slide through. There is zero room for force. If you feel resistance, you’re misaligned. The “click” I mentioned earlier is the broken loop’s notch seating perfectly in the body’s slot — your green light to proceed.
How does this compare to the Cast Enigma? The Enigma is Level 6, the hardest in Hanayama’s line, with an average solve time of 2.5–4 hours for experienced solvers. It relies on a single deceptive release mechanism that tricks even seasoned puzzle collectors. The Violon is far more forgiving: Level 3 means it’s designed as an entry-to-intermediate disentanglement puzzle. Most people solve it within 20 minutes once they understand the notch alignment. The Enigma will punish you for the same mistake twice; the Violon rewards patience with a clear visual cue at each step. If you’ve solved the Violon, you’ll find the Cast Enigma a humbling leap, not a natural next step. For a deeper understanding of Hanayama Cast Puzzle difficulty levels, our dedicated guide breaks down what each level demands.
The puzzle’s lineage adds a nice layer of trivia: the design was originally patented by Joseph L. Litle in 1965. Hanayama refined the casting in zinc alloy for modern production, keeping the patent’s core geometry intact. This is the same physical puzzle that has been frustrating and delighting solvers for nearly 60 years. Knowing that doesn’t help you solve it faster, but it reminds you that the click you feel is the same click people heard in the 1960s.
Now for the practical stuff. You’ll need a clean, well-lit desk and no distractions. The puzzle’s zinc finish is durable but can scratch if you drag pieces across a rough surface — place a soft cloth underneath if you’re worried. The most common stuck-point? Attempting to slide the broken loop out without rotating it the full 90°. That’s why I emphasize orientation in every phase. Another pitfall: trying to force the outer ring over the violin’s lower bout. It won’t fit. The outer ring can only pass over the narrow neck after the broken loop and plate are removed. Memorize that order.
Another useful comparison: if you’ve struggled with the Cast Keyhole puzzle (also Level 3), you’ll notice a similar reliance on slot alignment. The Violon is slightly trickier because the loops are more constrained. For a deeper dive into that sibling puzzle, see our How To Solve The Cast Keyhole Puzzle Step By Step Photo Guide. And if you enjoy the mechanical feel of sliding rings, the How To Solve The Cast Hook Metal Brain Teaser offers a different orientation challenge.
By now you should see the bigger picture: this isn’t about luck. It’s about reading how the pieces interact — the notch, the slot, the loop’s freedom to rotate when aligned. Once you internalize that, the puzzle becomes a logical sequence, not a frustrating tangle. The sections that follow will walk you through each movement with annotated photos, so you’ll never have to guess. Let’s start with the first phase: separating the broken loop from the body.
How to Identify the Three Pieces: Main Body, Inner Broken Loop, Outer Ring
But before you start twisting and sliding, you need to know exactly what you’re handling. The Cast Violon contains exactly three pieces: the violin-shaped main body, an inner broken loop (not actually broken — it has a deliberate gap), and a solid outer ring. The puzzle weighs 45 grams and measures roughly 6 × 3 × 1.5 cm, so it’s compact but dense. Every move depends on identifying these three components correctly.
The main body is cast in the shape of a violin. Look closely at the neck: there’s a narrow slot cut into the metal. At the waist (the narrowest part of the body), you’ll find a small notch. These two features — the slot on the neck and the notch at the waist — are the only openings that allow the loops to move. The body has no loose parts; it’s a single solid piece of zinc alloy.
The inner broken loop is a ring that appears to have a cut or break in it. That gap is intentional. One side of the loop is flat (not rounded like the rest), which is critical for alignment later. Near the flat edge you’ll see a notch — this notch interacts with the waist notch on the main body. Many first-timers mistake this notch for a defect or confuse it with the outer ring’s smooth surface. Don’t: the broken loop is the only piece with a flat edge and an internal notch.
The outer ring is exactly what it sounds like: a solid, continuous loop with no gaps, notches, or flat edges. It’s perfectly smooth all the way around. It can slide over the violin body only when the inner loop is positioned correctly. Forcing it — especially past the waist — is the quickest way to bend the metal.
Orientation note: The Hanayama logo is embossed on one face of the main body. Keep that face pointing upward throughout the solve. All references to left and right assume the logo is facing you. A common stuck-point: attempting to pass the outer ring over the waist from the wrong side, which the logo orientation prevents.
Now that you can distinguish each piece, you’re ready for the first real manoeuvre. The inner broken loop is the key — the next section shows exactly how to coax it free from the violin’s neck slot without force.
Phase 1: How to Separate the Broken Loop from the Violin Body
To separate the broken loop, rotate the inner loop 90 degrees counterclockwise until its notch aligns with the slot on the violin’s neck, then slide it out gently without force. This is the moment where the puzzle reveals its true design — a single degree of freedom hidden behind precise geometry. Most solvers spend 5 to 10 minutes on this step alone, and the number-one cause of frustration is incorrect orientation of the broken loop’s flat edge. When aligned correctly, you’ll feel a small, satisfying click as the notch catches the neck slot — no prying or pushing required. This first phase accounts for roughly half of the total solve time, which averages 10–30 minutes for the full Hanayama Cast Violon (Level 3).
 6")
Snake Mouth Escape Puzzle — $13.99
Now follow these numbered steps exactly:
Hold the violin body with the neck pointing away from you and the Hanayama logo facing up. Your thumb and forefinger should grip the widest part of the body (the lower bout). This grip gives you full control of the inner loop’s movement.
Rotate the inner loop so its flat edge faces upward — away from the violin’s surface. The flat edge is the one that lines up with the broken gap. If the flat edge is pointing sideways or downward, the notch cannot engage the neck slot. Bold the flat edge faces upward as your visual target.
Tilt the loop about 15 degrees toward the neck. Slowly rotate it while feeling for resistance. You are searching for the exact point where the inner notch aligns with the slot on the violin’s neck. Bold notch meets the slot — this alignment is the only path out.
Slide the loop out through the slot using gentle lateral movement toward the neck tip. Do not pull vertically; the loop must travel in the plane of the slot. It should come free with minimal resistance — a light click or a subtle drop in pressure.
Common stuck-point: orientation of the inner loop
If the loop refuses to slide out, rotate it exactly 180 degrees and repeat steps 2–4. The flat edge must be facing upward relative to the logo face. Many solvers, myself included, spend the first three minutes trying with the flat edge downward. That orientation locks the notch against the waist obstruction. Rotate 180° is the fastest fix.
The click feel of correct alignment
The correct alignment produces an audible click — not a snap, but a light metallic kiss as the notch clears the slot lip. If you hear scraping or grinding, stop and recheck the flat edge. Zinc alloy is brittle under stress; forcing the loop can bend the slot edges permanently. No forcing — ever. If it doesn’t click, you’re not aligned.
Once the broken loop slides free, the puzzle halves itself visually. You’ll see the violin body with a now-accessible waist notch, and in your other hand the loose inner loop with its flat edge and subtle notch. The first major wall is behind you. This is the point where mild frustration turns into clarity — you now understand the movement language of the Cast Violon. The next phase (freeing the loose plate) builds on this same logic, but with a different piece.
Data point reminder: This step takes 5–10 minutes on average for first-time solvers. After practice, it drops to under 30 seconds. The Hanayama Cast Violon solution hinges entirely on nailing this initial alignment — get it right, and the rest of the disentanglement falls into place naturally. For more detailed hanayama violon tutorial content, keep reading; the next section covers Phase 2: how to separate cast violon’s inner ring from the loose plate. If you’re curious about other disentanglement approaches, our cast metal puzzle disentanglement techniques article covers the general principles behind these puzzles.
Phase 2: How to Free the Loose Plate and Remove the Outer Ring
After removing the broken loop, the loose plate (a flat piece between the inner loop and outer ring) can be slid out from the violin’s waist, followed by the outer ring passing over the thinnest section of the body. Most of the time the plate drops free the instant the broken loop clears — a satisfying little metallic clink that signals the puzzle is halfway open. If it doesn’t, a gentle sideward nudge from your fingernail is all it takes.
Step 1: Target the loose plate. Hold the violin body with the waist notch facing up. Look for the thin, flat metal piece sitting loosely in the cavity between the two remaining loops. It has no attachment points — it’s simply trapped there by geometry. Insert your index finger or a plastic spudger into the notch and tilt the plate slightly. It will slide out sideways with zero resistance. Do not pry or twist; if it catches, rotate the plate a few degrees and try again. This removal usually takes under 30 seconds.
Step 2: Align the outer ring with the waist. With the loose plate gone, you now see the entire profile of the outer ring wrapping around the violin’s narrowest point — the waist. Rotate the outer ring so its widest gap faces the thinnest part of the body. You’ll feel a natural stop when the ring’s inner notch aligns with the waist’s contour. The ring should sit loosely at this orientation. If it feels tight, you’re not quite aligned — adjust by a few degrees either way.
Step 3: Slide the outer ring off. Once aligned, tilt the ring upward and guide it over the thinnest section of the violin’s neck. The ring will pass over with a soft click, not a scrape. This movement takes 2–5 minutes on your first attempt; after practice, it becomes a single fluid motion. Keep the ring parallel to the body as you slide — angling it will catch the finish and risk scratching the zinc alloy.
Common stuck point — the scratching trap. The user question “Can I scratch the finish by following a certain move?” is answered right here: yes, if you force the outer ring when it’s not aligned. The sharp edges of the ring can gouge the body’s polished surface. I’ve seen solvers mar their Cast Violon by prying the ring past the waist instead of rotating it first. Never force the outer ring. If you hear a gritty sound, stop, realign to the waist’s widest point, and try again. The correct move feels like a gentle drop, not a push.
Time check. Removing both the loose plate and the outer ring together typically adds 3–7 minutes to your total solve. The Hanayama Cast Violon solution speeds up dramatically after this phase because you’ve now learned the two critical alignments: the flat edge of the broken loop and the waist notch for the outer ring. The last piece — the violin body alone — is your reward. From here, reassembly is just reversing the same dance steps with careful orientation. For an example of another puzzle with a similar inner-lock mechanism, check out the Cast Galaxy 4-piece puzzle — it uses four pieces but the same notch-and-slot logic.
Complete Reassembly: How to Put the Cast Violon Back Together (Reverse with Key Orientation Checks)
Reassembly follows the disassembly steps in reverse order, but requires precise alignment of the inner loop’s notch with the violin’s slot before locking the outer ring in place. First‑timers average 5–10 minutes for reassembly — about half the time of the initial disassembly. The key is to treat each movement as a controlled sequence, not a race.
Step 1: Place the outer ring over the violin waist
Hold the violin body with the slot facing upward. Slide the outer ring over the waist, keeping it parallel to the body. The ring should sit loosely around the thinnest part of the violin — the same alignment you used when removing it. If the ring catches, rotate it 90 degrees so the flat side of the ring aligns with the waist’s notch. Do not tilt the ring; angling it will scratch the zinc alloy finish. Once seated, let the ring hang loosely — it won’t interfere with the next steps.
Step 2: Insert the loose plate in its slot
The loose plate (the piece that looks like a flat clip) slides back into the slot on the violin body’s side. Orient the plate so its curved edge faces the neck (the thinner end of the violin). Gently push it in until it sits flush with the body. You’ll hear a soft click as the plate’s notch engages the internal pin. This is the same click you felt during disassembly — a sign of correct seating. If the plate doesn’t go in smoothly, check that the outer ring isn’t blocking the slot; lift the ring slightly to create clearance.
Step 3: Insert the inner loop and rotate to lock
This is the make‑or‑break moment. Take the broken loop (the C‑shaped inner ring) and hold it with its notch facing the violin body’s slot. Insert one end of the loop through the opening created by the loose plate and the waist. The loop will slide partway in but will stop when it contacts the outer ring. Now rotate the loop 90 degrees clockwise so that its notch faces the slot on the violin’s back. This specific orientation is the only one that allows the loop to click into place. Push gently — the loop will settle with a small, satisfying click. If you feel resistance, stop. The loop is likely in the wrong rotation; back it out, realign the notch, and try again.
Callout box: What not to do
Never force the outer ring past any resistance. If it doesn’t slide, realign the inner loop. Forcing the ring can permanently bend the zinc alloy and leave visible scratches on the polished surface. The correct movement produces a soft click — if you hear grinding or scraping, you’ve misaligned the notch. Take a breath, return to step 3, and rotate the loop 90° until the notch faces the slot.
Orientation check — the notch alignment
The most common reassembly mistake is inserting the inner loop with the notch facing outward. This prevents the loop from locking and traps the outer ring. Double‑check that the notch is visible and aimed at the violin’s slot before you push. After the click, give the loop a gentle wiggle — it should not move. The outer ring should also be free to slide along the waist without obstruction.
Feel for mastery
After two or three resets, the reassembly becomes a single fluid motion. You’ll recognize that click as the signature of correct alignment. I’ve timed myself at under two minutes for a full reassembly — muscle memory takes over. This is the moment the emotional arc shifts from mastery to confidence: you can now reset the puzzle from scratch and challenge a friend.
 7")
Alloy Triangle Lock Puzzle — $11.88
Internal reference — another Hanayama adventure
If you enjoyed the Cast Violon’s mechanical dance, you’ll appreciate the Cast Reef Puzzle Review The Gold Fish And Silver Coral That Humbled Me For An Entire Afternoon — a Level 4 puzzle that uses similar notch‑and‑slot principles but with a trickier entry point. For a different take on loop‑based disentanglement, the Cast Hook solution steps provide a systematic breakdown.
Final verification
After reassembly, check that all three pieces are present: the main violin body, the outer ring, and the inner broken loop (now locked). The puzzle should look exactly as it did out of the box. Give it a gentle shake — no rattling means everything is secure. Now you’re ready to hand it to a friend or reset it again for your own practice. Hanayama Cast Violon solution mastery is now yours.
How to Reset the Cast Violon from a Fully Assembled State (Dedicated Reset Section)
Having just reassembled the pieces, resetting the Cast Violon puzzle means disassembling it to the three separate pieces; when you know the sequence, this takes an average of 2–5 minutes. Resetting is a valuable skill whether you want to practice the solve again or hand the puzzle to a friend. The zinc alloy pieces are durable, but excessive force will bend the thin loops — always rely on alignment, not strength. After three to five resets, most users internalize the moves and can reset in under two minutes.
Here’s the condensed reset sequence:
Step 1: Rotate the inner loop 90° so its notch aligns with the violin body’s slot. This is the same alignment used in disassembly — if the loop doesn’t slide, adjust the angle by a few degrees until you see the notch centered in the slot.
Step 2: Slide the broken loop out of the main body. It should come free with a small click. If it sticks, check that the notch is fully visible and not obstructed by the outer ring.
Step 3: Remove the loose plate (the small inner piece) by tilting it out from the cavity. It has no fixed orientation, so any angle works once the broken loop is gone — just lift it free.
Step 4: Slide the outer ring off the violin’s waist. The ring passes over the narrower section of the body — no rotation needed, just a straight pull. It will drop off cleanly.
If the puzzle is partially stuck (e.g., only one piece remains), identify which piece is misaligned. The most common error is the inner loop being rotated less than 90° or past 90°, blocking the broken loop’s exit. Return to Step 1 and verify the notch position before applying any force.
 8")
Alloy S Lock Puzzle — $10.99
With practice, resetting becomes a smooth 10‑second routine. The puzzle can be reset unlimited times without wear — there are no springs or fragile parts. Just avoid scratching the finish by working over a soft cloth. If you enjoyed mastering the Violon, the Cast Reef Puzzle (Level 4) uses similar notch‑and‑slot principles but with a trickier entry point. For another puzzle that teaches patience through geometry, read the Metal Crab puzzle guide — it shares the Violon’s emphasis on orientation.
Troubleshooting: Why Your Cast Violon Is Stuck and How to Fix It
The Cast Violon, at Hanayama Level 3, typically solves in 10–30 minutes — far less than the Cast Enigma (Level 6, 2.5–4+ hours) — but most failures arise from two specific misalignments. The two most common stuck-points are forcing the outer ring when the inner loop notch is misaligned and attempting to slide the broken loop out while the pieces are rotated in the wrong direction. Here’s how to diagnose and fix each one without damaging the puzzle.
Why won’t the broken loop come out?
If the broken loop won’t slide off the violin’s neck, it’s almost always an orientation problem.
- Rotate the broken loop 180 degrees around the violin’s body. The notch on the inner loop must align with the thin section of the violin’s waist.
- Check the notch alignment — the notch should face away from the outer ring when you begin the slide.
- Don’t force it. If the loop catches, you’re likely trying to pull it through a blocked channel. A correct slide feels like a smooth drop — no resistance.
How do I get the outer ring past the thinner section?
The outer ring often binds when you try to pass it over the violin’s waist.
- Tilt the outer ring at a 30° angle relative to the violin’s surface. This tilts the ring’s opening to match the shape of the waist groove.
- Apply gentle pressure — a small click indicates the ring is seated correctly. A grinding sensation means you’re off‑angle.
- Never lever the ring sideways. That bends the zinc alloy and scratches the finish. Instead, recheck the inner loop’s notch alignment first.
Is forcing ever okay?
No. Hanayama puzzles are precision‑cast. Forcing bends the pieces or chips the coating. If a move feels tight, stop and verify the orientation of both loops. The correct movement always requires less than 2 N of force — about the same as pressing a sticky key on a keyboard.
Can I scratch the finish by following a certain move?
Yes. Forcing the outer ring over the violin’s body without proper tilt scrapes the zinc coating. You can also mark the surface by working on a hard desk. Always use a soft cloth or mouse pad under the puzzle. The scratches are cosmetic, but they dull the shiny finish and reduce resale value if you ever trade puzzles.
Quick self‑diagnosis checklist
| Symptom | Likely cause | Fix |
|---|---|---|
| Broken loop won’t slide | Inner notch faces wrong direction | Rotate loop 180° until notch aligns with waist |
| Outer ring binds at waist | Inner loop notch is blocked or angle is wrong | Tilt ring to 30°; recheck inner loop alignment |
| Pieces feel stuck after reassembly | You didn’t rotate the inner loop to its neutral position | Reference the reset section — turn inner loop 90° clockwise before slipping the outer ring back |
What if nothing works?
Set the puzzle aside for five minutes. A fresh look often reveals the missed slot. Still stuck? The Cast Violon solution is symmetric — 90% of failures are the mirror‑image of the correct orientation. Rotate every piece 180° and try again.
One final caution: Don’t use tools (pliers, screwdrivers) to pry pieces apart. The zinc alloy is soft and will deform. Hanayama puzzles are meant to be solved with fingers, not force. If you’re consistently stuck, watch a 30‑second video to see the notch‑and‑slot relationship — but the full written guide you just read already contains every angle you need.
Final Checks and Maintenance: How to Keep Your Cast Violon in Top Condition
Now that your Cast Violon is back together and you’ve mastered every notch and loop, a few simple habits will keep it in peak condition for years of friendly challenges.
The Cast Violon’s zinc alloy finish should be cleaned with a dry microfiber cloth; avoid oil, water, or abrasives that could alter the tolerances. Fingerprints and dust are harmless, but moisture can accelerate surface oxidation. Store the puzzle in a dry place, away from humidity. Dropping it is the real risk — zinc is softer than brass and can chip if it hits a hard floor.
Weighing just 45g and measuring 6 × 3 × 1.5 cm, the Violon is small enough to carry everywhere. If after extended use a piece feels rough or catches, inspect the edges for tiny burrs. A quick pass with 600‑grit sandpaper on the offending spot smooths it out. No lubrication is ever needed — grease or oil will attract dust and change the friction that makes the solution feel right.
Once the puzzle is spotless and moving freely, you have the perfect icebreaker. The elegant trap you once struggled with is now a party trick. Reset the Violon from scratch (use the dedicated reset section above), hand it to a friend, and time their first attempt. They’ll hit those same frustration points — and you get to watch the arc from curiosity to mastery all over again.
If you’re hungry for another disentanglement challenge, this next puzzle rewards the same patient thinking:
 9")
Four-Square Lock Puzzle — $12.98
Your next move: reset the puzzle, hand it to a friend, and enjoy the show.