Mechanical Model 6")
Quick Answer: 3D Metal Puzzle Mechanical Model Buying Guide
Choose your first or next kit based on your primary goal, not just piece count. A smaller, sturdier build with clear instructions is a better learning tool than a 500-piece dragon that will test your patience and your tweezer skills.
| Option | Best For | Price | Skip If |
|---|---|---|---|
| A Simple ‘Desk Trophy’ (e.g., Metal Earth Eiffel Tower) | The absolute beginner. Builds in 2–4 hours, teaching the fundamental tab-and-slot technique. Low-cost entry to see if you enjoy the meticulous work. | $15–$25 | You crave moving parts or complex 3D forms. It’s a static sculpture. |
| A Brand Starter Kit (e.g., Robotime Marble Run) | Hobbyists who value clear, multi-language instructions and all-inclusive toolkits. Often includes kinetic features like rolling marbles or turning gears. | $45–$80 | You want pure, challenging metal assembly; these kits often include wood or plastic bases. |
| An Articulated Challenge (e.g., Mecrob Walking T-Rex) | Builders with 1-2 kits under their belt, ready for mechanical articulation. The reward is a model with moving limbs, not just a static display. | $60–$120 | Your dexterity is low or your tolerance for “fiddly” sub-assemblies is minimal. |
| The Display Masterpiece (e.g., EngineDIY Grand Piano) | The experienced hobbyist seeking a weeks-long project. These 500+ piece models dominate a shelf and showcase serious dedication. Expect 30+ hours. | $120–$300+ | This is your first model. The high piece count and complex sequencing can overwhelm. |
What Are 3D Metal Puzzle Mechanical Models and Why Are They So Compelling?
To move from evaluating kits to understanding their soul, start here: the average kit consists of 80-3000+ laser-cut stainless steel or aluminum pieces, assembled without glue using only tab-and-slot connections. Prices reflect this scale, ranging from $25 for a modest model to over $300 for the most epic, multi-thousand-piece builds. This is the fundamental pivot from passive consumption to active creation; you are not gluing pre-molded parts but engineering a structure from a flat plane of metal into a complex, three-dimensional form. It’s a modern, hands-on subset of the broader mechanical puzzle tradition.
The core appeal for the mechanically-minded is exactly that process. Unlike a plastic model kit where parts are shaped for you, here you are the press brake, the assembler, and the QC inspector. Each piece, called an “etching,” is popped from a metal sheet. Your tools—pliers, tweezers—are extensions of your hands, bending tabs, forming curves, and finally locking joints with a precise, satisfying click. This is a hobby of tangible, minute cause and effect. The silence of concentration. The click of success. It’s a form of meditation built on metallurgy and geometry.
This is also where a key misconception is clarified: the difference between what many call “3D metal puzzles” and brands like Metal Earth. Traditionally, Metal Earth models are smaller, often single-sheet affairs (typically 4×4 inches) resulting in relatively thin, lightweight sculptures—fantastic for iconic architecture. The broader category of 3d metal puzzle mechanical models, from brands like Robotime (Rokr), Mecrob, and EngineDIY, represents an evolution. These kits frequently use thicker metal, involve multiple large sheets, and critically, often incorporate mechanical movement. We’re not just building static dragons or skyscrapers; we’re building kinetic sculptures with walking legs, turning gears, rolling marbles, or opening lids. This is the “mechanical” in the title—it’s applied kinematics in a desk-sized package. Beyond the Desk, the build process secretly teaches fundamental principles of mechanical engineering: leverage, linkage, gear ratios, and structural integrity.
The raw statistics only tell part of the story. Piece count is a lie as a sole indicator of difficulty. A 500-piece kit of a detailed but static animal might be less challenging than a 200-piece model of a working steam engine, where each piston and drive wheel must be aligned for smooth motion. Difficulty is less about quantity and more about complexity of form (tight curves, nested sub-assemblies) and the inclusion of functional mechanisms. The primary material matters, too. Stainless steel offers a brilliant, durable finish and that satisfying finishing heft, but demands more care in bending. Softer aluminum alloys are more forgiving for shaping but can feel less substantial.
Ultimately, the compulsion comes from this unique alchemy: you start with a sheaf of cold, rigid metal that feels industrial and impersonal. Through hours of focused work, you impart order and function. The end result is a desk trophy that isn’t just a representation of something, but a proof of your own patience and precision. It’s the transformation, and the miniature machine you hold in your hand at the end, that hooks you. For a deeper exploration of starting this hobby, our comprehensive guide to 3D metal puzzles contextualizes this within the wider landscape.
The Reality Check: Time, Tools, and True Skill Required for Your First Build
A beginner’s first kit, like a simple Metal Earth landmark, takes an average of 4-6 hours to complete, not the 1-2 hours often advertised. That advertised range is a best-case scenario for an experienced builder, ignoring the time spent deciphering diagrams, correcting minor bends, and hunting for dropped pieces. The true build time spectrum for the hobby spans from 3 hours for a trivial 30-piece model to 40+ dedicated hours for a multi-sheet, articulated masterpiece. Understanding this discrepancy is the first step toward a satisfying build, rather than a frustrating race against a fictional clock.
The core misconception is that these are simple, glue-free “snap-together” projects. They are not. They are exercises in micro-engineering. You are the assembly machine. The primary skill is not artistic flair, but a methodical, patient approach to following sequential instructions and executing precise, small-scale manual operations. The most common cause of failure for first-timers isn’t a lack of skill, but a mismatch between expectations and the required meticulous pace.
The Non-Negotiable Toolkit
You will need needle-nose pliers. Not optional. The kits themselves almost never include tools. A basic set of jewelry pliers with fine, smooth tips is your primary interface with the parts. You need them to cleanly bend tabs at 90-degree angles, to curl tight cylinders, and to apply pressure where your fingers are too large. Tweezers are a close second for holding tiny parts and positioning tabs into impossibly small slots. A magnifying lamp or visor is a wise investment for anyone over 40, as eye strain is a real factor. Finally, a small, hard file or emery board is for dealing with burrs—the tiny, sharp metal whiskers left on some pieces after they are punched from the sheet. Rubbing a finger along a freshly-removed part’s edge will tell you if your kit needs this finishing touch. Expect to invest $20-$40 in a proper starter toolkit; it transforms the experience from a fight into a controlled process.
Skill: The Two Most Important Capabilities
Forget prior model experience. The two proficiencies that determine success are spatial reasoning and touch.
The diagrams are 2D representations of 3D assemblies. You must constantly mentally rotate parts, visualizing how a flat piece will become the curved hull of a ship or the angled armor of a dragon. If you’ve ever been good at reading IKEA instructions or assembling furniture, you have a foundation. If not, start with a kit labeled for beginners with larger, more forgiving parts.
Touch is about feel. It’s learning the pressure required to bend a tab without fatiguing the metal, and recognizing the satisfying click of a tab fully seated in its slot through the pliers. It’s knowing when to bend a joint slightly past its final position so it springs back into perfect alignment. This is a tactile language learned only by doing. The silence of concentration. The click of success.
The Fragility Question, Answered
Yes, a completed model is delicate, but not nearly as fragile as you fear. A well-built model, where all tabs are fully bent and locked, has surprising structural integrity. It can withstand careful dusting with a soft brush or a blast of compressed air. It can be picked up and moved deliberately. What it cannot survive is a fall from desk height, pressure on its most delicate protrusions (like antennae or thin limbs), or being tossed loosely into a drawer. They are display pieces, not toys. For transport, surround them with packing foam in a small box. This inherent delicacy is part of their charm—they command respect.
The ‘Dry Assembly’ Trick: Your Secret Weapon
This is the one pre-build step 90% of beginners skip that prevents disaster. Before you bend a single tab permanently, perform a dry assembly. For each step in the instructions, gently fold the parts together without locking the tabs. Just hold them in place with your fingers or tweezers. This 10-minute investment reveals hidden interferences, clarifies confusing diagram angles, and confirms the fit of complex sub-assemblies. It’s the difference between realizing a gear assembly is backwards on step 3 versus discovering it on step 30, when you’d have to painfully disassemble two hours of work. It turns perplexing puzzles into a logical sequence.
 Mechanical Model 7")
If the prospect of starting directly on metal still gives you pause, consider a wooden kit like this sailboat as a training ground. The tab-and-slot principles are similar, but the material is more forgiving. Wood allows for slight adjustments and is less prone to permanent crimping if you make a mistake. Building one is an excellent way to develop the spatial reasoning and patience required for metal, without the added challenge of metal’s rigidity. It’s a logical stepping stone, as discussed in resources like the best 3D wooden puzzle for your first build, which builds the foundational micro-engineering mindset needed for wooden puzzle kits.
So, are 3d metal puzzles hard? They are demanding, but not insurmountably so. They require a shift in mindset from instant gratification to incremental, precise progress. The difficulty is less about innate talent and more about willingness to slow down, to use the right tools, and to engage in the process as deeply as the outcome. Your first build may test your patience, but equipped with realistic time expectations, proper tools, and the dry assembly trick, you are not setting yourself up for failure—you are preparing for a genuinely rewarding accomplishment.
Decoding the Major Brands: Robotime, Metal Earth, Mecrob, and Others Compared
Robotime’s premium wood-mechanism kits can cost over $300 and require 40+ hours, positioning them at the high-end, while Metal Earth’s iconic sheet-metal models start under $30. This isn’t just a price gap—it’s a philosophical divide between kinetic sculpture and precision miniature. The ‘metal earth vs robotime’ debate is less about which is better and more about which type of challenge you seek: the intricate, static architecture of steel or the complex, moving mechanics of wood-and-metal composites. Your choice dictates the tools you’ll use, the space you’ll need, and the very texture of the experience.
Let’s apply The ‘Click’ Test. It’s a simple, brutal metric I use on every new brand: when you bend a small tab at a 90-degree angle and slot it home, does it make a clean, definitive snick, locking the piece firmly without wobble? That sound is the result of precision-cut parts, correct material thickness, and well-engineered tolerances. It’s the first indicator of whether you’re holding a quality kit or a frustrating mess of misfit parts. The brands that consistently pass this test earn a permanent spot on my workbench.
Metal Earth is the ubiquitous entry point. Their models, primarily 2-4 inch tall landmarks and pop-culture icons, are etched onto thin, spring-tempered stainless steel sheets. With piece counts from 20 to 150 and prices between $15-$50, they are accessible but deceptively demanding. The steel is tough; bending a misaligned tab back more than once risks a fatigue fracture. Their instructions are graphical and straightforward, but they assume you understand the physics of forming a 3D curve from a flat piece. Ideal for the detail-oriented beginner who values display density over interaction. Finished models are delicate—be prepared for a dedicated, dust-free shelf.
Robotime (Rokr) occupies the opposite end of the spectrum. Their flagship kits are 3d mechanical sculpture kits that integrate laser-cut birch plywood, metal gears, and sometimes rubber bands or sand for kinetic motion. Think marble runs, grand pianos with working keys, or steam engines. Prices soar from $80 to $350, with piece counts from 200 to 1,000+. The 40+ hour build time for their largest kits is not an exaggeration; it’s a multi-week project. The instructions are often dense, multi-lingual booklets requiring careful study. This brand is for the patient builder who finds joy in creating a functional, conversation-stopping desk trophy with genuine mechanical articulation. It’s engineering, not just assembly.
Mecrob and EngineDIY fill the crucial middle ground, specializing in intricate steampunk metal model kits like dragon skeletons, elaborate ships, and gear-driven automata. They typically use a softer, often chemically blackened aluminum or brass-coated steel, which is more forgiving to bend than Metal Earth’s steel but can feel less substantial. Kits range from $40 to $150 with 200-800 pieces. The trade-off here is complexity for material finishing heft. Their designs are spectacular—gears mesh, cranks turn, and wings flap—but the softer metal can develop small burrs and requires a gentler touch during the final fiddly stages of assembly. Instructions vary widely in quality between models.
Then there are brands like Metalkitor and others often found on Amazon. This is the wild west. Prices are low ($20-$60), and the designs are often knock-offs or overly ambitious. The Click Test frequently fails here. Tabs don’t align, metal is flimsy, and instructions are translated into near incomprehensibility. However, a rare gem exists. The key is to scour community feedback on forums like Reddit (a great resource is our guide to the best metal puzzles for adult enthusiasts) for specific model recommendations, not brand loyalty.
So, how do you choose? Don’t start with the shiniest picture. Start with your goal.
* For a first build to learn the craft, choose a small Metal Earth model or a Mecrob kit under 200 pieces.
* For an impressive display with movement, target a mid-range Mecrob or EngineDIY model with clear kinetic function.
* For a deep, immersive project that teaches real mechanisms, budget for a mid-tier Robotime kit.
The brand is your blueprint. It tells you the language of the build—whether it will whisper with the subtle clicks of locking tabs or announce itself with the satisfying grind of interlocking wooden gears. Your desk, your time, your ambition. Choose the one that speaks to you.
How to Judge Difficulty: Why Piece Count is a Misleading Metric
A 50-piece model with complex, repetitive curves can be far more challenging than a 200-piece model with large, straightforward planar components. This is the core truth that shatters the most common assumption new builders make. Choosing your kit based on the number on the box is the quickest path to frustration, because true difficulty is a function of design intricacy, part geometry, and mechanical complexity, not raw quantity.
This is the hook I promised you: Piece Count is a Lie. It’s a marketing number, often inflated to imply value or ambition. In my logbook, the most grueling eight-hour stretch wasn’t on a 300-piece diorama; it was on a 90-piece insect where every leg was a sequence of eight identical, microscopic bends that had to be perfectly mirrored. The silence of concentration. The faint ache in your fingertips. That’s what a high-difficulty build feels like, regardless of the sheet it came from.
So, if the number is a false prophet, what should you look for? Based on timing and cataloging my builds, I’ve found a more reliable framework breaks down into three tangible tiers. This spectrum focuses on the type of work, not just the volume of it.
Tier 1: Foundational Focus (Sub-150 pieces / 4-10 hours)
These are your skill-builders. The defining characteristic is planar construction—you’re mostly working in two dimensions, forming flat components that slot together to create a 3D shape. Think of a simple landmark or a geometric animal. The challenge here is mastering the basic vocabulary: cleanly removing parts without bending them, making precise 90-degree folds, and learning the proper order to connect sub-assemblies so you don’t trap yourself. Frustration typically comes from a single tricky bend or a poorly illustrated step, not from systemic complexity. A Metal Earth sedan or a small Robotime treasure box lives here. It’s where you learn the satisfying click of a tab locking home.
Tier 2: Geometric Complexity (150-500 pieces / 10-30 hours)
Welcome to the realm of compound curves and nested assemblies. This is where piece count starts to dance with true difficulty. You’re no longer just building outward; you’re building inward. A dragon’s torso becomes a central core with overlapping armor plates, each requiring a specific curvature before attachment. A steam locomotive involves a boiler formed from multiple curved panels, a detailed cabin interior, and external piping that must weave through it all. The time sink isn’t just assembly; it’s dry-fitting—the critical, often-skipped step of test-fitting parts without bending the final tabs to visualize orientation and clearance. Miss this, and you’ll face the dreaded “disassembly,” which in metal models is often a destructive process.
 Mechanical Model 8")
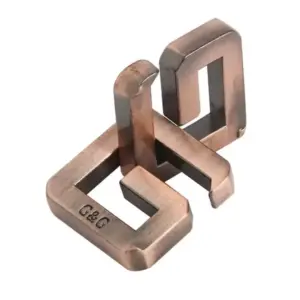
Cast Galaxy 4-Piece Silver — $14.88
Consider the Cast Galaxy puzzle above. It has only four pieces. Yet, solving its interlocking 3D geometry can stump someone for hours. This principle translates directly to metal models: a kit with fewer, more complexly shaped parts that require spatial reasoning is often harder than one with many simple, repetitive ones. It shares DNA with the challenge of solving a classic six-piece burr puzzle solution.
Tier 3: Mechanical & Structural Mastery (500+ pieces / 30+ hours)
This tier is defined by functional kinematics and structural load-bearing. You are now an architect and a watchmaker. The piece count may be high, but the real challenge is the integration of moving systems—gears that must mesh with minimal friction, walking linkages that require precise alignment, or layered assemblies that create a stable skeleton for a massive wingspan. A 500-piece static cathedral might be less difficult than a 400-piece walking mech. The time investment balloons because you must constantly test movement throughout assembly, ensuring a gear train isn’t pinned in place by a later-added panel. Brands like Mecrob and EngineDIY specialize here. The payoff is unparalleled: a desk trophy with mechanical articulation you can interact with, a true testament to the principles of engineering in your hands.
 Mechanical Model 9")
This set embodies the deceptive nature of piece counts in a different medium. Twelve pieces suggest a quick solve, but the intricate, non-intuitive interdependence creates a significant spatial challenge—much like a metal model where a central gear assembly must be perfectly aligned before the outer shell, which consists of dozens of pieces, can be added. It’s a beautiful example of a disentanglement puzzle in crystal form.
Therefore, before you buy, audit the product photos for these red flags: numerous tiny, identical sub-assemblies (tedious but not necessarily hard), many small radial parts (annoying to curve), and exposed mechanical linkages (precision-critical). Read reviews for the phrases “fiddly” or “instructions unclear on step X.” This due diligence is your true metric. It separates an enjoyable, immersive challenge from a shelf of regret, and guides you to a build that matches not just your ambition, but your skill and patience.
The Ultimate Buying Criteria: Movement, Display, and Giftability
Kits with functional mechanical movement—like gear trains or walking legs—typically add 30-50% more build time due to precision alignment requirements. This is the core trade-off between a static sculpture and a kinetic marvel. After you’ve decoded brands and true difficulty, choosing your next model comes down to these three practical outcomes: what it does, how it looks on a shelf, and who it’s for.
A moving model transforms the build from assembly into a true engineering exercise. You are no longer just connecting parts; you are debugging a mechanism. The allure is immense—a steampunk metal model kit with turning gears or a dinosaur that walks delivers a profound “desk trophy” appeal. But the reality involves meticulous calibration. Gears must mesh without binding, axles must spin freely, and linkages must have just the right amount of play. A model with 200 moving pieces isn’t just twice as hard as a 100-piece static one; it’s exponential. The finishing heft feels different, too—a kinetic model is often denser, its weight distributed across a chassis designed for motion, not just aesthetics.
For display, think in physical dimensions and environmental fragility. Most finished models range from a modest 4 inches (a small car) to an imposing 12 inches (a large dragon or ship). Measure your space. A model with delicate, protruding parts—antennas, thin wings, weapon tips—is a poor choice for a high-traffic shelf or a home with curious pets. Conversely, a solid, low-profile build like a tank or engine block is surprisingly robust. Consider dusting: a can of compressed air is your best friend; a feather duster is your nemesis. The goal is a permanent display, not a temporary toy.
This brings us to giftability. A 3d metal puzzle gift for him is a common search, but it requires careful matching. Gifting a notorious, 40-hour Level 5 kit to a novice is a recipe for frustration. The perfect gift kit balances impressive visual payoff with a manageable difficulty curve. It should say “I think you’re clever” not “I expect you to suffer.” Look for kits with clear, pictorial instructions (Robotime/Rokr excels here), included basic tools, and a defined “wow” factor upon completion—movement, size, or recognizable detail. The unboxing experience matters; premium kits with numbered part bags and a protective display case signal a thoughtful gift.
 Mechanical Model 10")
Take this Wooden Ferris Wheel Music Box Kit as a parallel example. It embodies the ultimate convergence of movement, display, and giftability. It’s a kinetic sculpture (the wheel turns) with a functional purpose (it plays music), resulting in a highly displayable centerpiece. The build teaches principles of gear alignment and structural framing—beyond the desk into basic kinematics. For a metal model seeker, this illustrates the premium tier: a multi-functional display piece that justifies its time investment with continuous engagement. Our complete guide to the wooden Ferris wheel music box kit details this exact journey.
Ultimately, your choice hinges on a simple question: do you want a monument or a machine? The static model offers pure, sculptural satisfaction. The click of the last tab. The silence of a job done. The kinetic model offers an ongoing relationship. The subtle whir of gears. The satisfying click of a lever in motion. Both are valid, but your criteria—the promise of movement, the demands of display, the intent as a gift—will point you to the right sheet of metal, waiting to become more than the sum of its precision-cut parts.
Hands-On Kit Recommendations for Different Goals (Not Rankings)
With your criteria for movement, display, and difficulty clarified, the final step is matching those needs to specific sheets of metal. After a month of methodical builds, here are my hands-on recommendations, categorized by goal rather than arbitrary rank. Each model was timed, its frustrations logged, and its final satisfying click evaluated.
The Gold Standard for a First Build
For a first build, the Metal Earth T-Rex Skeleton (127 pieces, 6-8 hour build) provides clear lessons in basic bending and cylindrical forming without overwhelming complexity. Its challenge lies in creating symmetrical leg and rib assemblies, but the large, forgiving parts and stellar illustrated instructions build confidence piece by piece. You’ll learn the fundamental tab-and-slot technique on a model that results in a surprisingly sturdy and classic desk trophy. The skill ceiling is perfect: demanding enough to feel accomplished, straightforward enough to avoid the crushing fiddly details that plague more ornate creatures.
The Most Impressive Static Display Piece
If your goal is a commanding centerpiece, the Mecrob Great Pharaoh (approx. 750 pieces, 25-30 hours) defines the category. This isn’t a model; it’s an architectural dig in metal. The finishing heft is substantial, and the layered details—from the throne’s filigree to the surrounding pillars—create incredible depth. The key challenge is repetitive sub-assemblies (dozens of identical column segments) requiring monastic patience. But the result is a museum-quality sculpture that consistently draws questions. It’s a masterclass in layered construction and arguably qualifies as one of the most intricate 3d metal puzzle displays for patient builders.
The Kinetic Marvel (For the Movement-Obsessed)
When mechanical articulation is non-negotiable, the Robotime (Rokr) Mechanical Tank stands apart. With functional treads, a rotating turret, and a working suspension system, it’s a kinetic education. The build (18-22 hours) is less about delicate bending and more about precise gear alignment and axle placement. The instructions include a primer on basic gear trains, truly taking the hobby beyond the desk. The challenge is ensuring every moving part has just enough tolerance to function without wobble—a fantastic exercise in applied tolerancing. The reward is a model you don’t just look at, but operate.
The Dragon Collector’s Ultimate Challenge
For those specifically seeking a legendary 3d metal dragon model kit, the Metal Earth Fiddler Dragon (300+ pieces, 18-22 hours) is the benchmark. It avoids being a static silhouette; its pose is dynamic, with layered wings and a coiled tail that demands careful 3D shaping. The primary challenge is the head and neck assembly—a dense cluster of small, similar-looking parts that form the snout and horns. The ‘Dry Assembly’ Trick is critical here: test-fit every facial plate before committing. The result is a creature with palpable personality and texture, a definitive build for any fantasy enthusiast.
 Mechanical Model 11")
The Bridge to Other Materials (A Wooden Alternative)
While our focus is metal, exploring other materials like wood can profoundly improve your spatial reasoning for complex kits. The Galleon Ship 3D Wooden Puzzle is a prime example. Its construction relies on laser-cut plywood sheets and a similar glue-free, slot-based philosophy. Building it teaches a different kind of structural thinking—how to create rigidity from interlocking planar frames—which directly translates back to understanding the skeleton of a complex 3d mechanical sculpture kit. For a deep dive into its historical design and build process, I documented the experience in the deep dive into building the galleon 3D wooden puzzle. It’s a worthy detour for the dedicated modeler.
The “Expert-Only” Epic
Reserve this category for when you’ve mastered the pliers and crave a months-long project. The EngineDIY Stirling Engine Model (1000+ pieces, 35-40+ hours) is less a puzzle and more a precision engineering simulator. This is a fully functional, heat-powered engine. The challenge is twofold: the microscopic size of some brass parts (requiring magnifiers and supreme dexterity) and the absolute necessity of perfect alignment for the engine to actually run. A single bent piston rod or misaligned bearing will render it a static display. The build is a marathon of frustration and breakthroughs. The silence of concentration, broken by the first, faint put-put of the flywheel turning under steam power. That is the pinnacle reward.
Pro Assembly Tips and Common Pitfalls From 30+ Builds
Bending a tab more than three times significantly increases the risk of metal fatigue and breakage, a point rarely mentioned in instructions. After building over thirty kits, I’ve found that 90% of builder frustration stems from preventable errors in technique, not the kit’s inherent difficulty. This is the practical knowledge that bridges the gap between selecting your impressive display piece from the last section and actually completing it with confidence. Let’s move from theory to the workbench.
Your Toolkit is Non-Negotiable. You need needle-nose pliers with smooth, flat jaws for clean 90-degree bends. You need fine-tipped tweezers for inserting tiny tabs into slots. For cylindrical curves, a set of mandrels or even precision screwdriver handles in graduated diameters (1mm to 10mm) will save you from crimped, polygonal-looking pipes. A dedicated bending tool with a 0.5mm radius edge is ideal for crisp folds along pre-scored lines. A magnifying lamp or headset isn’t for the weak-eyed; it’s for anyone building a kit with gears, as misaligning them by less than a millimeter will halt movement. I estimate 90% of first-time builders with moving parts misalign their initial gear train.
The “Dry Assembly” Trick. This is the single most transformative habit. Before making a single permanent bend, pop out the relevant parts for a sub-assembly—like a leg or a gear housing—and fit them together with your fingers. Just lay the tabs into their slots. This five-minute exercise reveals spatial relationships the 2D instructions can’t, preventing you from bending Tab A in the wrong sequence and making Tab B inaccessible later. It’s the difference between fluid progress and needing to break a connection to fix a mistake.
Sequencing and the “Click” Test. Always follow the manual’s numerical order. These are engineered for structural integrity, building an internal skeleton. When connecting parts, listen and feel. A proper tab-and-slot connection has a definitive, quiet snick as it seats. If it feels spongy or looks crooked, it is. Back it out and try again. Forcing it will either splay the slot (weakening the joint) or shear the tab off. This tactile feedback is where you directly engage with the principles of mechanical engineering and kinematics—understanding how load paths are created through these tiny, precise connections.
Managing Fragility and Finishing Heft. A completed model is sturdy within its design parameters but is not a toy. To dust, use a soft makeup brush or a can of compressed air held at a distance. To move it, lift from the base or the most substantial structural member—never a delicate antenna, limb, or unbraced panel. The satisfying finishing heft of a model comes from its engineered rigidity, not brute material strength. This is why understanding a brand’s design logic, as discussed in my veteran’s guide to metal puzzles that don’t break, is crucial for long-term display.
Common Pitfalls, Cemented in Metal:
* Burrs: Run your fingernail or a hobby knife gently along the edge of every part after removing it from the fret. A tiny metal burr will prevent a clean fit.
* Cylindrical Calamity: Rolling a part around a mandrel is a slow, patient roll. Do not try to crease it into a tube.
* The Drop: Work over a soft, lint-free cloth or a tray with a raised edge. A dropped piece can be nearly impossible to find and catastrophic to replace.
* Fatigue: Work in 90-minute sessions. Your fine motor control degrades, and frustration builds. The silence of concentration is a resource. The click of success is its reward.
Your next step is concrete: Before you even open your new kit’s plastic sleeve, assemble your tools on a clean, well-lit desk. Lay out that soft cloth. You are not just building a model; you are conducting a symphony of precision. Now, go make that first, confident bend.