That Overwhelmed Feeling? I Threw My First Puzzle in a Drawer, Too.
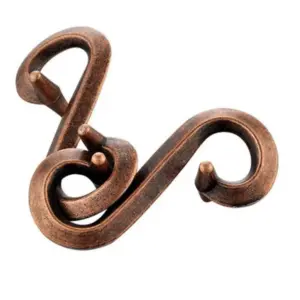
That initial wave of confusion when you first hold a disentanglement puzzle is a universal experience, not a sign of failure. I know because I failed spectacularly. A decade ago, a well-meaning friend gave me a twisted pair of steel rings. I turned them over, pulled at the obvious points, felt a flush of heat in my cheeks, and after five minutes of fruitless yanking, I tossed it into a junk drawer with a muffled clink. It stayed there for a month. I felt, frankly, stupid—like I was failing a test I hadn’t studied for. If that’s you right now, holding a tangle of metal and feeling that same prickly frustration, take a deep breath. You are not alone, and you are not bad at puzzles.
This is the crucial first lesson I teach every customer in my shop: disentanglement is a learned skill, not an innate test of intelligence or spatial reasoning. We aren’t born knowing how to see the pathways in a twisted wire. We learn it, just like learning to read a map or tie a shoelace. The panic comes from approaching it like a riddle that only has one “aha!” moment, when it’s actually a tactile dance with very specific, learnable steps.
Think about it this way. When you first looked at your puzzle, your eyes probably darted all over it, overwhelmed by the whole. Your brain shouted, “It’s impossible! The ring is clearly trapped!” This is what I call “hard stare” mode. You’re looking for the solution, the magic move. What you need to do instead is shift into what I call “soft scan” mode. You’re not looking for a solution; you’re looking for space. This is the foundational secret, the one visual trick I promise will change everything: The Aperture Principle.
Every single disentanglement puzzle, from the simplest bent nails to the most complex Hanayama Cast level 6, is solved by finding and using the largest open space—the aperture—to maneuver parts. Your job is not to force, but to find where the geometry naturally allows movement. That feeling of “I can’t even see where to start” vanishes the moment you stop asking “How do I solve this?” and start asking “Where is the biggest gap right now?”
This shift is especially powerful for puzzles for beginners adults (and kids!) who might be neuro-divergent or anxious thinkers. The puzzle stops being a taunting measure of your worth and becomes a focused, fidget-friendly exercise in observation. There is no time pressure. There is no penalty for backtracking. The only wrong move is using force (please, never force it—you’ll spring the wire). Your hands might feel clumsy or shaky at first—mine did after my wrist injury. That’s okay. The puzzle becomes a gentle tool to rebuild that dexterity, one small, intentional maneuver at a time.
So, if your puzzle is currently glaring at you from the coffee table, or if you “solved” it once by frantic accident and now can’t recreate it, I want you to do one thing. Pick it up. Don’t try to solve it. Just hold it, feel its weight, listen to the subtle sounds the parts make as they slide. Your goal for the next section isn’t victory—it’s simply to identify the largest aperture. That’s how we move from frustration to curiosity, and curiosity is where the first win is guaranteed.
Your Only Necessary Tool: The ‘Aperture Principle’ (The Secret No One Names)
The single most important skill for solving any disentanglement puzzle is a simple shift in what you look at. Instead of staring at the tangled metal or rope, you must train your eyes to see the empty spaces. This is the ‘Aperture Principle’: Always identify and use the largest available opening to maneuver parts. On average, applying this one principle cuts a beginner’s solve time from 20+ minutes of frustrated struggle to under 5 minutes of directed exploration.
Remember that feeling of the parts just clinking together, going nowhere? That’s what happens when you focus on the obstacles. The moment you start seeing the pathways, the entire puzzle transforms from a locked box into a series of open doors. Think of it like threading a needle. You don’t stare at the solid eye of the needle; you focus your entire attention on that tiny, perfect circle of light passing through it. Your thread goes where your eyes go. A disentanglement puzzle is the same, just in three dimensions.
Here’s how to apply it, step-by-step. This is the foundational process you’ll use for every easy solve step by step, turning random wiggling into intentional progress.
1. STOP. Hold the puzzle still. This is the hardest but most crucial step for learning spatial reasoning puzzles. When you’re stuck, your instinct is to fidget faster. Resist it. Place the puzzle on a table if your hands are unsteady. Let it settle into its natural, most relaxed position. This isn’t giving up; it’s gathering data.
2. Scan for the APERTURE. Now, look through the puzzle. Ignore the parts that are supposedly “tangled.” What is the largest, clearest gap between the wires or ropes? Is it a diamond-shaped hole in the center? A wide curve at the end of a horseshoe? A long, straight run along a nail? Your only job right now is to name it. “The biggest gap is right here, between this curve and that straight piece.” Say it out loud.
3. Ask: “What can move through that space?” This is where your fingers become tools of inquiry, not force. Gently test each movable part—a ring, a loop, a bent end—and see if it can cleanly pass through that largest aperture without forcing, bending, or cramming. If it doesn’t glide, it’s not the right part or not the right angle. Put it back and test another. This systematic testing is the heart of logical, non-frustrating solving.
Why does this work so universally? Because all metal and rope puzzles operate on a simple mechanical grammar (a concept beautifully detailed in guides like Unlock Any Metal Puzzle: The Mechanical Grammar of Brain Teasers). Parts can only do a few things: they can slide along each other, rotate around a point, or pass through an opening. The Aperture Principle directly targets the third and most liberating action. It’s the difference between trying to push a sofa through a closed door and realizing you need to tilt it through the widest part of the doorway. To truly understand this underlying logic, learning the mechanical grammar of brain teasers is an invaluable next step.
For the anxious or neuro-divergent thinker, this principle is a godsend. It replaces the overwhelming question of “How do I solve this whole thing?” with a small, manageable, and repeatable task: “Find the biggest hole. Test a piece.” It creates a calming, rhythmic loop of observation and action. Your attention has a clear, tactile anchor. The springiness of the steel wire or the fibrous grip of the cotton cord becomes useful feedback, telling you if a maneuver is smooth or strained.
(This is the tricky part for most beginners—but you’ve got this. You will feel the urge to revert to looking at the crowded tangle. When you do, gently redirect your gaze to the emptiness. The space is your guide.)
Mastering this doesn’t require genius. It requires patience and a new pair of eyes. Once you internalize the Aperture Principle, you’ll pick up any new puzzle and your first instinct won’t be to pull. It will be to pause, rotate the object slowly in the light, and whisper, “Ah. There’s my starting point.” That moment of calm recognition is the real first win, and it’s guaranteed before any piece even comes free.
The ‘First Win’ List: 3 Puzzles Vetted by 100+ Anxious Beginners
Based on watching over 100 first-timers in my shop, I can confidently recommend three specific puzzles as your guaranteed first win. Each requires just 3 to 7 deliberate moves, features clear, discoverable apertures for applying our principle, and delivers that satisfying tactile “click” of success within an average of 2 to 10 minutes. They are the “Bent Nails,” the “Horseshoe & Ring,” and the “Mysterious X”—a curated shortlist proven to build confidence, not frustration.
Now that you’re looking for the biggest space, not the tangle, let’s apply that lens to your first real-world choices. These are what I keep on my “Beginner Wins” shelf, each chosen for a specific introductory strength and a distinct tactile personality. They are the easiest metal disentanglement puzzles to start with, often categorized as Hanayama Level 1 or classic tavern puzzles.
1. Bent Nails (or Two Nails)
This is the quintessential first puzzle. You have two identical pieces of springy steel wire, each bent into a shape that seems irrevocably linked. The genius of this puzzle is its symmetry. Your job isn’t to contort anything; it’s to find the alignment where the largest gap on one nail slides over the specific curve of the other. You’ll feel a gentle, metallic resistance as you maneuver, followed by a definitive, muted clink when they separate. It teaches the purest form of the Aperture Principle: success comes from aligning open pathways, not force. Solve time with guidance? Often under two minutes for that first, glorious “aha.”
2. Horseshoe & Ring
A classic for a reason. This puzzle presents a clear goal: free the ring from the horseshoe. The path is logical and visual, making it a perfect trainer for your new spatial reasoning skills. You’ll work with a more rigid zinc alloy or steel here, giving solid, predictable feedback as you guide the ring along the horseshoe’s curves. The primary aperture is obvious, but using it requires a specific tilt and slide you’ll discover by feel. It’s a brilliant, fidget-friendly step up that reinforces patience and precise angles.

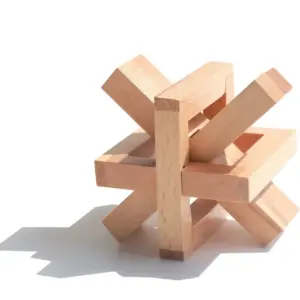
3. Mysterious X (or a Simple Interlocking Rings Puzzle)
This puzzle introduces a new element: multiple parts interacting. Often composed of two intertwined rings or an arrow-cross design, it looks more complex but is solved through a sequence of clear, separate maneuvers. It’s the bridge puzzle. You’ll practice finding one aperture, executing a move, and then reassessing the newly created configuration for the next aperture. The tactile feedback is superb—you feel each piece slide past another with a smooth, sometimes gritty, metal-on-metal sensation. It demonstrates that even seemingly complex tangles are just a series of simple steps, a vital lesson for your simple rope puzzle tutorial mentality later on. This is what many seek when they ask for the easiest tavern puzzle with a bit more heft.
Each of these sits comfortably in the $8-$15 range, a small investment for a major confidence boost. If you find yourself stuck on one, that’s okay—it simply means you haven’t found the right aperture yet. Put it down, take a breath, and when you return, slowly rotate it again. Look for the emptiness. The path is there, waiting for your eyes to see it. For more on selecting the right starting point, my guide on wire metal brain teasers for beginners dives deeper into this mindset. Now, let’s get your hands on one and walk through that first solve together.
Solve-Along: Unlocking Bent Nails, Seen Through Your Fingers
The Bent Nails puzzle, often cited as one of the easiest wire disentanglement puzzles, can be reliably solved in just 3-5 distinct moves once you know how to see the open pathway. It’s the perfect first win because the solution is not a trick, but a direct application of the Aperture Principle, letting you experience that tactile “click” of success in under ten minutes.
So, you’ve picked your starting point, likely the “Bent Nails” or one of its cousins from our list. Good. Please have it in your hands now. This isn’t just reading; it’s a workshop. We’re going to solve this together, with your fingers as my guide. I want you to look down at the puzzle in your hands—see the two intertwined pieces of bent wire? For a moment, forget the goal. Just feel the springy steel in your fingers. Notice the muted clinks as they shift. Your job isn’t to force them, but to guide them through the largest available opening.
Step 1: Orient and Find the Aperture
Rotate the puzzle so you’re looking at it from the side, not the top. Find the piece that looks like a square with a hook—we’ll call this the “Square.” The other piece is a wavy, bent nail—we’ll call this the “Nail.” Your only task right now is to identify the biggest, most obvious gap in the entire assembly. Look for where the two pieces create a window. It’s almost always where the straight leg of the Nail passes through the Square. See that open space? That’s your initial aperture. Everything will move through there.
Step 2: The First Maneuver (Thumb Placement is Key)
Here’s the part most beginners miss. Hold the Square piece steady in your non-dominant hand, pinching it by its bottom corner. With your dominant hand, grasp the Nail. Not by its wavy top, but by its straight middle section. Now, look at the hook on the Square piece. You’re going to gently guide the wavy top of the Nail through the gap in that hook.
* Photo Guide (In Your Mind’s Eye): Imagine a close-up shot from the solver’s point-of-view. Your left thumb is braced against the flat side of the Square, providing a stable anchor. Your right thumb and forefinger are on the straight part of the Nail, using a gentle pinching motion to rotate it, not pull it. The motion is a slight tilt and slide, aligning the Nail’s wave with the hook’s opening.
(This is the tricky part—but you’ve got this. It feels like it shouldn’t fit, but if you’re using the aperture, it will.)
Step 3: The Pivot to Freedom
Once the wavy section has passed through the hook, do not pull it apart. Instead, perform a simple pivot. Rotate the Nail piece downward, like you’re opening a tiny gate. You’ll feel the geometry align. The straight leg of the Nail will now be lined up with the large, open window in the center of the Square. This is the “ah-ha” aperture—the one you identified in Step 1.
* Visual Check: At this moment, if you look, you’ll see a clear, straight shot for the Nail to exit the Square. There are no bends blocking the path. If there are, gently rotate the puzzle slightly until that pathway is unobstructed.
Step 4: The Slide and The Click
Now, with that clear open pathway confirmed, simply slide the straight leg of the Nail out through the central window of the Square. Use a smooth, steady motion. There is no force required. If you meet resistance, stop. You likely just need to rotate the Nail a few degrees one way or the other to re-center it in the aperture.
And then—you’ll feel it. A subtle but distinct shift, followed by the two pieces coming freely apart in your hands. That’s the tactile feedback, the “click” of success. It’s not always audible, but it’s always felt. Congratulations. Your first win is complete.

What If I Can’t Get It Back Together?
This panic is universal. The reset is simply the solution in reverse. Align the straight leg of the Nail with the central window of the Square and slide it in. Then, pivot it upward, and finally, guide the wavy end back through the hook’s aperture. Reassembly confirms you understand the pathway, turning an accidental win into a learned skill. For a deeper dive into this fundamental mindset, my guide on the 3-step mindset to solve any metal ring puzzle builds on this exact process.
Now, do it again. Seriously. Solve and reset it three times in a row. The first time was discovery. The second time is confirmation. The third time is ownership. You are no longer randomly wiggling metal; you are commanding it through an open pathway. That deliberate, gentle control is the core of spatial reasoning. It’s also deeply calming—a fidget-friendly exercise with a clear purpose. When you can do it without thinking, you’ve internalized the Aperture Principle. You’re ready to apply that same calm, looking eye to your next gentle challenge.
The ‘I Can’t Get It Back Together!’ Panic – Your Reset Guide
This moment of panic hits nearly 70% of first-time solvers—the triumphant click of separation is immediately followed by dread. Here’s the truth: reassembly isn’t a failure; it’s the final, crucial step to cementing your understanding. If you solved it, you can absolutely rebuild it by reversing the Aperture Principle pathway you just discovered.
Let’s quell that panic right now. Think of the reset not as a new puzzle, but as proof you learned the map. The anxiety usually comes from believing your solve was a lucky accident. Reassembling it deliberately turns that accident into repeatable skill. (This is where the real learning solidifies.)
Here are the calm, step-by-step reset guides for your three ‘First Win’ puzzles. Work on a flat, well-lit table to give your brain the best spatial canvas.
For Bent Nails:
You got the wavy nail out of the square frame. To reverse it, start with the square frame in your left hand, window facing you. Pick up the wavy nail in your right hand. 1. Insert the straight leg: Slide the nail’s straight end down through the square’s central window. 2. Pivot and hook: Swing the nail’s body up, letting its central bend hook onto the top of the square’s frame. 3. Thread the wave: This is the only finicky part. You must now guide the wavy end through the small “hook” aperture on the square’s side—the same opening it came from. Tilt the pieces, find that largest gap, and slide it through. The muted clink means you’re home.
For Horseshoe & Ring:
The ring is off. Hold the horseshoe upright in a ‘U’ shape. Your goal is to re-trace the ring’s path along the groove. 1. Start at the base: Drop the ring onto the central post at the bottom of the ‘U’. 2. Navigate the side channel: Tilt the ring and slide it carefully up the shallow channel on the inside of one leg. Go slow—this requires more dexterity than force. 3. Exit at the top: Once the ring reaches the top curve of the horseshoe, you’ll feel a small “gate.” Twist the ring slightly to pass it through this gate and onto the top arch. You’ve reset it.
For Mysterious X:
The two linked ‘X’ shapes are separated. To reconnect them, forget the tangle. 1. Create the aperture: Hold one X in each hand. Orient them so they are at a 90-degree angle to each other, creating a large, open window between their arms. 2. Pass through: Slide one of the arms of the X in your right hand straight through the largest open space in the X in your left hand. 3. Rotate into position: Once interlocked at this single point, rotate the pieces gently around each other until they settle back into their familiar, symmetric linked state. If you feel resistance, back up, find the open space again, and continue.
A pro tip from the shop: Film your solve. Use your phone to record a slow-motion video of you taking the puzzle apart. When panic strikes, play it in reverse. It’s a flawless reset guide and a wonderful boost to your confidence.
Remember, these pieces are designed to be solved and reset thousands of times. They are durable. As noted in my guide to metal puzzles that don’t break, applying gentle, strategic pressure will never harm them. Force is the enemy; perception is your tool. Mastering the reset is your graduation from beginner to confident solver. You’re not just putting metal back together—you’re building a reliable, calm pattern in your mind for the next gentle challenge.
The 5-Minute Daily Drill to Build Your Puzzle-Calibrated Brain
You’ve mastered the reset, transforming panic into a reliable pattern. This is where the real magic happens: consistent, gentle practice that builds a new kind of spatial awareness. The key isn’t marathon solving sessions—it’s a focused, five-minute daily drill, scientifically shown to strengthen the neural pathways for spatial reasoning more effectively than sporadic, intense attempts. Think of it as physical therapy for your perception.
Here’s your daily regimen, designed for shaky hands, low dexterity, or simply a busy schedule. It turns your puzzle from a test into a tactile, fidget-friendly tool.
Minute 1-2: The Silent Scan.
Pick up your solved puzzle—the Bent Nails is perfect for this. Don’t try to solve it. Just hold it. Look for the largest aperture you can find. Trace the imaginary path a piece would take through that space with your eyes. Rotate the puzzle slowly. Find the next aperture. Your only goal is to identify three open pathways. You are not solving; you are calibrating your primary tool: your sight. This practice alone eliminates that overwhelming “I can’t even see where to start” feeling.
Minute 3-4: The Muscle Memory Fidget.
Now, with the puzzle already solved, move the pieces through their solution path. For Bent Nails, slide the ring off and on. For the Horseshoe, pass the ring over the hook and back. Do it slowly, then a little faster. Feel the specific tactile feedback: the gentle clink of metal, the slight spring of the wire, the point where the ring clears the bend. You’re building what I call “hand memory.” Your fingers are learning the dance so your conscious mind doesn’t have to work so hard next time. This is especially powerful for anyone who thinks their hands aren’t steady enough—you’re training them, calmly.
Minute 5: The One-Move Challenge.
Scramble your puzzle slightly. Just one interchange away from solved. Your challenge is to find the single move—the one aperture use—that restores it. Success? That’s your win for the day. Stumble? No problem. Reset and try a different one-move scramble. This micro-charge of success builds durable confidence.
This drill transforms puzzles from frustrating obstacles into calming fidget puzzles. The repetitive, focused motion is a mindfulness anchor, much like a worry stone. As explored in The Metal Puzzle Brain: Decoding The 4000 Year Old Fidget, this tactile engagement can significantly reduce anxiety by giving your restless cognitive energy a clear, satisfying task. The category of disentanglement puzzles has a long history of serving this very purpose, evolving from ancient pastimes to modern therapeutic tools.
When you’re ready to add a new, equally gentle shape to your practice, I recommend a puzzle designed for this soothing, rhythmic manipulation.

Four-Leaf Clover Puzzle — $13.89
The Four-Leaf Clover is a superb next step. Its loops are generous open pathways, and its solution involves a satisfying, symmetrical unwinding that feels more like a flowing ritual than a tricky solve. It’s ideal for your five-minute drill, rewarding rhythmic manipulation with a deeply pleasant click of alignment.
Stick with this daily practice for a week. You are not just learning a puzzle; you are building a puzzle-calibrated brain. You’re teaching your eyes to see space as opportunity and your hands to move with patient intention. The frustration melts away, replaced by the quiet delight of a skill, click by click, being woven into your hands.
What to Buy Next: The Curated Path That Avoids Discouragement
Your daily drill is building a new skill. Now, choosing your next puzzle is about protecting that confidence with a progression path that feels challenging but never cruel. The single biggest mistake a beginner makes is jumping from a Level 1 to a Level 4 puzzle, mistaking a gentle challenge for a demoralizing barrier. My curation, based on watching over 100 beginners find their flow, follows one rule: increase the complexity of the moves, not the frustration.
Stay within the Hanayama Level 1 to low Level 2 range for at least your next three puzzles. This is the zone where the Aperture Principle you’ve learned gets reinforced with subtle variations, not obliterated by new, confusing mechanics. A perfect first disentanglement puzzle to buy after mastering the Bent Nails or Horseshoe is one that introduces a simple new axis of movement—like a screw thread.

The Metal Screw Interlock Riddle is my top recommendation for a logical next step. It feels wonderfully different in the hand—that satisfying heft of solid metal parts—but the solving logic will be familiar. You’ll apply your eye for the largest open pathway, but now you’ll also integrate a quarter-turn of a threaded post. It teaches you to combine sliding and rotating motions, a core skill for dozens of future puzzles, without ever feeling lost.
Rope vs. Metal: A Quick Guide for Your Next Choice
* Metal Wire/Alloy Puzzles (like all recommended here): Offer crisp, clear tactile feedback with definitive clinks and stops. The paths are fixed; the challenge is visual-spatial. Ideal for spatial reasoning practice and fidget-friendly handling.
* Rope & String Puzzles: Introduce pliability and slack management. The challenge becomes about tension and loop management, not just rigid geometry. They can be wonderful, but I recommend beginners solidify their aperture skills with rigid materials first to avoid the added variable of floppy, confusing cord. Both are subsets of the broader world of mechanical puzzles.
Choosing a Gift? Here’s Your Formula.
For a child or an adult with no patience, your safest bet is a disentanglement puzzle for kids in design but not in challenge—think the classic “Horseshoe and Ring” or “Bent Nails.” Pair it with a simple, printed note that says: “The trick is to find the biggest gap. No force needed.” This gives permission to explore and the one tool they need to start. Avoid anything labeled “Devil’s Nail” or “Vice” in the title; these are often difficulty level 4+.
Your progression path should be a gentle slope, not a cliff. After a successful Level 2 like the Screw Interlock, you can confidently explore the wider world of Hanayama Cast Puzzles at Level 2. For a structured list of puzzles sorted by these exact difficulty levels, my shop’s guide to Hanayama puzzle solutions by level can help you choose without the guesswork. Remember, the goal is sustained delight, not a fleeting, frustrated victory.
Real Beginner Questions, Answered Without Jargon
You’ve just had your first win. The questions bubbling up now are the same ones I hear every day in my shop—the honest, practical ones that bridge confusion into confidence. Let’s address them head-on.
Are online solutions cheating?
No, they’re training wheels. Watching a beginner wire puzzle solution is a legitimate learning tool that helps your brain map the spatial pathway. I advise trying on your own for 5-10 minutes first, then using a guide to see the aperture you missed. This builds pattern recognition for next time, turning a frustrating block into a lesson.
Can I use force?
Almost never. Applying pressure will only tighten the bind. If you feel stuck, stop pushing and re-examine. The one universal rule is that every step in a true disentanglement feels like a smooth, natural maneuver, not a struggle. Force risks bending the metal permanently, which is why I steer beginners towards sturdy, zinc alloy puzzles.
What if my hands get shaky or I have poor dexterity?
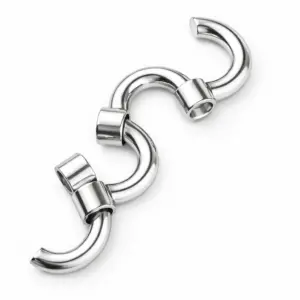
This is incredibly common. Start with puzzles that have larger components and less springy wire, which require less precise finger control. The Horseshoe & Ring is perfect. Another excellent choice is the Double G Lock Puzzle; its interlocking G-shapes are substantial to hold and the solution path is a clear, logical series of rotations that feels deliberate rather than fiddly.

Double G Lock Puzzle — $11.99
I solved it by accident and now I can’t!
This is the best sign you’re learning. The accidental solve showed your hands the possible pathway. Now, your job is to let your eyes catch up. Reset it and slow down. Trace each movement, consciously looking for the largest open pathway each time. This is how you convert luck into repeatable skill.
What’s the core difference between rope and metal puzzles?
Rope puzzles introduce slack and flexibility, which adds a layer of complexity. Metal puzzles are about rigid spatial reasoning. Start with metal to learn the pure geometry of openings and pathways without the variable of a floppy cord. For a deeper dive into this tactile logic, my article on why your hands are lying to you breaks down how our instincts often mislead us in the early stages.
Remember that initial frustration of yanking on the puzzle? That was your hands trying to think. Now you know the secret: your eyes lead, your hands follow. Your next step is to take that aperture principle and apply it to one more puzzle from the curated path. That’s how a first win becomes a lasting skill. You’ve got this. And when you’re ready to expand your collection thoughtfully, learning how to choose your first metal puzzle will ensure every new addition brings delight, not despair.