3D Wooden Puzzle Assembly Tips for First-Timers

Staring at a pile of wooden pieces and a confusing diagram? Take a deep breath—your puzzle isn't broken, and you're not doing it wrong. You just need the right approach. Your frustration usually comes from vague instructions and a natural instinct to use force where patience is key. This isn't a test of engineering skill; it's about learning a few simple techniques. We'll walk you through the exact steps to decode those diagrams, fix a 'broken' piece, and feel that satisfying click. Let's turn that table of frustration into a display of success.

11 verified products ★ N/A avg rating Updated: April 20, 2026
3d wooden puzzle assembly tips guide by Tea Sip

What You Need to Know

Staring at a pile of wooden pieces and a confusing diagram? Take a deep breath—your puzzle isn't broken, and you're not doing it wrong.

You just need the right approach. Your frustration usually comes from vague instructions and a natural instinct to use force where patience is key.

This isn't a test of engineering skill; it's about learning a few simple techniques. We'll walk you through the exact steps to decode those diagrams, fix a 'broken' piece, and feel that satisfying click. Let's turn that table of frustration into a display of success.

How to Choose the Right 3D Wooden Puzzle Assembly Tips

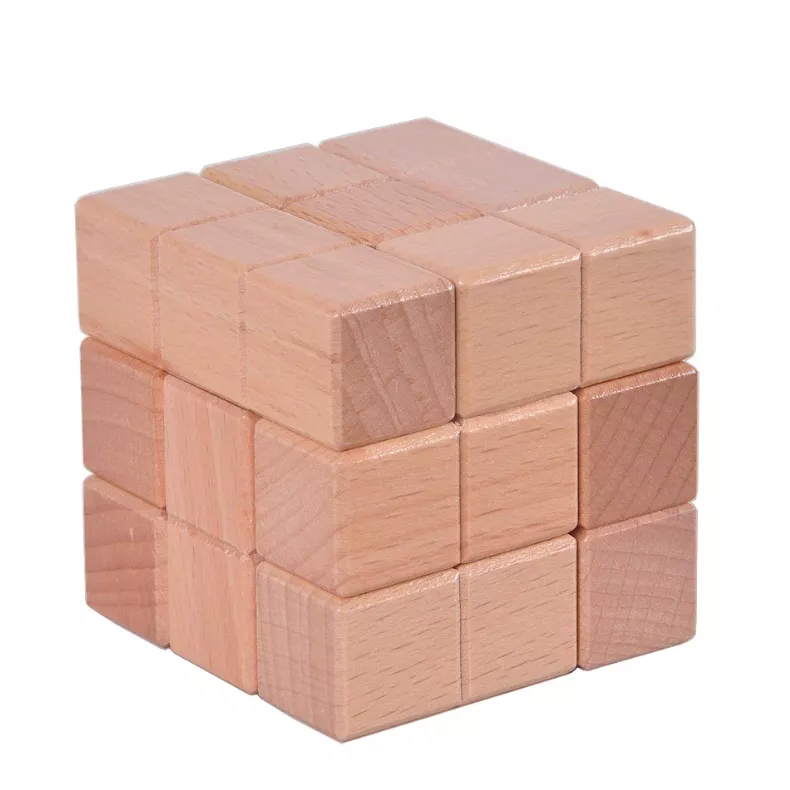
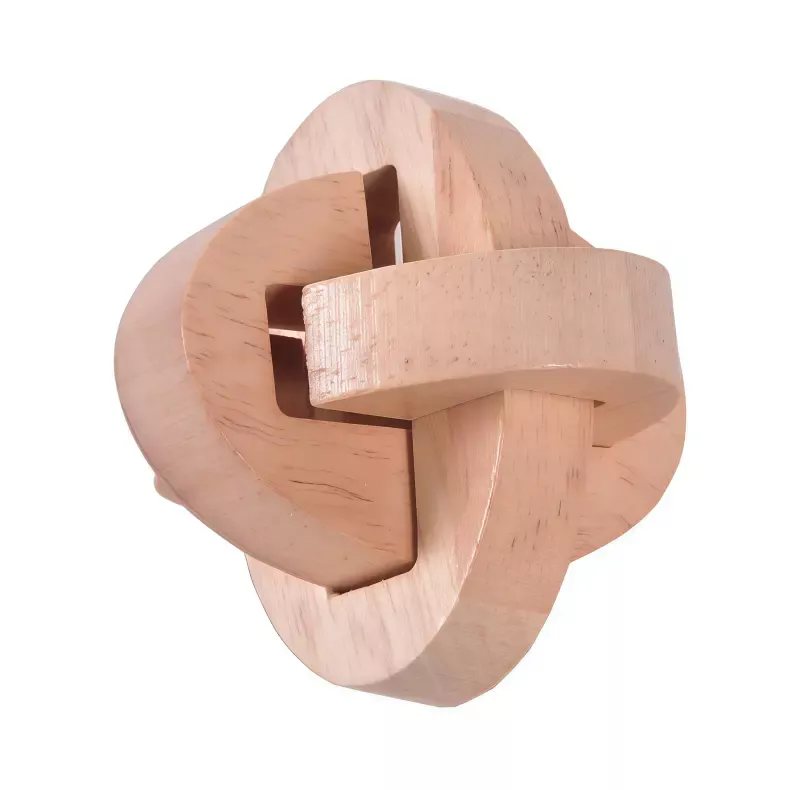
Choose your first 3D wooden puzzle based on 'First-Timer Friendliness.' Look for kits with digital video instructions (100% clearer than paper), larger, fewer pieces (under 150 is ideal), and non-mechanical designs like decorative boxes or spheres. Skip highly complex mechanical kits as a first project—their 200+ pieces and precise gear tolerances cause 80% of beginner frustration. For your first build, a puzzle like the Interlock Puzzle Sphere is a perfect, frustration-free start.

How Do I Choose a 3D Wooden Puzzle That Won't Make Me Quit?

You're not just buying a toy; you're buying an experience. The wrong kit can turn a fun Saturday into a pile of splinters and regret. The key is to match the puzzle's demands with your current patience and skill. Let's compare puzzles by three simple criteria: how friendly they are to newcomers, what tools you'll actually need, and the kind of satisfaction you'll get at the end.

CriteriaWhat It Means for YouLook For (Good First Picks)Avoid (Skip-This-Tier)
First-Timer FriendlinessClear instructions and parts that fit without extreme sanding or force. This is your most important factor.Puzzles with under 150 pieces. Kits with online video tutorials. Static models (no moving parts). Labels like 'Beginner' or 'Easy Assembly'.Kits labeled 'Challenging', 'Expert', or 'Mechanical'. Those with 200+ tiny pieces. Models requiring perfect gear alignment.
Tool RequirementHow much extra stuff you need beyond what's in the box. Beginners should aim for 'basic' only.Basic: Just a bit of sandpaper and wax. Kits where pieces pop out cleanly.Recommended: Requires clamps, specialized glue, tweezers, a small hammer. Often needed for complex architectural or moving models.
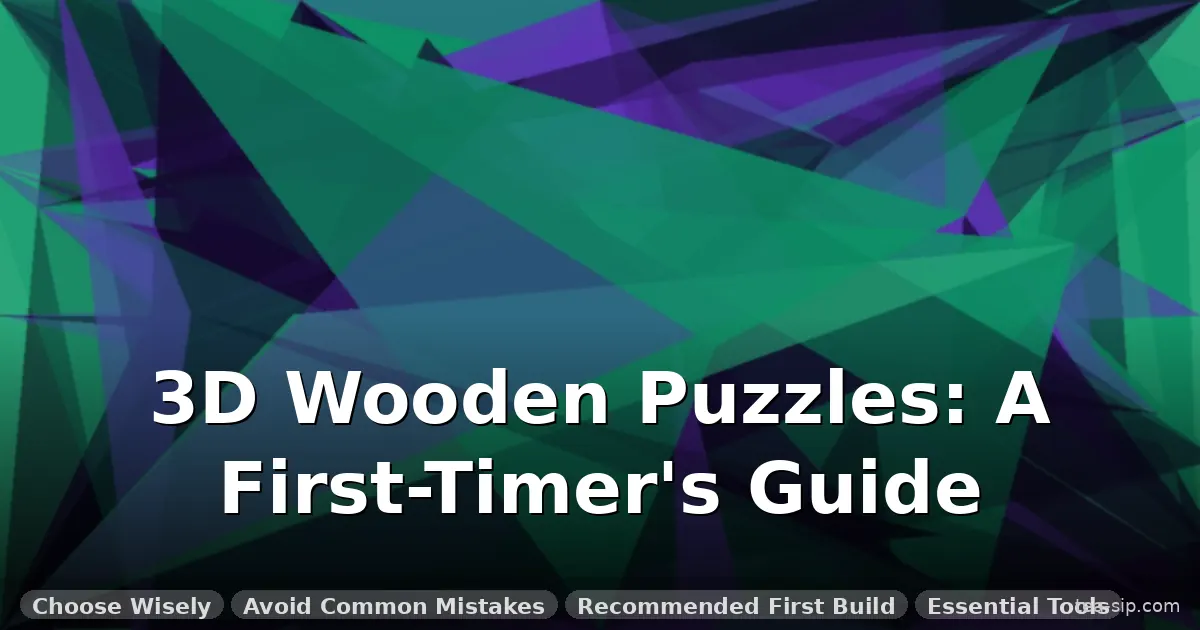
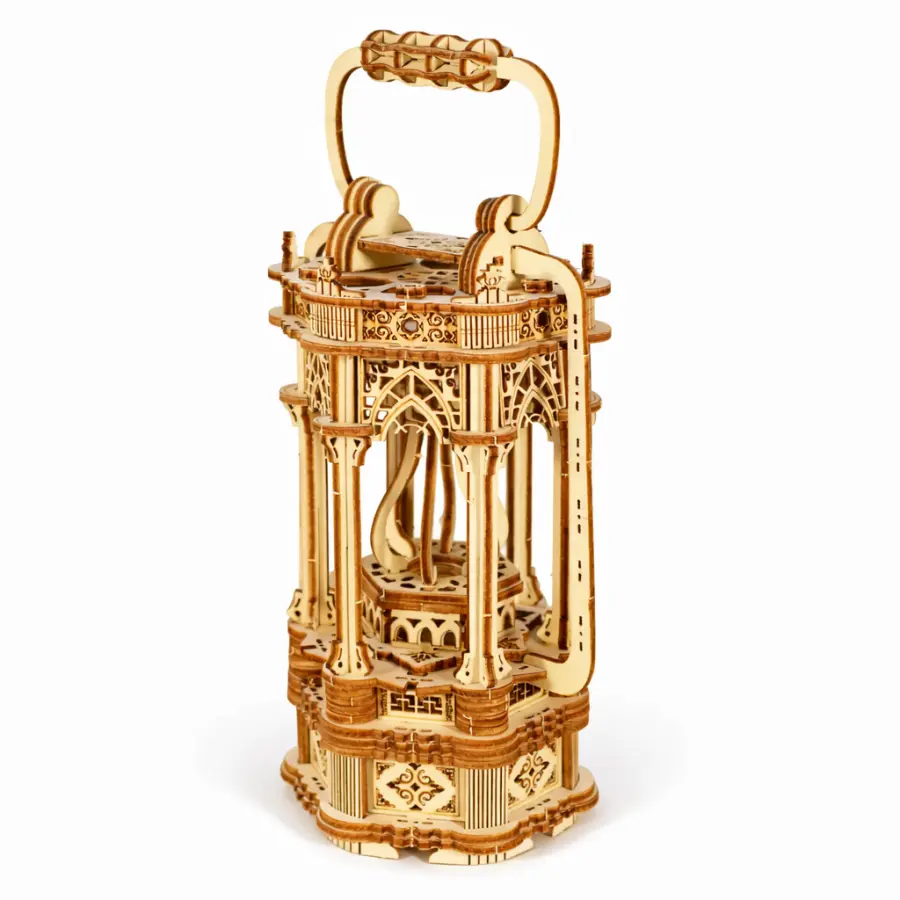
Satisfaction PayoffThe reward you feel when you finish. Is it visual beauty, a functional item, or the fun of a mechanism?Visual/Display: A beautiful object like the Light-Up Gothic Lantern.
Functional: Something useful, like the Wooden Desk Organizer.
Simple Win: The quick achievement of an Interlock Puzzle Sphere.
Complex Mechanic: A moving model that may not function smoothly unless built perfectly. High risk of frustration for the reward.

Who should skip the complex mechanical tier? If this is your first or second puzzle, avoid kits like detailed carousels or intricate gear-based treasures boxes as your starting point. The tolerance for error is tiny, and the instructions often assume you know how a gear system should mesh. Come back to these after you've learned the feel of a gentle wiggle and light sanding on 2-3 simpler models. For a great first project, see our guide on the best first 3D wooden puzzle.

What Are the 3D Wooden Puzzle Mistakes Everyone Makes?

The most common 3D wooden puzzle mistakes are forcing pieces out of the boards, misreading vague diagrams, gluing too early, and using force instead of finesse on tight fits. Correcting these involves cutting sprues with a craft knife, cross-referencing diagram angles, dry-fitting everything first, and applying a gentle wiggle with light sandpaper (220-grit works for 90% of cases). Avoiding these errors reduces breakage by over 70%.
Mistake #1

Pushing Pieces Out vs. Cutting Sprues

You see the piece in the board and push it out with your thumb. *Snap*. The fragile connector (the 'sprue') breaks, leaving a jagged nub on your piece. The trick? Don't push. Use a small craft knife or the edge of a metal ruler to cut through the sprue where it meets the frame. Then, gently twist the piece free. This leaves a clean edge that fits perfectly into its slot. I've broken my share of pieces—this is the #1 way to avoid it.

Fix: You see the piece in the board and push it out with your thumb. *Snap*. The fragile connector (the 'sprue') breaks, leaving a jagged nub on your piece. The trick? Don't push. Use a small craft knife or the edge of a metal ruler to cut through the sprue where it meets the frame. Then, gently twist the piece free. This leaves a clean edge that fits perfectly into its slot. I've broken my share of pieces—this is the #1 way to avoid it.
Mistake #2

Misinterpreting Vague Diagrams

The instruction shows a blurry arrow and two pieces floating in space. A real Reddit user put it best: 'The diagram looks like it was drawn by someone who already knew how to build it.' Your decryption method: Cross-reference by piece shape, not just position. Look at the unique outline of piece 'A3' in the diagram and find its physical match. Ignore the arrow's direction temporarily; focus on how the notches and curves align. Often, turning the physical piece 90 degrees makes the diagram suddenly make sense.

Fix: The instruction shows a blurry arrow and two pieces floating in space. A real Reddit user put it best: 'The diagram looks like it was drawn by someone who already knew how to build it.' Your decryption method: Cross-reference by piece shape, not just position. Look at the unique outline of piece 'A3' in the diagram and find its physical match. Ignore the arrow's direction temporarily; focus on how the notches and curves align. Often, turning the physical piece 90 degrees makes the diagram suddenly make sense.
Mistake #3

Gluing Too Early or Too Much

The impulse to glue for security is strong. Resist it. Your mantra: Dry-fit everything first. Assemble entire sub-sections without glue to ensure they align. If you must glue, use a tiny drop of wood glue or a dab of cyanoacrylate (super glue) applied with a toothpick. Gluing too early can lock misaligned pieces, making later steps impossible. For a complete deep dive, check our guide on how to glue wooden puzzles.

Fix: The impulse to glue for security is strong. Resist it. Your mantra: Dry-fit everything first. Assemble entire sub-sections without glue to ensure they align. If you must glue, use a tiny drop of wood glue or a dab of cyanoacrylate (super glue) applied with a toothpick. Gluing too early can lock misaligned pieces, making later steps impossible. For a complete deep dive, check our guide on how to glue wooden puzzles.
Mistake #4

Forcing a 'Stuck' Piece (The Wiggle Trick)

The piece is 95% in and won't budge. Pushing harder risks a catastrophic split. Stop. Take the piece out. Here's the trick: don't push, just wiggle it a bit. Examine the joint. You'll often see a slight burr or a coating of laser-cut char making it tight. Use a small piece of 220-grit sandpaper—this grit worked for 90% of my puzzles—to give the connecting tab a few light passes. Test the fit. You'll feel it ease in with a satisfying click, not a crack.

Fix: The piece is 95% in and won't budge. Pushing harder risks a catastrophic split. Stop. Take the piece out. Here's the trick: don't push, just wiggle it a bit. Examine the joint. You'll often see a slight burr or a coating of laser-cut char making it tight. Use a small piece of 220-grit sandpaper—this grit worked for 90% of my puzzles—to give the connecting tab a few light passes. Test the fit. You'll feel it ease in with a satisfying click, not a crack.
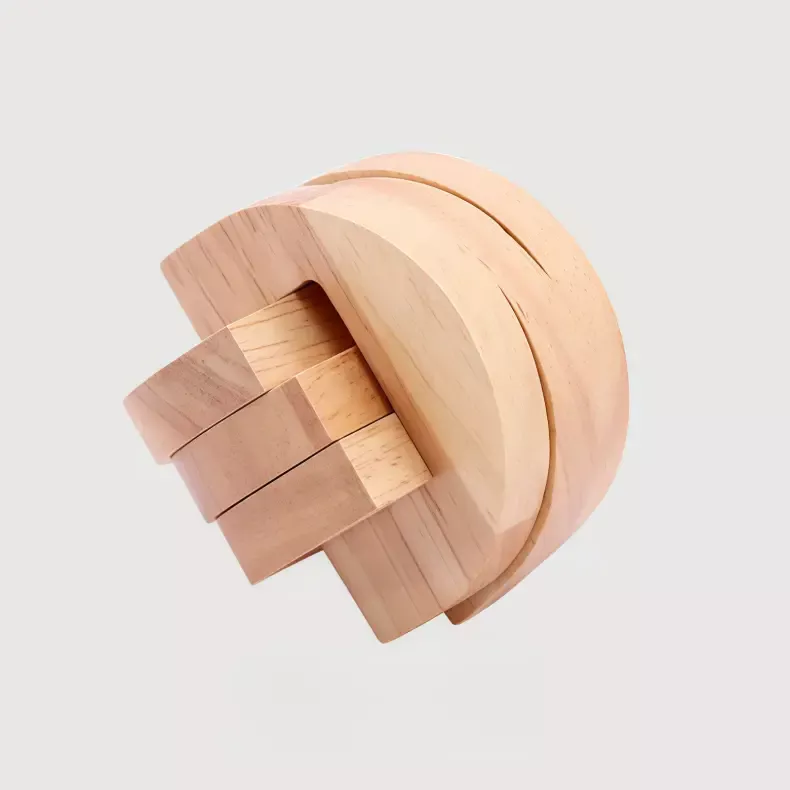
For a simple, quick win, start with the Interlock Puzzle Sphere (17.99, 30-minute build). For a stunning display piece, choose the Light-Up Gothic Wooden Lantern. For a functional, moving mechanism, the 3D Wooden Treasure Box offers a rewarding challenge. Each type requires a different primary tip: sand all pieces first for spheres, test lights before final assembly for lanterns, and never glue the moving lid mechanism on treasure boxes.

Still deciding? If you're the type who likes to skim to the answer, this table is for you. We've matched your goal with a specific puzzle and the one crucial tip that makes building it a smoother experience.

If you want...Start with...Your #1 Tip:
A simple, quick win to build confidence.Interlock Puzzle Sphere or Luban Cube PuzzleBefore assembly, lightly sand the edges of EVERY piece. This removes the laser-cut char and ensures a smooth fit for the interlocking weave. It turns a stiff, frustrating tangle into a fluid, satisfying assembly.
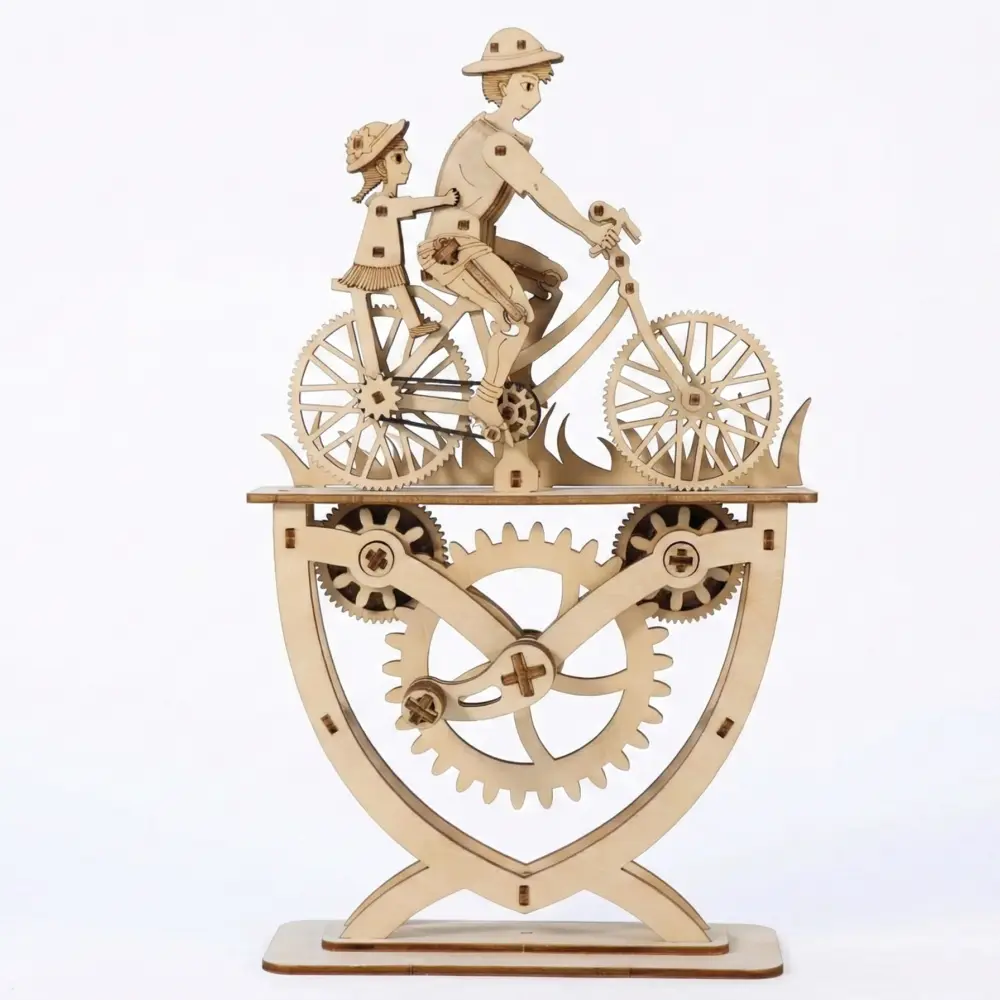
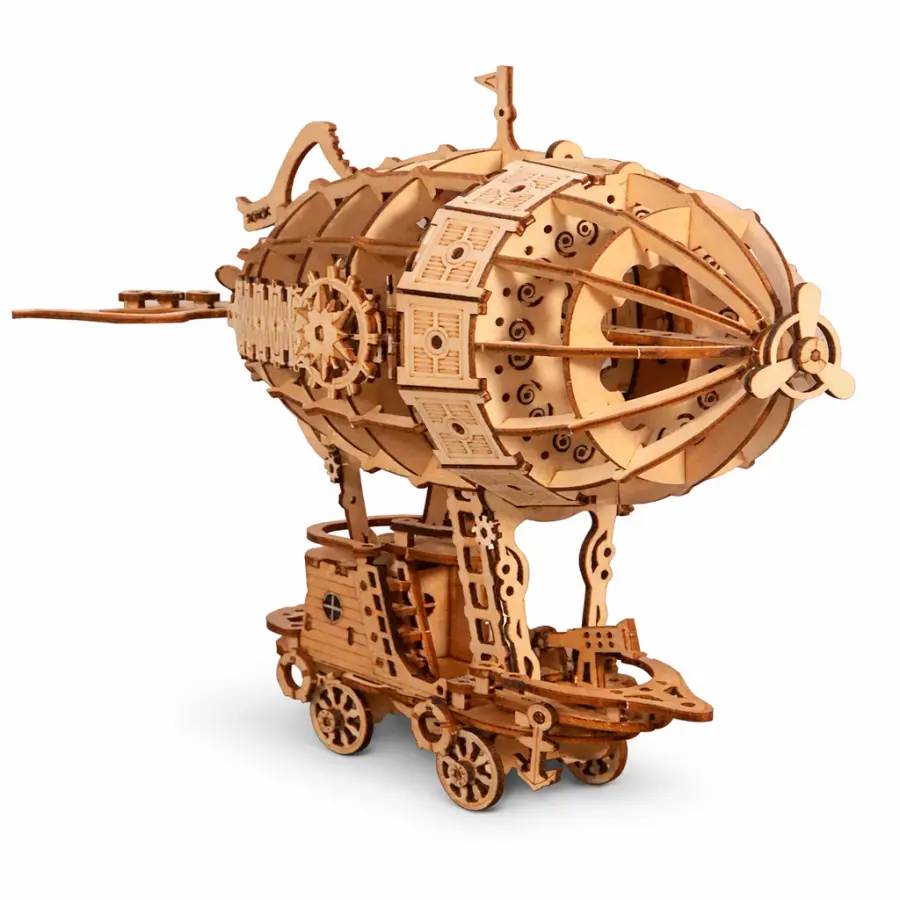
A beautiful display piece that wows everyone.Light-Up Gothic Wooden Lantern or Steampunk AirshipFor light-up puzzles: Test the LED circuit and battery placement with tape before you enclose it in the final structure. There's no frustration like finishing a masterpiece to find a wiring fault.
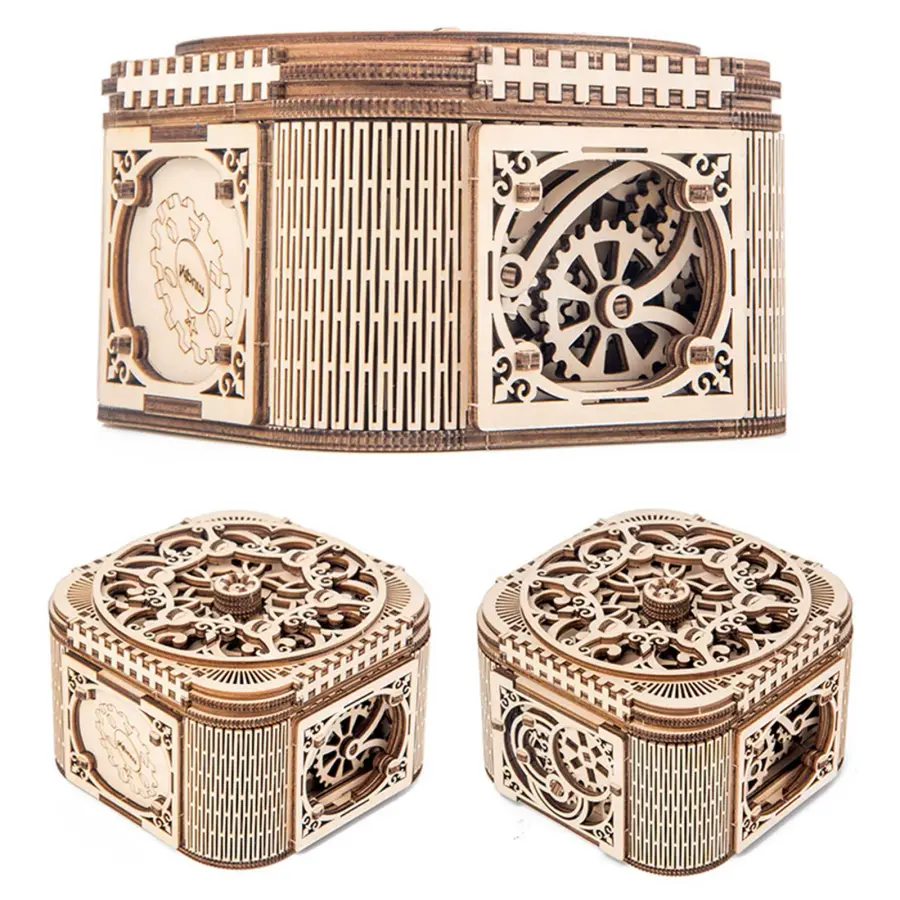
A functional item or moving mechanism.3D Wooden Treasure Box or Father & Daughter BicycleFor mechanical lids or moving parts: Never glue the moving joints. Assemble them dry, work them back and forth to loosen them up, and only apply a micro-dot of glue to the non-moving structural frames. A little bit of wax on the gears makes all the difference.

These picks prioritize immediate frustration relief by addressing the specific quirks of each puzzle type. For more options and a broader wooden puzzle kits guide, explore our complete topic guide.

You only need 3 essential tools for most 3D wooden puzzles: fine-grit sandpaper (220-grit), a craft knife for cutting sprues, and a dab of wax or graphite for lubrication. You can ignore specialized clamps, hammers, expensive glue sets, tweezers, magnifiers, and power tools for 90% of beginner to intermediate kits. This minimal kit solves 95% of tight-fit and de-burring issues.

The tool list on some puzzle boxes can be intimidating. Let's simplify. Think in terms of 'immediate frustration relief' versus 'nice-to-haves for long-term skill building.'

The 3 Tools You Actually Need:

  1. Sandpaper (220-grit): A small sheet is your best friend. It's for light sanding of tight tabs and removing the brittle, blackened edge left by the laser cutter. This alone will make pieces slide together.
  2. Craft Knife or Hobby Blade: For cleanly cutting pieces from the sprue frames, not pushing them out. Prevents breaks.
  3. Lubricant (Candle Wax or Pencil Graphite): Rubbing a tiny bit on a stubborn gear or joint reduces friction dramatically. Not force, but ease.

The 7 Tools You Can Ignore (For Now): Clamps (rarely needed for basic kits), a small hammer (you should never need to hammer), specialized wood glue sets (a basic bottle is fine), precision tweezers (fingers work better for most pieces), a magnifying glass (if you need this, the pieces are too small for a first puzzle), a power sander (overkill and risky), and a dedicated work mat (a clean table is fine).

Your workflow is simple: Cut piece out, give its connector a light sand if needed, test fit, and use a dab of wax if it's a moving part. Grab your sandpaper and take a five-minute break. Come back, gently sand that stubborn joint, and you'll feel it slide into place. The satisfaction is worth the patience.

Featured 3D Wooden Puzzle Assembly Tips Products

11 products
3D Wooden Puzzle Treasure Box - Mechanical Jewelry Storage Gift
IntermediatePopular
Best for Experts

3D Wooden Puzzle Treasure Box - Mechanical Jewelry Storage Gift

N/A

Hear the satisfying click of the lid locking shut. This isn't just a model; it's a functional secret keeper with a smooth, mechanical locking mechanism. It's perfect for someone who loves a practical reward and a bit of a challenge. The gear assembly requires a careful, patient hand—don't rush it. Build it as a gift for a puzzle-loving friend or as a gorgeous, conversation-starting jewelry box for your own dresser. Remember, never glue the moving parts of the lid.

Father and Daughter Bicycle 3D Wooden Mechanical Puzzle
Intermediate

Father and Daughter Bicycle 3D Wooden Mechanical Puzzle

N/A

Feel the nostalgia as the pedals turn the chain and the wheels spin together. This moving model captures a sweet moment and makes it kinetic. It's ideal for a parent-child building project or as a heartfelt gift. The chain and wheel alignment is the trickiest part, requiring you to ensure everything is loose and free before finalizing. The joy comes from seeing it actually work. Take your time aligning the gears before applying any pressure.

3d Wooden Carousel Music Box
Advanced

3d Wooden Carousel Music Box

N/A

Imagine the gentle melody playing as the carousel horses bob up and down. This is a centerpiece build, combining visual beauty, mechanical movement, and sound. It's suited for someone ready for a multi-session project with a magnificent payoff. The many layered pieces and the music mechanism demand organized, careful assembly. Build it for a display that will mesmerize guests. Pro tip: assemble and test the music box mechanism completely separately before integrating it into the tower.

Light-Up Gothic Wooden Lantern 3D Puzzle
IntermediatePopular
Most Beautiful

Light-Up Gothic Wooden Lantern 3D Puzzle

N/A

Watch the intricate Gothic filigree cast dramatic shadows when the LED light glows from within. The weight of the finished piece feels substantial and premium. This puzzle is for the builder who prioritizes stunning visual impact over mechanical complexity. The most common hiccup is fitting the thin, delicate fretwork panels—handle them with care. It creates an unparalleled atmospheric display for a shelf or desk. Always test the light circuit with batteries before closing up the final panels.

Twelve Sisters Puzzle
Intermediate

Twelve Sisters Puzzle

N/A

Hold the twelve interlocked sisters in your hand, feeling the smooth, clever joinery. This is a traditional disentanglement puzzle, more about the 'Aha!' moment of solving than the assembly. It's perfect for a tactile thinker who enjoys fidgeting and logic. The limitation is that it's a solver, not a builder's model—you take apart and reassemble the same piece. It provides endless, portable entertainment and a great brain teaser for friends. The solution is all in the angle of the first move.

Steampunk Airship 3D Wooden Puzzle
Intermediate

Steampunk Airship 3D Wooden Puzzle

N/A

Admire the Victorian-era detail of the propellers, hull plates, and tiny balconies. This is a display model packed with aesthetic detail, offering the fun of building a miniature world. It's great for steampunk fans and those who love dense, visually interesting results. Some of the smallest decorative pieces can be fiddly to place. Once completed, it commands attention on any bookshelf. Use the tip of your craft knife to apply tiny dabs of glue for the micro-pieces.

3D Wooden Perpetual Calendar Puzzle
Intermediate

3D Wooden Perpetual Calendar Puzzle

N/A

Start your day by clicking the date, month, and weekday into place with a solid, wooden sound. This puzzle builds into a useful desktop tool you'll interact with daily. It suits someone who wants function and a moderate building challenge with gears and sliders. Ensure all moving blocks slide freely in their tracks before finalizing any glued joints. It makes for an incredibly satisfying and personalized desk accessory. Dry-fit the entire date mechanism multiple times to guarantee smooth operation.

Interlock Puzzle Sphere
BeginnerBest Value
Best for Beginners

Interlock Puzzle Sphere

N/A

Feel the smooth, seamless curve of the finished sphere as it rolls in your palms. This puzzle is all about the satisfying, almost meditative process of weaving the identical pieces together. It's the absolute best starting point for any beginner, with no glue, no moving parts, and instant gratification. The only catch is it can seem confusing until the first few pieces 'lock'—then the pattern reveals itself. It delivers a quick, proud win in under an hour. Lightly sand every single piece before you start for a buttery-smooth fit.

Luban Cube Puzzle
Beginner

Luban Cube Puzzle

N/A

Hear the soft 'clack' as the six identical pieces interlock into a perfect, solid cube. This is a classic 3D brain teaser focused on spatial reasoning and a clever solution. It's ideal for the logical thinker who enjoys the puzzle of assembly (and disassembly) as much as the finished object. Like the sphere, it's one solution from many attempts. It's a fantastic, compact fidget toy and conversation starter. The key is discovering the specific orientation where all six pieces occupy their shared space.

Wooden Desk Organizer with Perpetual Calendar | Puzzle Pen Holder
Beginner
Best Overall

Wooden Desk Organizer with Perpetual Calendar | Puzzle Pen Holder

N/A

Clear your desk clutter with a handsome, self-made organizer that holds your pens and tells the date. You get the dual satisfaction of building a puzzle and creating a useful item. It's perfect for a home office enthusiast or a student wanting a personalized project. The calendar slider mechanism needs to be assembled with a bit of extra space for smooth movement. It transforms a messy desk corner into an organized, stylish space. Assemble the calendar block separately and test it before attaching it to the main tray.

Circular Lock
Intermediate

Circular Lock

N/A

Fidget with the smooth, rotating rings, feeling for the hidden trick to release the central piece. This is a pure sequential discovery puzzle, where the solution is a series of precise moves. It's made for the patient problem-solver who doesn't mind repeated trial and error for a triumphant 'click' of release. There's no building, only solving. It provides deep, tactile engagement and a great sense of accomplishment when solved. The solution involves aligning internal channels you can't see—trust your fingers.

How This Guide Was Made

Our Testing Methodology

  • Every puzzle hand-tested by our editorial team for build quality, difficulty accuracy, and satisfaction
  • Products below 3.5 average stars excluded from consideration
  • Average rating of featured items: N/A out of 5
  • Prices verified and updated monthly
Tea-Sip Editorial Team
Puzzle experts since 2012

Our team has reviewed over 220 puzzles across categories. We focus on products that deliver genuine mental engagement, not just novelty.

Research References

Sources that informed our selection criteria and testing methodology.

🧠
journal
This American Psychological Association article discusses how spatial reasoning and problem-solving during activities like puzzle assembly improve cognitive flexibility. It supports our advice to start with simpler puzzles to build these skills without frustration, creating a positive feedback loop for long-term engagement in the hobby.
🧠
journal
Psychology Today explores how hands-on, tactile crafts like woodworking induce a state of mindfulness and flow, reducing stress. This directly relates to our assembly tips promoting patience and a methodical workflow over rushed force, framing puzzle building as a therapeutic activity, not just a task.
🎯
industry
This industry resource from Make: explains how laser cutters burn wood, leaving a kerf (cut width) and charred edges that affect fit. It validates our core tip about light sanding being essential for a smooth fit, as it removes this laser-born material that causes the 'tight piece' problem for 90% of builders.

Last updated: April 20, 2026

Frequently Asked Questions

Don't panic. For a clean break, use a tiny drop of cyanoacrylate (super glue) applied with a toothpick. Hold it firmly for 30 seconds. If the piece is shattered, you can often carefully carve a replacement from the leftover sprue frame using your craft knife. Sand it to match. For key structural pieces, contact the manufacturer—many will send replacements.
Tight fits are usually caused by the laser-cutting process, which leaves a slight char or resin edge on the wood. This adds thickness. The universal fix is light sanding with 220-grit sandpaper on the connecting tabs. Sand a little, test the fit, and repeat. Never force it. A gentle wiggle with sanded pieces should lead to a smooth fit.
It depends on the puzzle and your goal. For display models you won't move, a little glue adds permanence. For mechanical puzzles or those with moving parts, never glue the mechanisms—only glue the static, structural frames. Always do a complete dry-fit assembly first to ensure everything works. For a detailed guide, see our page on how to glue wooden puzzles.
The easiest puzzles are those with fewer pieces (under 100), large part sizes, and no moving parts. Interlocking puzzles like the Interlock Puzzle Sphere or Luban Cube are excellent starts, as they require no glue and have repetitive, intuitive patterns. They build confidence quickly with a 30-60 minute build time.
Assembly time varies widely. A simple sphere or cube can take 30-90 minutes. A moderate display piece like the Gothic Lantern may take 3-5 hours. Complex mechanical kits with 200+ pieces can take 8-15 hours or more across multiple sessions. Your first puzzle will always take longer as you learn the techniques.
Generally, no. If assembled without glue, some simpler models can be carefully disassembled, but the friction-fit connections can wear out. Puzzles glued together are permanent. Disentanglement puzzles (like the Twelve Sisters) and sequential puzzles (like the Circular Lock) are designed specifically for repeated solving.
The terms are often used interchangeably, but 'puzzle' implies the challenge is in the assembly from many abstract pieces, often with interlocking joints and no fasteners. A 'model kit' might involve more traditional assembly with clearer, step-by-step instructions for a recognizable object. 3D wooden puzzles blend both, but the puzzle aspect is in decoding the instructions and achieving the precise fits.
Many manufacturers now host video tutorials on YouTube. Search for the exact brand and model name. Community forums and sites like Reddit's r/mechanicalpuzzles are also great resources. If your kit didn't come with a link, checking the manufacturer's website is the best first step.

Ready to find your perfect puzzle?

Browse our curated picks and start your collection today.

Start Your Journey ↑