The Kitchen Table Moment: Frustration, Weight, and the Promise of a ‘Snick’
You’re sitting there now, likely at a kitchen table, the forge-cooled weight of it resting in your palm. You turn it over and over. The ring is trapped, encircling the curved limbs of both iron-like arcs. You push. You pull. You try to slide it off an end, but the closed loop blocks you. It will not yield.
This is the precise moment of quiet frustration I know well. The classic two-horseshoe disentanglement puzzle typically takes a first-time solver between 60 seconds and several minutes of patient maneuvering, a timespan that stretches when you’re staring at a seemingly permanent tangle. Your thumbs test the solidity of the metal—often a cast zinc alloy with that substantial, cool-to-the-touch heft—and a fleeting, utterly human thought passes through your mind: Could I just… force it? The puzzle, a design dating back to the 19th century and inspired by a blacksmith’s wares, seems to mock the idea with its immutable geometry. You are not holding a trick; you are holding a lesson in topology, and it is a stubborn teacher.
I found my first one at a flea market, mistook it for a simple trinket, and spent 45 minutes in silent, stubborn defiance of its logic. I judged it unfairly. The quality of a puzzle like this isn’t in its difficulty, but in the specific, satisfying ‘snick’ sound the ring makes when it finally clears the horseshoe’s curve. That sound is your destination.
The promise here is simple. You are not missing strength or dexterity. You are missing one core principle—the gap-creation trick. This is the elegant, counter-intuitive topological key. The solution is a gentle, precise mechanical sequence where, paradoxically, you must move the pieces into a tighter, worse position to discover the path to freedom. Your current frustration is the first, necessary step on a short path to a very specific triumph. Let’s identify what you’re holding, and then we’ll create that gap.
Anatomy of a Flea-Market Find: Knowing What You’re Holding
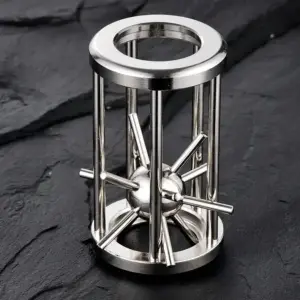
A classic horseshoe ring puzzle is a three-piece disentanglement puzzle consisting of two identical metal horseshoes linked together and a single ring that appears permanently trapped on their curves. The seeming impossibility arises because the ring’s inner diameter is smaller than the combined width of the two horseshoe shanks side-by-side, yet larger than any single, obvious gap—a clever topological trap made from typically cast zinc alloy with a cool, substantial weight.
That stubborn lesson you’re holding has a lineage. Its design directly echoes the utilitarian ironwork of a blacksmith’s shop, a clever take on familiar objects turned into a test of spatial reasoning. The two horseshoes are not merely bent wires; they are mirror images, their curved ends and straight shanks creating a closed, interlocked system. The ring, typically 1.5 to 2 inches in diameter, rests on this system, sliding along the curves but blocked at every turn by the junction where the horseshoes meet.
Look at it now. Name the parts in your hand: the Ring, the Curve of each horseshoe, and the Shank (the straight leg). The critical point, the one that currently feels like a dead end, is the Junction—where the two shanks cross and are riveted or welded together. This junction is the lock. The ring cannot pass over it. Your brain, logically, searches for an opening wider than the ring, scanning the gaps between the curves. You won’t find one. This is the core of the frustration: you are trying to solve a problem of width when the actual solution is a problem of alignment.

The typical construction is cast metal, often a zinc alloy, which gives it that satisfying heft for a common price range of $12 to $16. It’s not flimsy; it has a permanence that makes the impossibility feel all the more real. This is intentional. A good puzzle has weight—both physical and psychological. It must feel like a real object, not a trivial trick, so its eventual solution carries the gravity of a genuine discovery. For a deeper appreciation of its craftsmanship, you can take a deep dive into the horseshoe lock puzzle’s design and history.
So, you have two horseshoes, one ring, and no apparent exit. The junction is a fixed lock. The ring is blocked. Every intuitive push and pull only tightens the trap. This is the precise moment where you must abandon intuition and learn the language of the puzzle. The path out isn’t found by pulling away from the blockage, but by moving deliberately into it, into a worse tangle, to create a temporary, hidden gap. That is the gap-creation trick.
The Core Revelation: Topology and the Counter-Intuitive ‘Gap-Creation Trick’
The core trick—the gap-creation principle—is this: to free the ring, you must first twist and slide both horseshoes into a position where they appear more entangled. This action creates a temporary, hidden gap in the geometry that the ring can slip through. This counter-intuitive “worse-before-better” move is the universal key to most wire disentanglement puzzles, and mastering it transforms frustration into focused spatial reasoning. You aren’t pulling things apart; you’re reconfiguring the space between them.
Think of it not as breaking a lock, but as threading a needle. You don’t shove the thread at the eye; you carefully bring it to the right angle, often from a position that feels sideways or awkward, until the path aligns. Your horseshoe puzzle is a three-dimensional maze made of metal, and your hands are navigating it. The initial, intuitive strategy—to pull the ring straight away from the welded junction—will always fail because the geometry physically prevents it. The only successful pathway is topological, a sequence that changes the relationship of the pieces, not their distance.
Here is the mechanical heart of the gap-creation trick for your puzzle: you must bring the two free ends of the horseshoes through the ring and then past each other. This action temporarily traps the ring in a new, tighter-looking configuration. It feels wrong. Your brain will scream that you are making it worse. But in doing so, you have performed a topological maneuver. You have moved the ring from being around the closed, blocked side of the assembly to being positioned around a new section where a solution path now exists. You have created an exit by first closing a door and opening a window.
Why does this feel so counter-intuitive? Because our brains are wired for direct extraction. If something is stuck, we pull. This puzzle, and topology itself, teaches that freedom is often found through indirect reconfiguration. It’s a physical lesson in lateral thinking. When you twist those free ends through the ring and cross them, you are not jamming the puzzle; you are asking a new question of its geometry. The answer, after that twist, is a clear slide along the newly aligned curves.

This principle is not unique to your flea-market find. It is the foundational grammar for an entire class of puzzles. Once you understand gap-creation, you possess a mental toolkit for approaching more complex disentanglements. You stop seeing a tangled mess and start seeing potential pathways. To expand this thinking, explore the mechanical grammar of brain teasers and universal topological principles.
So, hold your puzzle with new eyes. You are not stuck; you simply haven’t yet performed the specific reconfiguration that the metal geometry allows. The frustration you feel is the friction between your linear intuition and the puzzle’s non-linear truth. The coming steps are simply the physical execution of this topological trick.
The Liberation Sequence: A Phase-by-Phase Walkthrough
The solution is a four-phase mechanical sequence. Forget force; this is about precision and trusting the gap-creation principle.
Phase 1: Align for the Twist (Setting the Stage)
Lay the puzzle flat. Identify the free end of each horseshoe: the straight, open prong. Your goal is to manipulate these ends to create the crucial gap.
The Setup: Orient the puzzle so one horseshoe is mostly horizontal. Hold this base shoe steady in your non-dominant hand, pinching it near its closed curve. With your dominant hand, grasp the ring and the angled horseshoe together. This is your movable unit. Push the ring along the shafts until it rests against the inside of the closed curve of the base horseshoe. You’ve just eliminated slack. This feels counterproductive—you’re making the ring more trapped. But in topology, you must first define the constraints before you can exploit them.
Phase 2: The Critical 90-Degree Pivot (Creating the Gap)
This is the heart of the solve and where almost everyone gets stuck. With the ring held firmly against the curve, rotate the entire movable unit—the ring and the angled horseshoe—90 degrees upward.
The Pivot: Your non-dominant hand stays put, holding the base horseshoe flat. Your dominant hand rotates everything it’s holding upward, perpendicular to the table. The ring will now be tilted on its side. Do not let the ring slide away from the curve during this pivot. Hold it there.
Why This Works: Before the twist, the ring’s hole and the horseshoe shafts are aligned on the same plane. The ring cannot slide off because the closed heels block it. By twisting 90 degrees, you misalign the planes. You’ve entered the “worse” state. But look carefully at the free ends now. A new, viable exit path has been created. You have traded a broad, useless alignment for a narrow, specific gap. The puzzle is now ready for its escape move. Adopting the right 3-step mindset to solve any metal ring puzzle in your hand is key here.
Phase 3: The Slide and Clear (Executing the Escape)
The pivot has done the hard work. Now, with the unit still rotated, perform a deliberate slide. Still holding the ring and the angled horseshoe together, guide the ring along the length of the now-vertical free end of the base horseshoe. You are sliding parallel to the metal.
The Maneuver: Slide the ring all the way to the very tip of that free end. You will feel it stop. This is the moment. Now, while maintaining the 90-degree orientation, you can finally pull the ring—and the horseshoe it’s still attached to—directly away from the base horseshoe’s tip. It will clear. You will hear and feel that precise, satisfying ‘snick’ as the ring releases from the first horseshoe.
Phase 4: The Final Disentanglement (Completing the Solve)
The hardest part is over. You now have the ring attached to only one horseshoe. The second separation is almost trivial. Simply maneuver the ring through the open end of the remaining horseshoe. It will slide off with no further contortions. The ring is free. The two horseshoes are separate. Place the three pieces on the table. Breathe. That is the triumph.
The Moment Most Get Stuck: Troubleshooting the 90-Degree Twist
The pivotal hang-up occurs for most solvers immediately after the crucial twist. You’ve performed the counter-intuitive 90-degree rotation, the ring is now seemingly more ensnared, and every instinct screams to pull it straight back. That instinct is your enemy. This is the precise checkpoint where frustration peaks and the gap-creation trick either clicks or fails.
Here is the exact dead-end: you twist, see the ring is now past the closed curves, and then you try to slide it directly off the end of the now-visible straight shank. It won’t budge. It jams firmly. The metal binds, the progress halts, and you might conclude the puzzle is defective. It is not. You are simply one subtle, deliberate move away from freedom. The error is not in the twist, but in the action you take immediately after.
Your hands are telling you a lie of geometry. They see an open path and pull. But topology requires a final reconfiguration. After the twist, the ring is not yet aligned with the true exit—the gap you so carefully manufactured is still partially blocked. To clear it, you must execute what I call the “secondary pivot.”
Do not pull. Instead, with the puzzle in the twisted state, apply gentle downward pressure on the ring while simultaneously rotating it another 45 degrees along the same axis as your initial 90-degree turn. Think of it as continuing the corkscrew motion you started. You are not forcing it; you are guiding the ring’s hole to ride along the edge of the metal into the final position of maximum freedom.
Here is your tactile checkpoint: As you perform this secondary pivot, you will feel a distinct, subtle shift as the ring’s internal diameter drops into perfect alignment with the thickness of the single horseshoe shank it now encircles. The binding pressure releases. The path is clear. Only now do you slide the ring smoothly down the straight length and off the open end.
If your ring is past the curves but won’t come off, you have almost certainly stopped at the twisted state and tried a linear extraction. You have missed the crucial follow-through. The puzzle’s design genius is that the solution isn’t one move, but a fluid, two-part maneuver: the twist to create the gap, then the pivot to occupy it. Reset. Go back to the post-twist position. Feel the bind. Now, instead of fighting it, lean into it. This moment is a perfect example of why your hands are lying to you and the real way to troubleshoot metal puzzles.
This moment is the entire lesson. It teaches you that in disentanglement, the point of maximum constraint is often the gateway to release. Your job is not to flee from the tight spot, but to move through it with precision. Pass it, and the ring doesn’t just come free; you understand why it’s free.
The Crucial Missing Chapter: How to Reassemble Your Puzzle
Mastering the puzzle isn’t complete until you can reverse the mechanical sequence and put it back together—a challenge that stumps over half of first-time solvers within five minutes of their initial triumph. True understanding means controlling both directions of the topological path. Reassembly isn’t just a bonus step; it’s the synthesis phase where you prove you internalized the gap-creation trick.
Here is the logical reversal, broken into deliberate phases.
Phase 1: The Starting Stance. Hold the two horseshoes in your left hand—parallel, their open ends aligned. In your right hand, hold the ring. Your goal is to thread the horseshoes through the ring, not the other way around. Position the ring so its plane is parallel to the floor. Introduce the two horseshoes downward through the center of the ring, letting them hang inside it. You are now in the mirror image of the final solve position.
Phase 2: Recreating the Bind. Remember the 90-degree twist? To reassemble, you must first create the opposite bind. With the horseshoes hanging inside the ring, tilt the entire assembly. Now, twist the horseshoes 90 degrees relative to the ring. This is the counter-intuitive move again. You are intentionally putting them into the “worse,” seemingly more tangled state. You will feel the metal bind. This is correct. You are manually rebuilding the constrained geometry.
Phase 3: The Pivot and Settle. Reverse the pivot maneuver. With the horseshoes twisted inside the ring, gently rotate and pivot the entire assembly, allowing the curves to find and settle into the grooves of the ring. Your aim is to guide the ring so it rests around the necks of both horseshoes, just above the curves. Listen for the soft ‘snick’ of metal settling into place.
Phase 4: The Final Alignment. The last step is pure alignment. Simply untwist the horseshoes back to their natural, parallel state. As you do this, the ring will travel smoothly down the straight lengths, coming to rest in the center, perfectly captured. The puzzle is reassembled. The cycle is closed.
This reverse process answers the desperate question, “I solved it but now can’t get it back together.” The failure point is almost always trying to force the ring back over the curves. The secret, just as in the solve, is to use the twist to create the necessary pathway. For more on this elegant reversal, see our guide to unlocking the unseen logic of your ring metal puzzle for reassembly.
Why is this chapter so crucial? Because it cements the lesson. In my workshop, a puzzle isn’t truly “solved” until it can be returned to its starting state without hesitation. This act of reversal proves you understand the space the metal moves through.
Why the ‘Click’ Feels So Good: The Psychology of Frustration to Flow
The definitive ‘snick’ of the ring clearing the metal isn’t just a sound—it’s the brain’s reward for a specific cognitive shift, a transition from helpless confusion to focused action that psychologists link to the ‘flow’ state. This satisfaction is amplified because you didn’t just follow steps; you internalized a fundamental principle of spatial reasoning that turns impossible into inevitable.
Think back to the moment you were stuck, turning the puzzle over and over. That was cognitive load—your brain trying to process a 3D path using 2D logic. The frustration is a signal that your current mental model is wrong. When you finally accepted the counter-intuitive twist, you surrendered the wrong map. Your mind stopped searching broadly and focused narrowly on the sequence. This is the pivot. The world narrowed to the path of the ring. Time compressed. This is flow.
The satisfaction is multilayered. First, there’s the relief of tension—the resolution of the “I can’t” feeling. Then, there’s the pleasure of insight, the “aha!” that literally changes how you see the object. Finally, there’s the confidence of mastery, especially after successful reassembly. You didn’t escape the maze; you memorized its walls. This process taps into a deep-seated human drive to decode and order our environment, a tradition explored in the history of mechanical puzzles.
The physical artifact grounds this abstract win. The cool, substantial weight of the puzzle makes the success feel earned, not digital. The final satisfying ‘snick’ is the auditory stamp of completion, a direct causal feedback your brain craves. You commanded the metal, obeyed its topological rules, and were rewarded with a clear, sensory result.
This entire frustration-to-triumph arc—from confusion, to focused flow, to resolution—is the hidden value of a good disentanglement puzzle. It’s a miniature, safe simulator for solving larger problems. It teaches you that the barrier is often perspective. That’s why the click feels so good. It’s the sound of a lesson locking into place. To delve deeper into this satisfying psychology, consider the insights in our article on the psychology and 4000-year-old appeal of the metal puzzle brain.
From Apprentice to Artisan: Your Next Disentanglement Challenge
After mastering the horseshoe’s gap-creation trick, you’ve built a foundational skill applicable to dozens of classic wire puzzles. Your logical next step is a puzzle that introduces a new mechanic while relying on the same patient, topological thinking. This progression transforms your skill from a one-time trick into a transferable tool.
Two puzzles on my workshop bench make perfect successors. The first is a natural evolution of the two-piece form.

Four-Leaf Clover Puzzle — $13.89
The Four-Leaf Clover Puzzle maintains the satisfying heft but with interlocking, organic curves. It’s still a two-piece separation, but the path is less obvious. You’ll need to apply your new instinct: when stuck, which deliberate constraint creates the necessary exit?
For a more significant leap, introduce a linked-ring mechanic. This is where you graduate from apprentice thinking to artisan-level planning.
Cupid’s Arrow Heart Lock adds a third piece—a heart, an arrow, and a lock. Here, the mechanical sequence becomes a dance. You must manage the relationships between all three independent pieces, a perfect step up that reinforces the core lesson: freedom is found through intentional, patient manipulation. This puzzle is a classic example of a disentanglement puzzle, a category with a rich history.
This is how you build a solver’s intuition. You started at a kitchen table, frustrated by a simple ring. Now you understand that the barrier was never the metal, but a missing principle. That same weight in your palm is now a familiar teacher.
For a broader view of this satisfying genre, explore our guide to the best metal puzzles for adults and over-thinkers looking for a next challenge or contemplate the solver’s touch and how to choose your next metal brain teaser with a collector’s eye. Your next satisfying snick awaits.