The Desk-Top Stalemate: When Force Is the Wrong Language
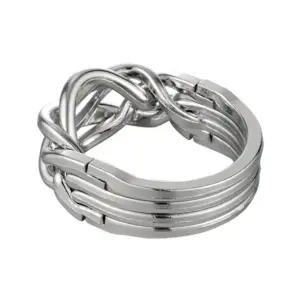
You’re staring at it on your desk. Two gleaming, interlocked discs that refuse to budge. You’ve twisted, turned, and maybe even felt a flash of frustration as your fingers slip against the smooth, cool metal. The instinct is to push harder, to muscle through the resistance. This is the first and most common diagnostic error: treating a precision mechanism like a deadlock. The solution lies not in force, but in understanding the language of its machined tolerances—often as little as 0.001 inches of designed play between parts.
That substantial feel in your hand? That’s roughly 1.5 to 2.5 ounces (40-70g) of zinc alloy, typically plated in nickel or antique silver. For the $12 to $20 you or your gift-giver invested, you didn’t purchase a brute-force test. You acquired a tiny, elegant machine. Forcing it isn’t just ineffective; it risks galling the fine finishes or, in extreme cases, creating a real, permanent jam (that subtle, grating sensation is your warning). This is why a Hanayama Cast Disk is rated a Level 2, not a 1: it demands more than casual play, but it absolutely does not require strength.
Set it down for a moment. The goal shifts from “winning” to “listening.” Forget what it looks like. Feel what it does. Pick it up again, but this time, hold it loosely in your palm. Don’t try to solve it. Try to diagnose it. Does one disc spin freely within the other, or does it bind after a few degrees of rotation? Can you tilt one plane relative to the other, or does it catch? Is there any minute sliding motion along the seam?
That binding you feel isn’t a “no.” It’s a data point. It’s the puzzle telling you about a hidden internal channel or keyway reaching its limit. Your job is to map those limits. This is precisely why the interlocking metal disk puzzle feels so immovable—it’s a designed system of precise stops, not a solid mass.
So, we abandon the language of force. We pick up the lexicon of mechanics: rotational axis, tolerance, binding, tactile feedback. The path out of this desk-top stalemate begins not with a secret trick, but with a simple, patient question. What are the allowed motions? The answer is already in your hands, waiting to be heard.
Anatomy of an Enigma: Your Puzzle’s Secret Machinery
The shift from feeling its motions to understanding its machinery is crucial. Your puzzle isn’t just stuck pieces; it’s a precise mechanical system measuring roughly 1.8 inches (4.5 cm) in diameter and weighing about 2 ounces, where each part—the discs, the hidden channels, and the rotational axis—serves a specific function in creating and releasing its elegant lock. This internal architecture, designed by masters like Oskar van Deventer for the Hanayama Cast Disk, is what separates a casual Level 1 puzzle from this more thoughtful Level 2 challenge.
Think of the two discs not as flat coins, but as three-dimensional plates, each with a specific thickness and a machined finish. They are your puzzle’s primary housing components. Between them, running along their inner faces, are the channels and keyways. These are not random scratches; they are precisely milled pathways that dictate all allowed motion. A channel is a groove that permits sliding, while a keyway is a shaped opening designed to accept a specific protruding feature (a key) from the opposite disc. Their intersection is often the release point.
The rotational axis is the imaginary line around which one disc can spin relative to the other. But here’s the first insight: in a quality puzzle like this, that axis is not fixed. It can translate—shift side to side or up and down—as guided by those internal channels. The binding you feel? That’s the edge of a keyway making contact, a designed limit telling you that pure rotation on the current axis is blocked. The plating—nickel or antique silver—isn’t just for looks. It provides a specific coefficient of friction, affecting grip and making subtle alignment shifts visually trackable under light.

This leads to the most critical concept: tolerance. This is the minuscule, engineered gap between moving parts. In a well-made cast metal puzzle, this tolerance is tight—often less than a millimeter. It’s why forcing feels so wrong; you’re trying to compress metal. The solution pathway exploits this exact tolerance, using it to slide keys through openings that seem impossibly small. (This is also why a puzzle can feel “looser” after many solves; you’ve polished the pathways with use.)
Oskar van Deventer’s Cast Disk is the benchmark here. As a Hanayama Level 2, its complexity lies not in the number of pieces, but in the interdependence of its motions. A Level 1 puzzle might guide you with obvious channels. A Level 2, like the Disk, requires you to discover the axis translation yourself. It expects you to experiment with combining rotations with slight shifts. This is the core of the cast metal puzzle solution steps for this entire category. For a complete map of this progression, you can explore structured solutions for Hanayama puzzles by difficulty level.
So, what are you holding? A self-contained, portable machine. Its state—locked or free—is determined solely by the spatial relationship between its channels and keyways along its movable axis. Understanding this anatomy turns the mysterious object into a readable diagram. The next step is learning the language to query it, which is where our diagnostic framework comes in.
The Core Principle: It’s Not Stuck, It’s Precisely Locked
Your puzzle isn’t stuck; it is in a state of perfect, machined alignment. This is the single most important concept for solving any rotational disentanglement puzzle. A disk puzzle like the Hanayama Cast Disk employs a sequence of temporary, deliberate locks—first a rotational lock, then a translational one—that must be navigated in the correct order, much like a two-stage combination lock. Understanding this transforms frustration into diagnosis.
Think of the interlocking not as a permanent fusion, but as a precisely timed dance between two components. Each piece has a “keyway”—a shaped negative space, channel, or slot. These keyways align only at specific, fleeting orientations in three-dimensional space to create a “gate” for the other piece to pass through. The puzzle feels solid because you are, in engineering terms, in a “locked phase” of its cycle. Your task is to find the sequence of moves that cycles it into the “release phase.”
This is where the distinction between a rotational lock and a translational lock becomes your core diagnostic tool. A rotational lock means the pieces cannot spin relative to each other because internal geometries are butting against each other. To unlock it, you must find the exact rotational axis where they can spin. A translational lock means the pieces cannot slide apart because their channels are not aligned. To unlock it, you must first achieve the correct rotation, then apply a precise shift or tilt.
This is why “forcing” feels so catastrophically wrong. The beautiful machined finish and satisfying weight (typically 1.5-2.5 oz) belie incredibly fine tolerances—often within a few thousandths of an inch. When you apply torque to a rotationally locked assembly, you are jamming those precisely milled surfaces against each other. The grating resistance you feel, that binding sensation, is not a challenge to your strength. It is the puzzle’s unequivocal tactile feedback, whispering: “Wrong axis. Try a different combination of movements.”
So, is there a general method? Absolutely. It’s a diagnostic process of querying the puzzle along its available degrees of freedom to discover which lock is currently active and what specific alignment will deactivate it. You are not fighting the mechanism; you are learning its language of cams and channels. The next section will give you the precise framework—the Three Axes of Motion—to conduct this interrogation. For now, hold your puzzle and feel for that binding. It is not your enemy; it is your first clear piece of data. This principle of reading mechanical feedback is the heart of solving, a concept explored further in our article on how to unlock any metal puzzle by understanding its mechanical grammar.
The Three Axes of Motion: Your New Diagnostic Framework
To solve any two-piece rotational puzzle without instructions, you must systematically test its three fundamental axes of motion. Every disk-shaped interlocking puzzle operates within this simple three-dimensional space. Mastering this framework transforms you from someone guessing to someone diagnosing, reducing the expected first-time solve duration from a frustrating hour to a methodical 10-15 minute inquiry.
With the principle of precise locks established, we move from abstract concept to practical tool. Your hands are the diagnostic instruments; the puzzle’s subtle tactile feedback is the readout. You are not looking for the solution yet. You are mapping the machine’s operational boundaries. Pick up the two interlocked discs. Forget “solve.” Think: “Interrogate.”
First, establish your fixed frame of reference. Hold one disc as still as possible in your non-dominant hand. This becomes your “base.” The other disc, held in your dominant hand, is the “tool” you will manipulate. All tests are movements of the tool relative to the stationary base. Your goal is to gently probe for any “give”—the slightest movement before a binding lock stops it.
Axis X: The Spin (Rotation around the center). This is the most obvious axis. Does the tool disc rotate smoothly around the shared center point? Try clockwise and counter-clockwise. Don’t force. Does it rotate a few degrees and stop? Does it rotate a full 360 degrees but feel like it’s sliding through detents or catching on internal features? The answer is critical data. Free spin means the rotational lock is disengaged. A hard stop means it’s actively engaged. A grind through notches means you are moving through a channel or keyway—you are on the right track, exploring the intended pathway. (A common beginner’s error is to fixate only on this axis, cranking it back and forth in frustration. This is like trying to open a door by only jiggling the knob up and down.)
Axis Y: The Tilt (Rocking one plane relative to the other). Now, can you rock the planes of the two discs out of parallel? With the discs held face-to-face, try to tilt one edge of the tool disc towards you while the opposite edge moves away, as if you were slightly opening a hinged locket. Apply only gentle pressure. You are testing for angular play. Many disk puzzles have their primary release hidden here. A successful tilt often means you’ve disengaged a lip or cam, freeing the next stage of movement. If it tilts smoothly to a point, note the angle. If it refuses to budge, the tilt is locked by the current rotational (X-axis) position. This is the core interplay.
Axis Z: The Shift (Lateral slide along the plane). This is the subtlest test. With the discs held parallel, can you slide the tool disc laterally—north, south, east, west—within its own plane? We’re talking millimeters, maybe less. Apply equal, opposing pressure with your thumbs and fingers. You are feeling for lateral tolerance. A positive shift indicates the discs are not centrally pinned; their interlocks are likely in a channel that permits this slide. A complete lack of shift suggests the pieces are seated in a central “hub” position, often a transit point between solution phases.
Now, the diagnostic power: these axes are never independent. The state of one dictates the available movement in the others. Your mission is to discover the sequence. The universal logic is this: A binding lock on one axis is almost always a command to explore a different axis first. Can’t spin (X)? Try a tilt (Y). Can’t tilt (Y)? Try a micro-shift (Z). Found a new tilt (Y)? Now re-check the spin (X). You are performing a structured search, cycling through X, Y, Z movements, listening and feeling for changes in resistance. This is the essence of the three-step mindset for solving any metal ring puzzle.
Think of it as navigating a three-dimensional maze where the walls themselves move based on your position. A specific combination of tilt and rotation will align internal channels to permit a shift. A specific shift will then allow a new degree of tilt. This iterative probing is the puzzle solution framework for beginners and experts alike. (I time my solves by how few probe cycles I need. The record for my Hanayama Disk is three. The first time, it took me forty-seven.)
This framework demystifies the process. There is no “magic” twist. There is only the systematic exploration of a finely machined space. The moment of separation—the release point—is simply the final state where all interlocks have been sequentially disengaged through this methodical axis manipulation. And reassembly? It’s the same diagnostic process in reverse, a perfect test of whether you truly learned the machine’s language or just memorized a sequence of twists. Ready to apply the framework? Let’s walk through the generic sequence your specific puzzle is waiting for.
A Guided Exploration: Applying the Axes to Your Disk
To apply the diagnostic framework, perform a systematic, hands-on exploration of your puzzle’s three axes of motion. This methodical probe cycle, which can take a novice 10 to 20 minutes of focused attention, transforms random twisting into informed discovery, leading directly to the moment of separation.
You now understand the theory. The forty-seven probe cycles from my first attempt are behind you. Now, let’s translate the X, Y, Z framework into physical, tactile action. Pick up your two interlocked discs. This is not about solving a puzzle; it’s about conducting a diagnostic interview with your specific machine.
Step 1: Establish Your Baseline – The X-Spin (Rotation).
Hold the puzzle comfortably in both hands, each thumb on a different disc. Apply gentle, opposing rotational pressure as if trying to turn one disc clockwise and the other counter-clockwise. Does it spin? Most likely, it rotates a few degrees and then binds solidly. This is your first data point: the primary rotational axis is locked. The binding tells you the internal keyways are misaligned. Note the exact point where motion stops—this is a boundary in the maze. (The binding sensation is the machined faces of the channels pressing together; forcing here risks galling the soft zinc alloy finish.)
Step 2: Introduce the Y-Tilt (Pitch).
Maintain that light, constant rotational pressure at the binding point. Now, with your fingers, carefully introduce a Y-Tilt. Think of rocking one disc forward and the other back, changing the angle between their planes. Do this slowly. Can it tilt? You are searching for a subtle “give.” As you tilt, you may feel the rotational binding loosen slightly—the walls of the maze are shifting. This is the iterative process: tilt a degree, check for rotational movement. Tilt another degree, check again. You are hunting for the specific angular relationship where the X-axis lock temporarily disengages.
Step 3: Execute the Z-Shift (Translation).
When you find the precise Y-Tilt that frees the X-Spin, you will feel a distinct, small rotational movement become possible—perhaps a 5-10 degree turn. This is not the solution, but a critical intermediary state. This new rotational position has, in turn, altered the alignment of the channels to permit a Z-Shift. Now, try to slide one disc laterally relative to the other, parallel to their shared face. Use the pads of your thumbs. If nothing moves, return to Step 2 and hunt for a different Y-Tilt angle. The correct sequence will present a clear, smooth lateral shift. You’ll feel the weight of one disc move independently. (For those with arthritis or limited dexterity: perform this on a soft cloth on a table, using your palms to apply the tilting forces and your fingertips for the fine shifts. The puzzle’s 1.5-2.5 oz weight provides enough inertia to help you feel the movements.) This is a prime example of why your hands often lie to you when solving metal puzzles—they want to apply force, not finesse.
Step 4: The Iterative Loop & The Release Point.
That first Z-Shift is the proof of concept. You have now changed the puzzle’s fundamental engagement. Return to Step 1. Re-assess the new X-Spin. You will find the binding points have changed. Repeat the cycle: test rotation, find the new critical Y-Tilt that relieves the bind, discover the next permitted Z-Shift. With each loop, the discs will gain more independent mobility. The final loop concludes not with another shift, but with the discs simply coming apart in your hands. The release point is often accompanied by a satisfying, low-frequency snick—the sound of the last machined edge clearing its counterpart. That is the ‘Aha!’ moment. You didn’t force it; you navigated it.
This guided exploration is the universal key to how to solve an interlocking disk puzzle. The exact angles and sequence of shifts are unique to your puzzle’s design, but the diagnostic protocol—Spin, Tilt, Shift, Repeat—is constant. By applying it, you learn the language of your specific piece. This learned tactile feedback is what makes reassembling the metal ring puzzle not a dreaded reversal, but a confident test. You now know the pathway; walking it backwards is simply a matter of recalling the sequence of gates you passed through. Master this, and you have moved from being stuck to becoming a solver, equipped to separate interlocking metal discs of countless designs.
Reverse-Engineering the Click: The True Test of Reassembly
Reassembly is where your new knowledge is proven. If separation felt like a series of discoveries, reassembly is the logical, deducible proof of your understanding. For the Hanayama Cast Disk—a Level 2 puzzle—a novice’s reassembly might take 2-5 minutes after their first solve, a clear measure of whether the mechanical principles have truly been internalized.
You now hold two separate discs. The triumph of the ‘Aha!’ moment fades, replaced by a quiet curiosity. Can you make the ‘snick’ happen in reverse? This is not about retracing your steps from memory—that’s mere mimicry. It is about actively applying the Three Axes of Motion framework in reverse order to guide the pieces home. If you understand the rotational axis, the channels, and the purpose of each keyway, you possess the blueprint. The puzzle becomes a tiny machine you are assembling, not a mystery you are fighting.
So, begin diagnostically. Look at the two pieces. Which faces have the deeper channels? Which edges have the protruding lugs that act as keys? Your goal is to align these pathways so the pieces can travel the solution corridor in reverse: final Z-Shift → final Y-Tilt → final X-Spin, locked. Think of it as a precision docking maneuver.
Start with the discs in the same relative orientation they were in when they came apart. Now, initiate contact. Does the initial engagement feel loose, or is there an immediate bind? (An immediate bind means your starting rotational alignment is wrong; you’re trying to insert a key into a solid wall, not a keyway.) Apply a gentle test spin. Find the orientation where the pieces settle into each other with the most play—this is the mouth of the channel.
Now, reverse the navigation. You remember the final separation involved a shift along the Z-axis. Therefore, the first major step of reassembly is to achieve that same shift, but in the opposite direction. You must tilt the pieces (Y-axis) to the precise angle that opens the channel for that shift to occur. Use the weight of the pieces as your guide; when the tilt is correct, gravity will help the discs seek alignment along the machined pathway.
The process is a loop, the inverse of your solving loop: Shift, until you meet a stop. Then, Tilt to relieve the bind. Then, Spin to find the next channel alignment. Repeat. With each cycle, the interlock deepens, and the free play diminishes. The final move is often a small, definitive rotation (X-Spin) that seats the last lug into its final recess. That is the release point in reverse—the click of full, perfect engagement.
This is the answer to the frantic search, “I took my Hanayama Disk apart and can’t get it back together, help!” The failure typically occurs at the first engagement. The solver tries to force the pieces together in a visually symmetrical but mechanically incorrect alignment. Remember: the tolerances are exact. If you are applying any significant force, you are wrong. Stop. Separate. Re-examine the channels. Spin one piece 90 or 180 degrees and try the engagement again. The correct starting alignment will feel inviting, like the first gear in a transmission sliding into place. For more on the durable design that allows for this kind of exploration, see this veteran’s guide to metal puzzles that won’t break under force.
Mastering this rebuild completes your transformation. You are no longer following steps; you are wielding principles. This skill directly translates to other rotational disentanglement puzzles. The logic you used here—diagnosing axes, seeking alignment, interpreting tactile feedback—is the core of solving more complex cast metal puzzles, such as those detailed in this step-by-step guide to solving the Cast Hook metal brain teaser.
You have now closed the loop. The puzzle is whole in your hand, not by accident, but by deduction. This is the true satisfaction: understanding the machine well enough to both disassemble and reassemble it on demand. You have not just solved a puzzle; you have learned its language.
Beyond the Disk: Your Framework for a New Collection
The deep satisfaction of reassembling your disk puzzle is your graduation. You now possess a transferable diagnostic skill that applies to roughly 70% of all two-piece cast metal puzzles. The Hanayama Cast Disk is rated Level 2 for a reason: it teaches the foundational grammar of rotation that more complex puzzles will build upon with added clauses, but not a new language. Your framework is now scalable.
The core of that framework is your trio of questions: Does it spin? Can it tilt? Will it shift? With a new puzzle in hand, this is your entry ritual. Ignore the shapes—fish, marbles, horseshoes—and analyze the rotational axes. A puzzle like the Hanayama Cast Marble (also Level 2) immediately complicates the Disk’s logic by introducing a third axis of simultaneous rotation and a keyway hidden inside a sphere. Your diagnosis remains the same, but the interplay between axes becomes the new challenge. The binding feeling you learned to interpret now signals you’re engaging a sequential lock.
True complexity arrives with puzzles like Hanayama’s Cast Equa (Level 4). Here, the designers introduce false channels—paths that feel promising but lead to solid, intentional dead-ends. This is where your framework proves its worth. A false channel isn’t failure; it’s data. It tells you which axis is not the primary one. You retreat, apply your three questions to the new binding point, and search for the alternative pathway. This iterative deduction is the heart of rotational disentanglement puzzle solving, a category that falls under the broader umbrella of mechanical puzzles.

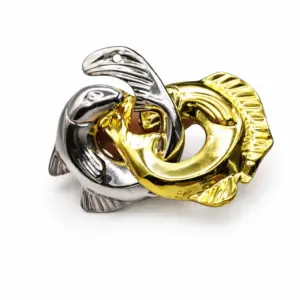
Consider the Double Fish puzzle pictured above. Its organic shape disguises a precise mechanical relationship. Your first diagnostic move? Don’t try to pull the fish apart. Instead, ask: What is their shared axis? You’ll find a spin (X-axis). Once fully rotated, does that create a new opportunity for a tilt (Y-axis)? The machined finish allows for a subtle, pivoting motion that was previously blocked. This sequential unlocking of axes is the direct application of your Disk-honed logic.
For collectors or those with arthritis, this analytical approach is empowering. It substitutes brute force and frantic wiggling for conserved energy and deliberate testing. If a move requires significant force, it is incorrect—a rule that holds from Level 1 to Level 6. Your hands learn to become sensitive gauges for alignment. (The puzzle that truly improved my tactile sensitivity was the Cast Hook, a brilliant exercise in leveraging off-center weight and curved channels.)
So, how do you build a collection that grows your skill? Start with the level 2 Hanayama puzzle tier—Marble, Harmony, Quartet. Each adds one new twist to the Disk’s formula. Then, graduate to Level 3 puzzles like Cast Loop or News, where you must manage multiple simultaneous clearances. Your framework is your constant guide. When stuck, return to your axes. Isolate the binding. Seek the next permissible degree of freedom. You are no longer solving puzzles; you are reverse-engineering tiny, elegant machines. And each one you open adds a new blueprint to your internal library.
Curator’s Corner: Disks Worth Your Hard-Earned Focus
Now that you’re fluent in the language of axes and channels, your hands crave more conversations. The true satisfaction of being the person who can explain it comes from applying your diagnostic framework to a curated collection. The archetype, the Hanayama Cast Disk, is a perfect Level 2 introduction with an expected first-time solve duration of 10 minutes to an hour for a novice. It is the benchmark against which all other rotational two-piece puzzles are measured. Where do you go from here?
Seek out puzzles that introduce one new mechanical variable at a time. Your goal is to expand your internal library of ‘pathways,’ not to be overwhelmed. Specialty online puzzle shops and dedicated sections in hobby stores are your best hunting grounds—places that curate for mechanics, not just novelties. This is where you’ll find the next disks worth your hard-earned focus. To navigate the many options, a resource like this tactile matchmaker guide for choosing your next Hanayama puzzle can be invaluable.

For a direct but clever evolution, consider the Metal Orbit Ring Cast Puzzle. It retains the familiar two-disc form but introduces a pronounced offset in its rotational axis. The challenge isn’t just finding the alignment channel; it’s maintaining a specific tilted orientation (your Y-axis) while executing the final shift. The tactile feedback is sublime—a lesson in balancing two clearances at once. A superb metal brain teaser solution guide for this one would simply ask: “What tilt angle unlocks the shift?”

The Interlocking Double-Ring Lian Puzzle takes a different approach. It presents what looks like two interlocked rings, but the solution pathway involves a more complex sequence of partial rotations and precise translations. It teaches you to “reset” and try a different rotational starting point if one axis feels completely bound. (This is where many solvers stall—they find one degree of freedom and assume it’s the correct path, rather than exploring its full range.)
Start with these. Each will reinforce your Three Axes framework in a new context. As you explore, you’ll find your puzzle-solving journey connects you to a long tradition of mechanical ingenuity, from classic disentanglement puzzles to the intricate world of burr puzzles. Remember, you began by staring at a disk, frustrated. Your next step is to pick up a new one, feel its weight, and listen. The first question is always the same: “Which axis moves first?” You already know how to find the answer.